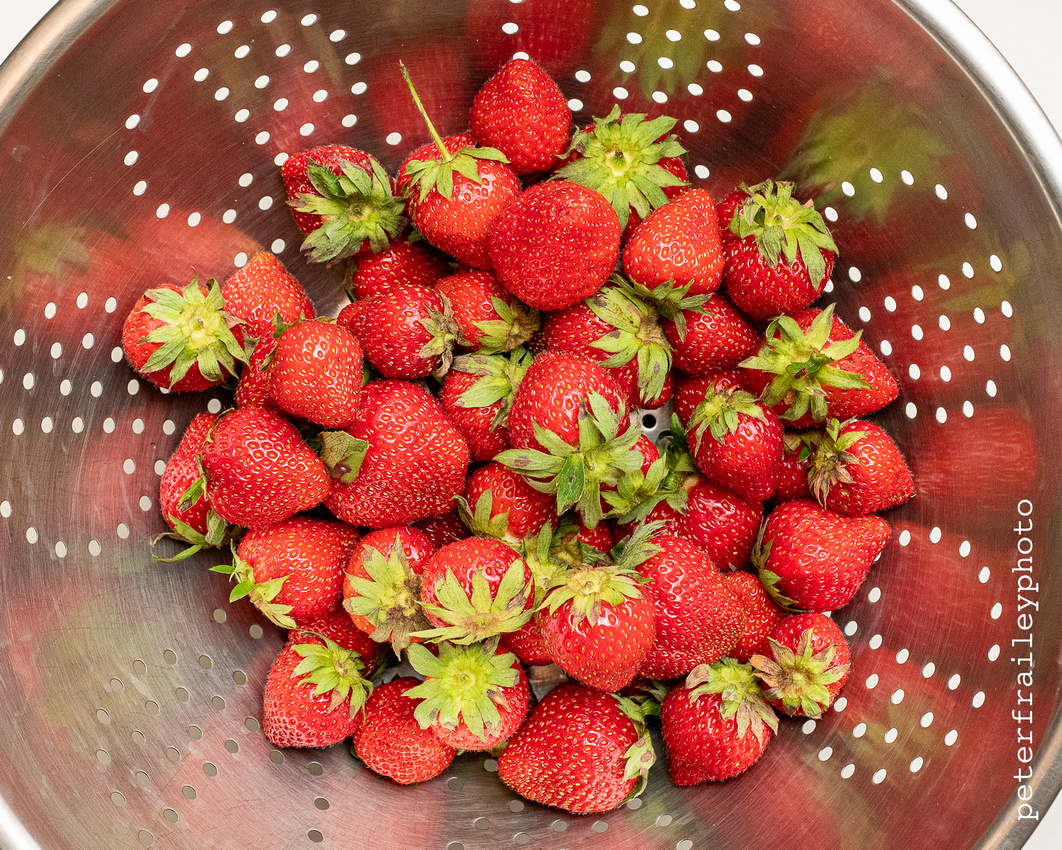
Strawberries
June (into early July) strawberries in New England are smaller (compared with California berries) and sweeter. This batch seemed to be about 50% larger than usual for our local berries. As a sign that they did not have to travel far, every berry was perfect.
Ingredients:
- 1 qt. strawberries
- 1/3 c. suger
Steps:
- Remove stems and green "hats".
- Cut the berries in halves or quarters (small ones in half, large ones in quarters).
- Add sugar and mix into the berries.
- Stir occasionally.
- The longer you wait, the more juice you will have.
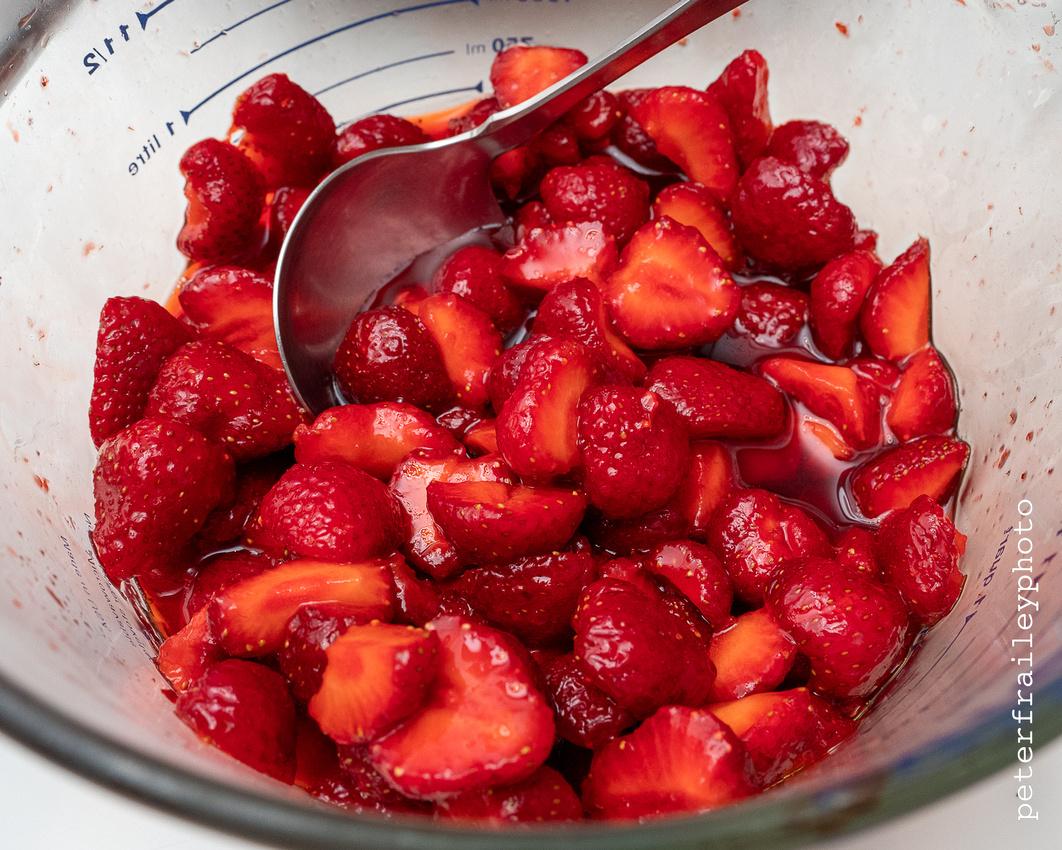 It may take a while, but the sugar will bring out the juice.
Shortcake
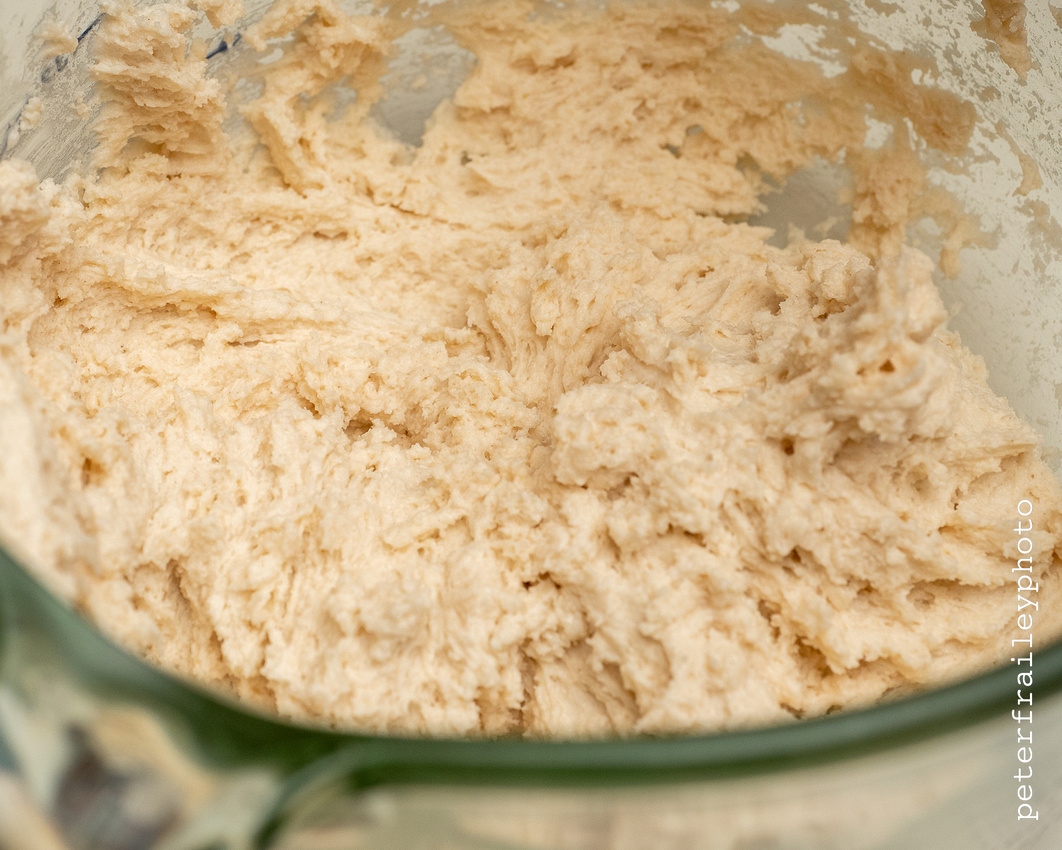
Ingredients:
- 2 1/3 c. Bisquick
- 1/2 c. milk
- 3 T. sugar
- 3 T. melted butter
Steps:
- Mix the four ingredients above in one bowl. It will look rather thick, like cookie batter. Like this:
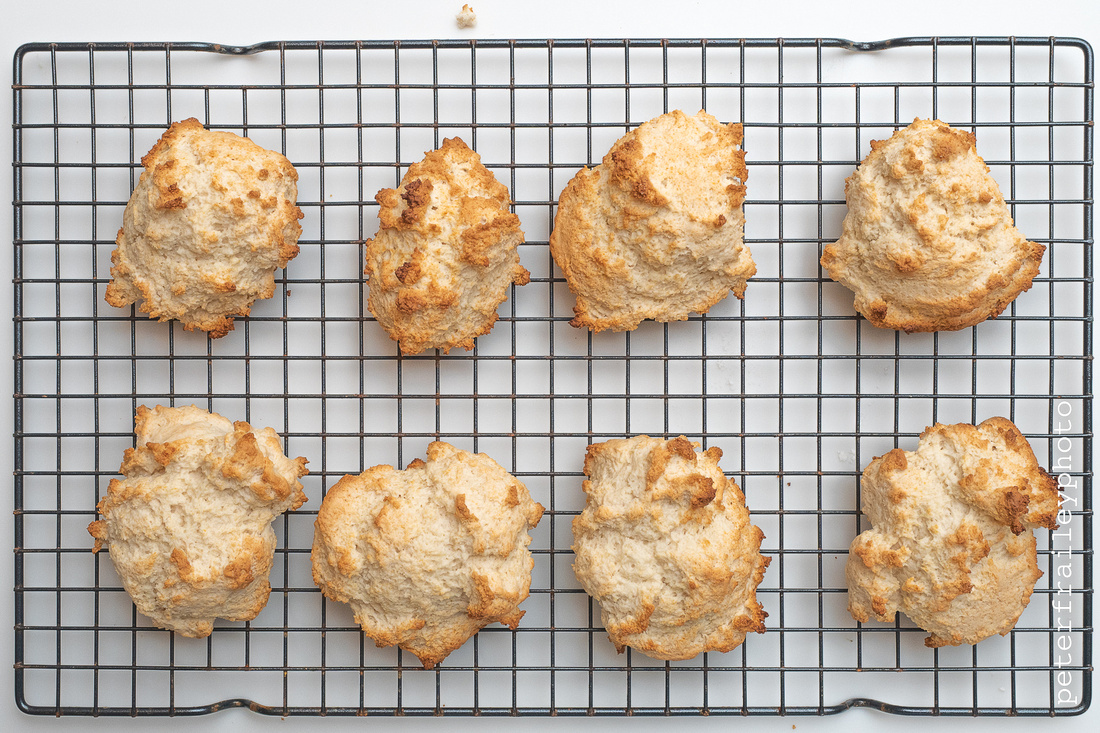
- With a large spoon, drop batter onto a cookie sheet so as to make 8 biscuits.
- Bake for 10-12 minutes at 425F.
- Slide biscuits off of the cookie sheet and onto a cooling rack.
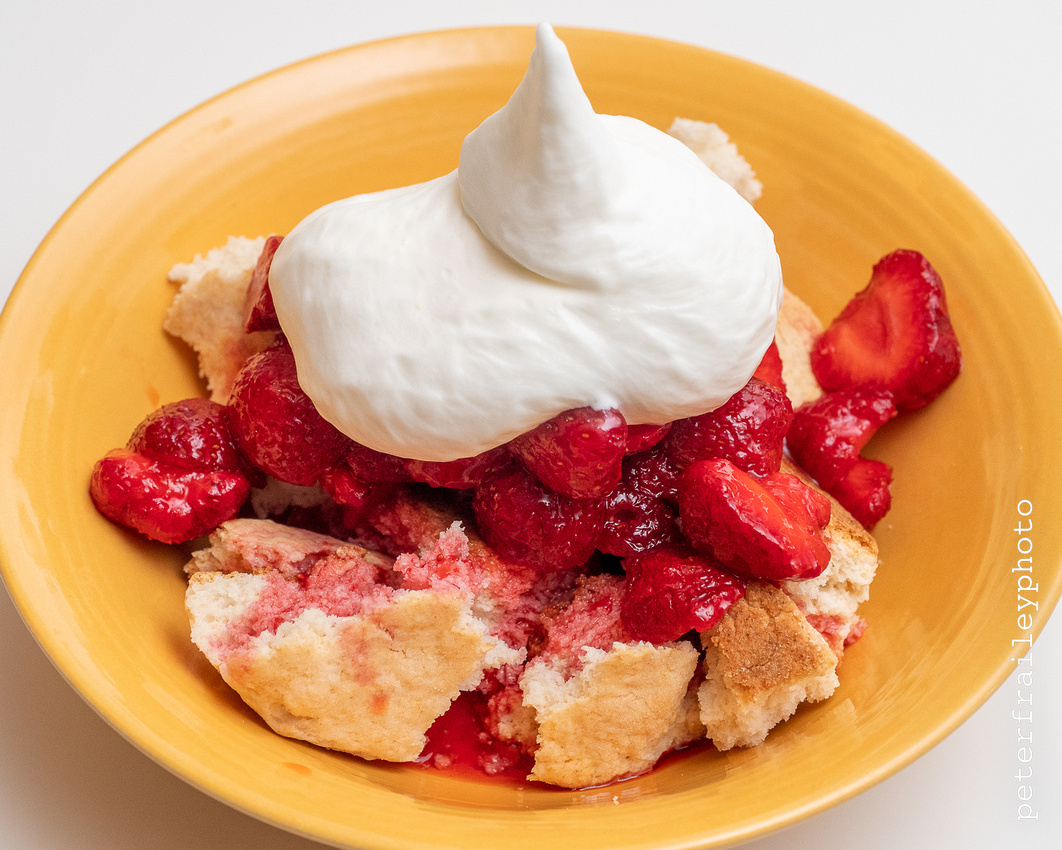 The finished product!
Before the pandemic you just grabbed a bag and picked out a loaf from one of the dozens of baskets of loaves (one basket per flavor) and then waited in line at the slicing machine (or not); but now the loaves are pre-sliced and pre-bagged. I'm sorry to see that but I guess it's necessary... at least for now.
On this trip Laurie picked out two of the breads we can’t get locally: chocolate bread and olive bread. Don’t they look tasty? The chocolate bread tastes half way between bread and a brownie, and it's mighty nice with a bit of peanut buttery.
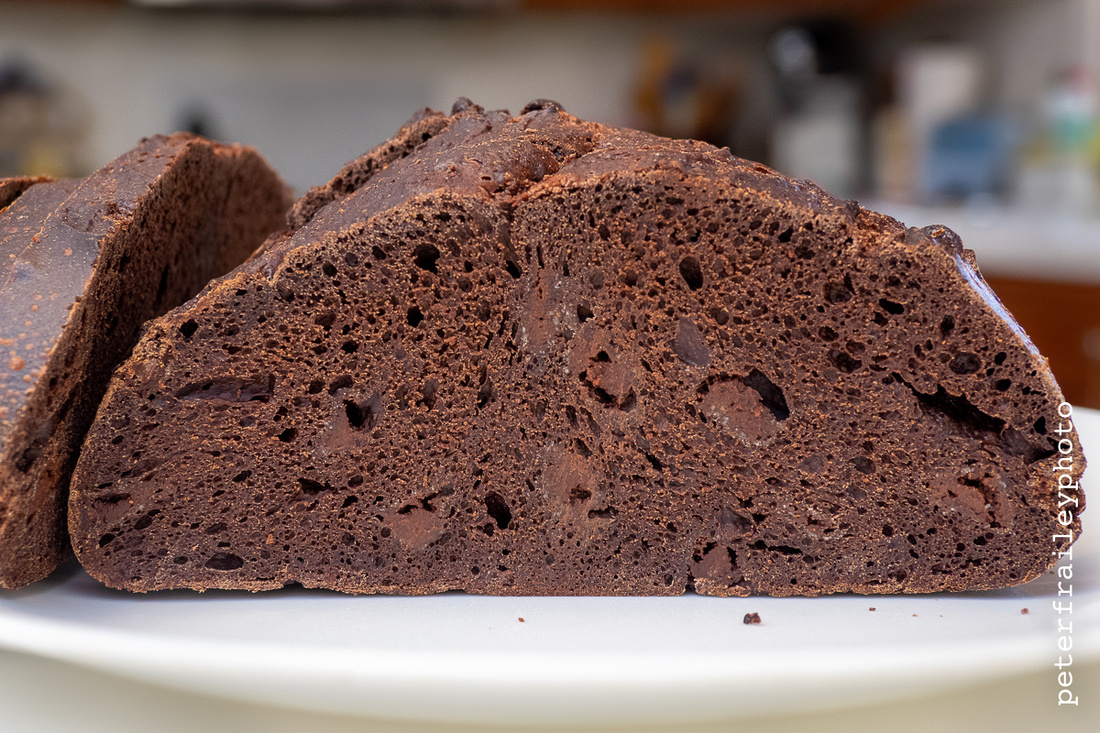
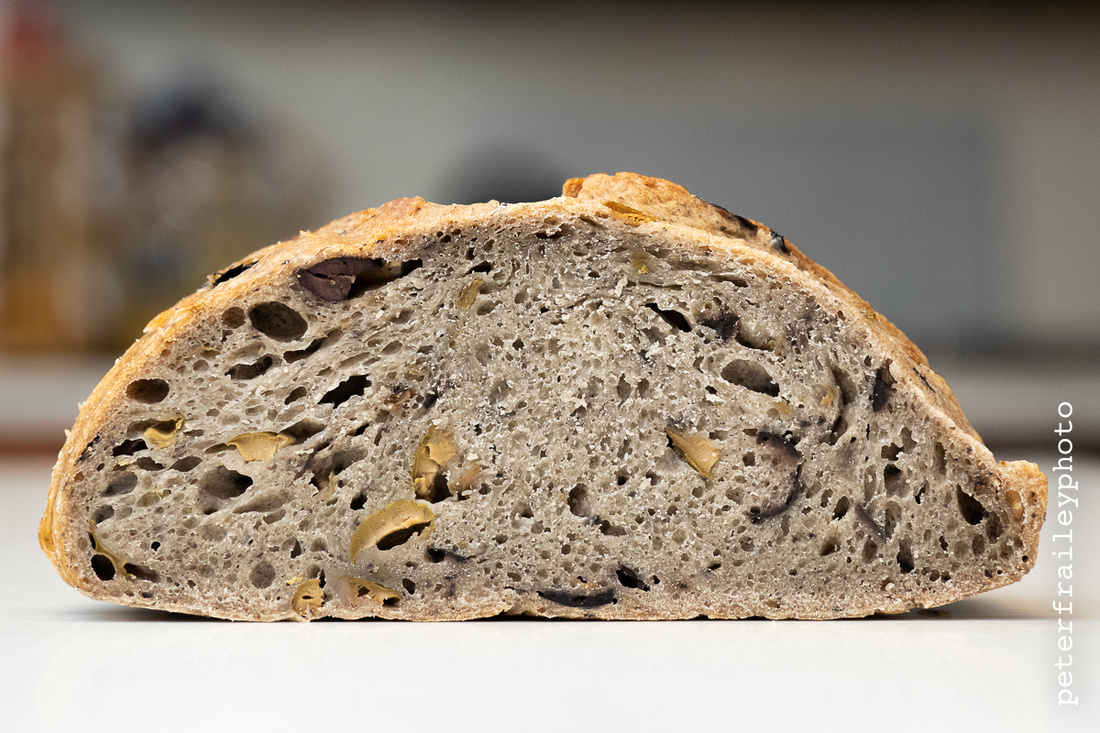
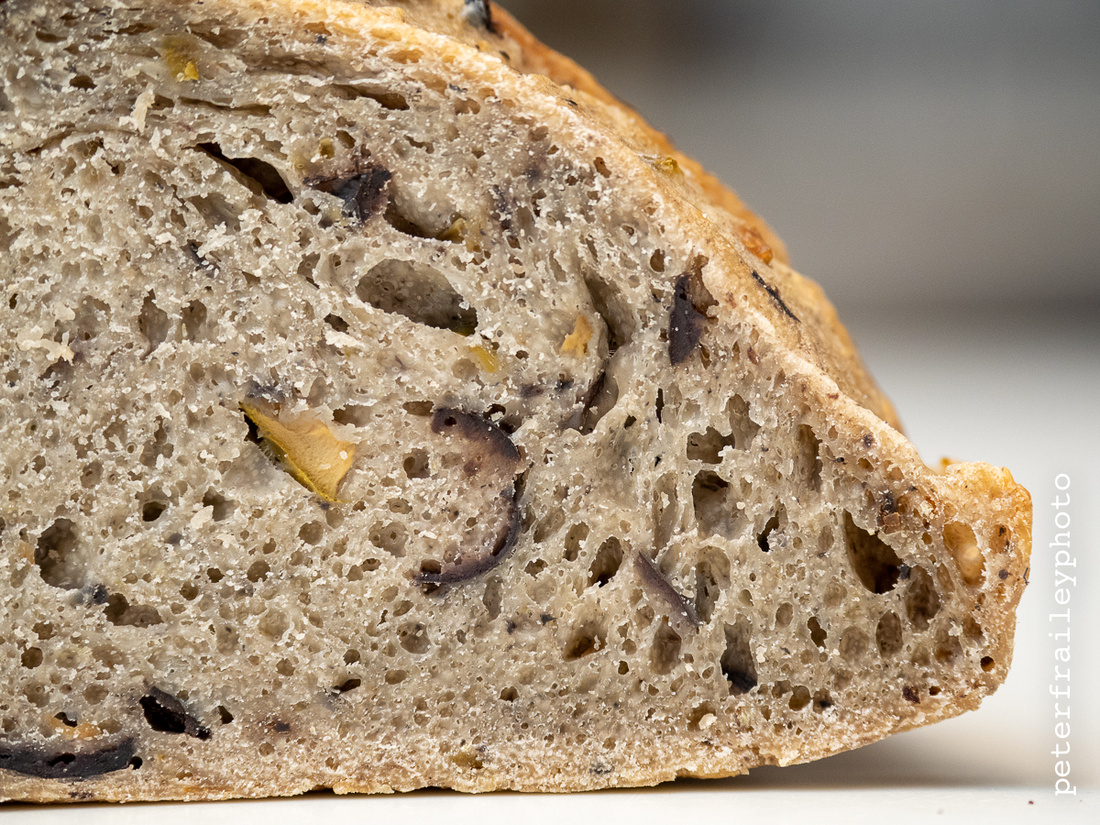
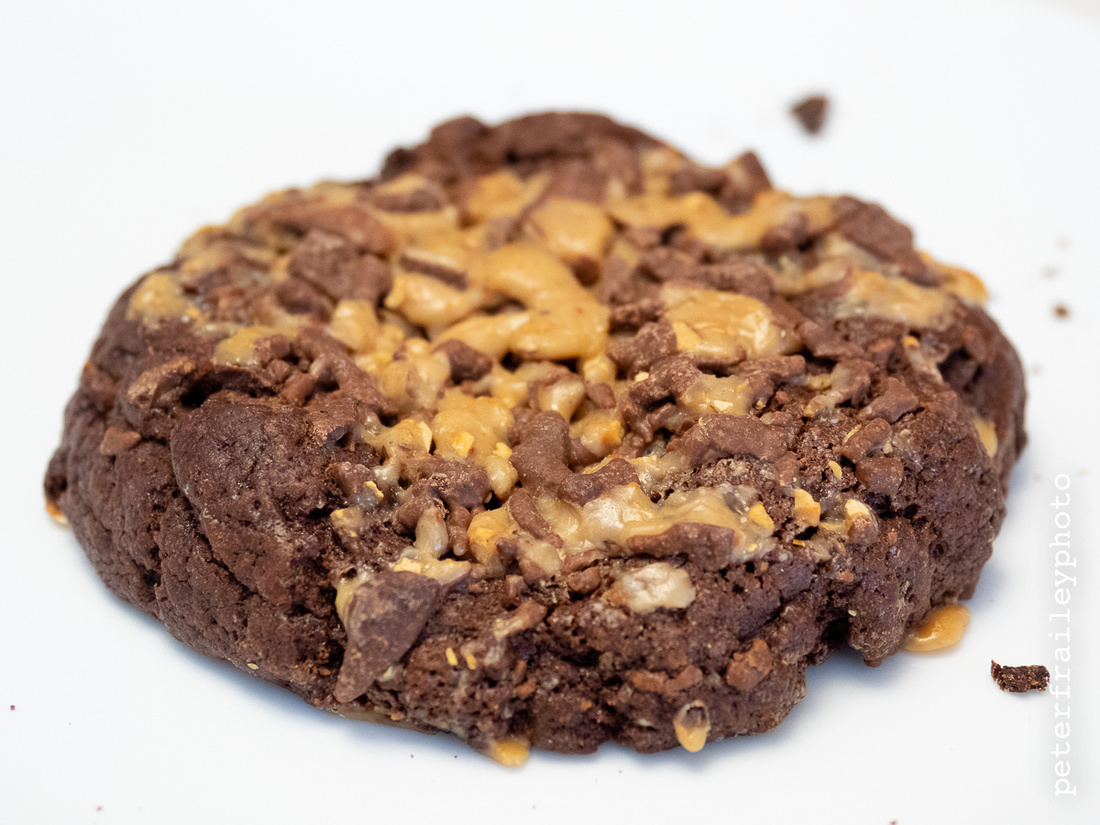
(These photos were taken in our kitchen, not the bakery; and somehow one of their chocolate toffey cookies found its way home *haha*.)
]]>
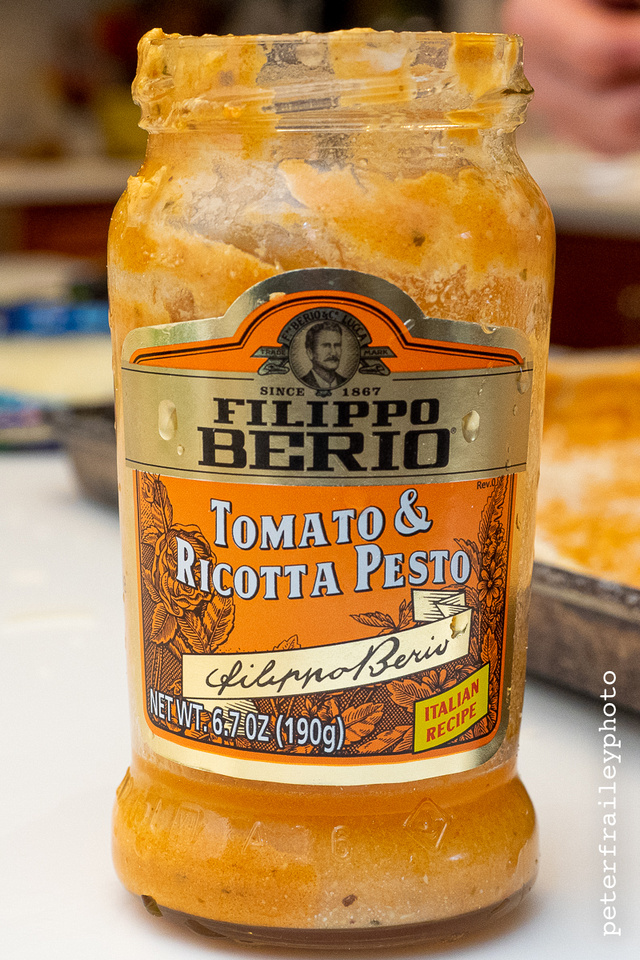
Laurie made two “personal” size Boboli pizzas for us last night. The pesto sauce is a wonderful alternative to tomato sauce.
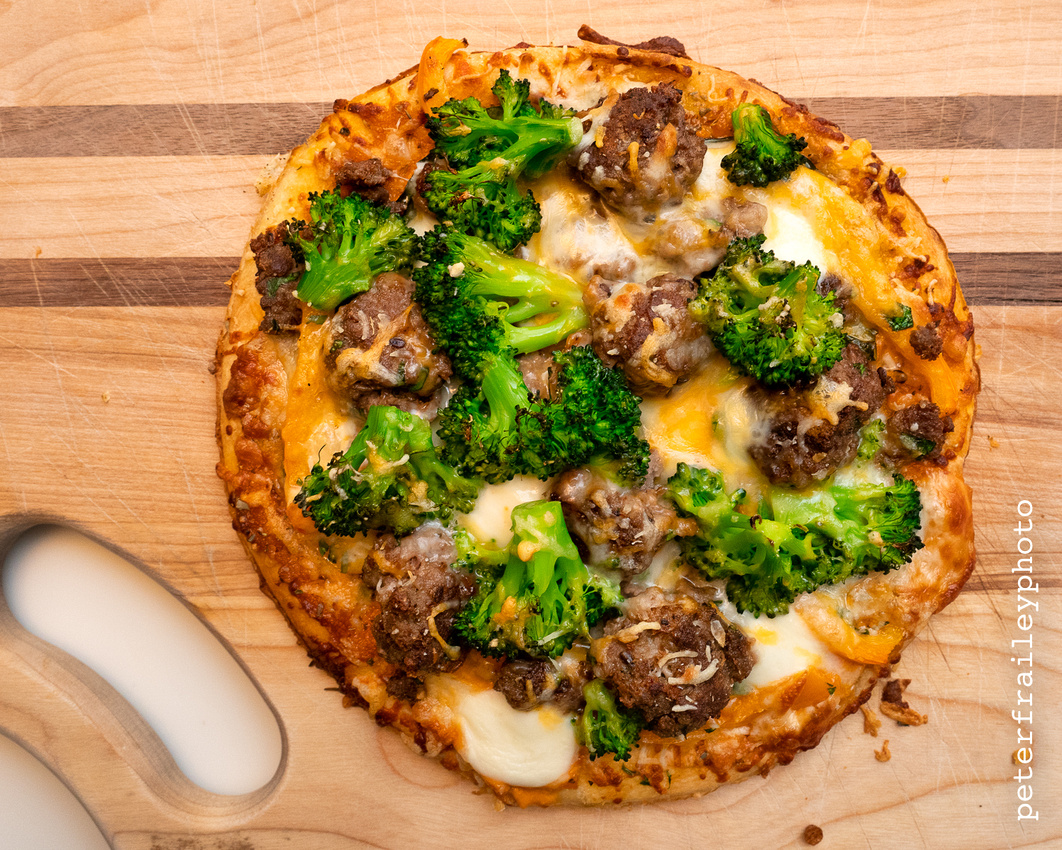
The rest of the ingredients are as varied as you want them to be. In our house, a lot depends on what is in the refrigerator. I think that's called a "kitchen sink Boboli". But on this night Laurie layered on the following, in approximately this order:
- Boboli Crust (Small x 2) (These crusts are pre-made and pre-cooked)
- Sauce (Ricotta Pesto or Tomato)
- Sautéed yellow pepper
- Fresh basil leaves
- Fresh Parsley
- Italian Seasoning
- Powdered Onion
- Mini pre-cooked meatballs
- Mozzarella balls
- Broccoli
- Shredded Mozzarella cheese
- Parmesan cheese
- Red pepper flakes? (I am guessing that Laurie put a few of these on her pizza. But thankfully not on mine.)
Cook 10-15 minutes at 475F.
]]>
A deeper dive shows that the peaches in question are peaches supplied to some major chains A recall was issued for bulk or loose peaches distributed and sold from June 1 through August 3, and bagged peaches through August 19.
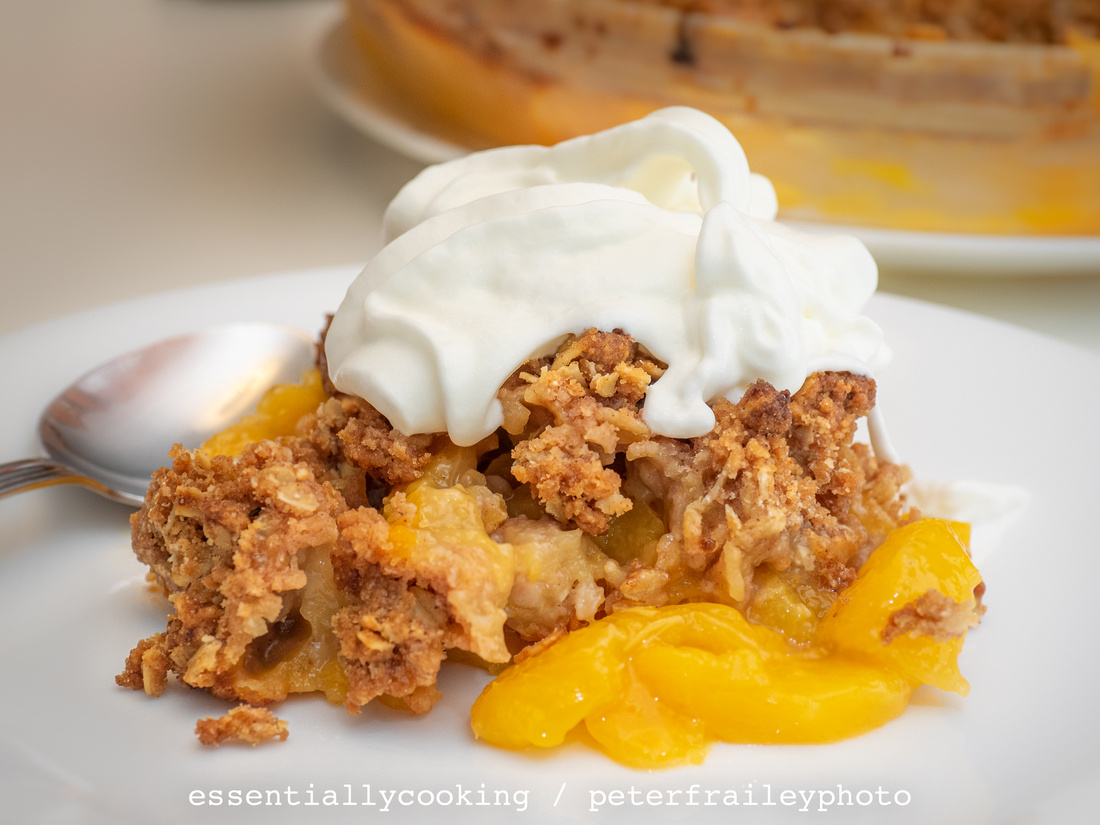
Well, nothing to worry about in our kitchen. The peaches we've been buying (and which were used in the peach cobbler recipe posted two days ago) are local peaches grown and sold at a local farmstand, Springdell Farm. Massachusetts peaches are smaller than the ones you buy in the supermarket (from Georgia?), but they are fresher, and are plenty sweet and juicy.
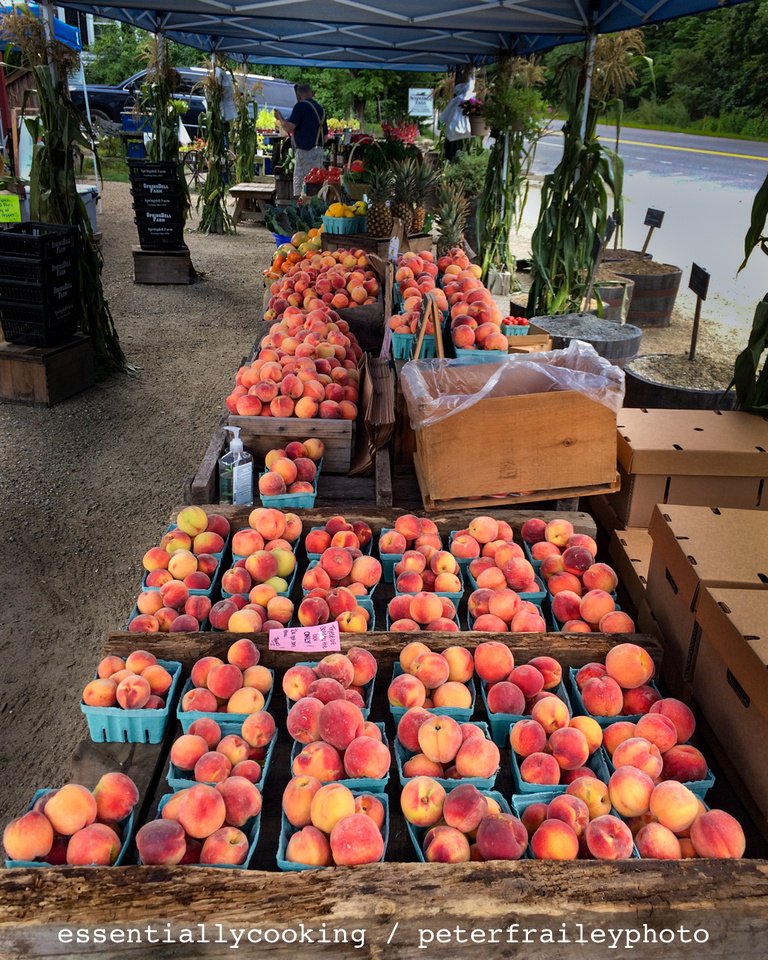
"Springdell Farm Peaches"
Great for all things peach, including peach crisp
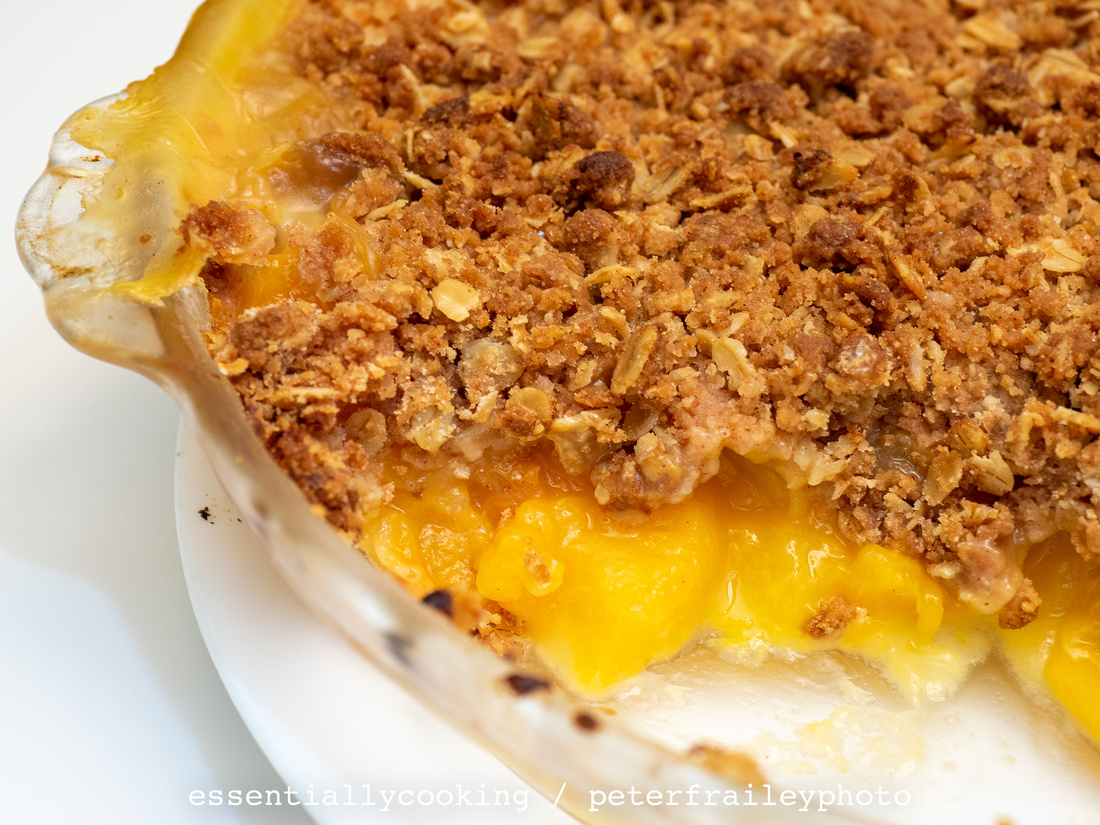
The starting point for this recipe was https://www.epicurious.com/recipes/food/views/mixed-berry-crisp-101940
What you need:
- 6 cups of sliced peaches (or apples or blueberries). Or, if using frozen fruit, use two 12 ounce bags.
- ¼ cup sugar
- 1 cup all purpose flour, divided
- 1 tablespoon fresh lemon juice
- 3/4 cup old-fashioned oats
- 2/3 cup (packed) golden brown sugar
- 1 teaspoon ground cinnamon
- ½ teaspoon ground ginger
- ¼ teaspoon ground nutmeg
- ¼ teaspoon salt
- 7 tablespoons chilled unsalted butter, diced (or grated, see tip #1 below)
What to do:
- Preheat oven to 375°F.
- Combine fruit, ¼ cup sugar, ¼ cup flour, and lemon juice in a large bowl; toss to blend well. Transfer fruit mixture to 9-inch (minimum) glass pie dish.
- Combine remaining 3/4 cup flour, oats, brown sugar, spices, and salt in medium bowl. Add butter (see tip #1 below); rub in with fingertips until topping holds together in small moist clumps. Sprinkle over fruit (see tip #2 below).
- Bake until the fruit mixture bubbles thickly and topping is golden brown, 50 minutes to 1 hour. Let stand 15 minutes. Serve warm or at room temperature. (Wonderful with vanilla ice cream or whipped cream!)
Notes from Laurie:
- I like to grate a full frozen stick of butter (1 T. more than called for, but I figure that about 1 T. gets lost in the grating) on a box grater. It’s easier to blend into the oat mixture this way.
- While I’m at it, I sometimes like to make a double batch of the topping ingredients sans the butter, and keep it for a rainy day.
This meal was adapted by Laurie from a pizza recipe here: https://www.favfamilyrecipes.com/lemon-chicken-pizza/
There’s a lot of room here to experiment with toppings. This recipe is really all about the lemon cream sauce. It’s a delightful alternative to a red sauce.
What you will need:
For the pizza:
- 1 pizza dough (or use a Boboli)
- 1 to 2 cups shredded mozzarella cheese (or mix with cheddar or anything shredded cheese you want to experiment with)
- 1 cup (more or less, depending on preference) sliced or shredded chicken (a rotisserie chicken makes it easy)
- 1 lemon, thinly sliced
- feta cheese, crumbled or cubed
Any or some of the following for toppings
- fresh basil
- turkey bacon strips (we had some left-over in the frig)
- marinated artichoke hearts
- red bell pepper strips
- broccoli florets, barely steamed
For the lemon cream sauce:
- 1/4 c. butter
- 4 oz. cream cheese
- 1/4 c. sour cream
- 1 tsp. garlic powder
- 1/2 c. milk
- 1/2 c. freshly grated Parmesan cheese
- 2 Tbsp. lemon juice
- Salt and pepper to taste
What to do:
For the lemon cream sauce:
In a small sauce pan over medium heat, bring all ingredients except the Parmesan cheese and lemon juice to a low boil. Remove from heat and stir in the Parmesan cheese and lemon juice. When the cheese is completely melted, it’s done.
For the pizza:
Roll dough out into a large circle (or use Boboli), and place onto a large cookie sheet or pizza pan. Spread the top evenly with lemon cream sauce, then top with mozzarella cheese, lemon slices, vegetables (whatever suits you), bacon (we had some left-overs to use up), chicken, and feta cheese.
Bake at 400° F for 18 to 25 minutes. This is the tricky part if you started with dough and not a Boboli. You want the dough to be completely cooked of course, so you may need to add extra time, depending on your oven. (In the photos below Laurie made a square pizza; but for a round pizza she has been quite happy with the results she’s getting from a newly acquired round cast-iron pizza pan.)
After removing from the oven, let the pizza rest for about 5 minutes before slicing.
Ready for the oven
Let sit for 5 minutes after cooking and before slicing
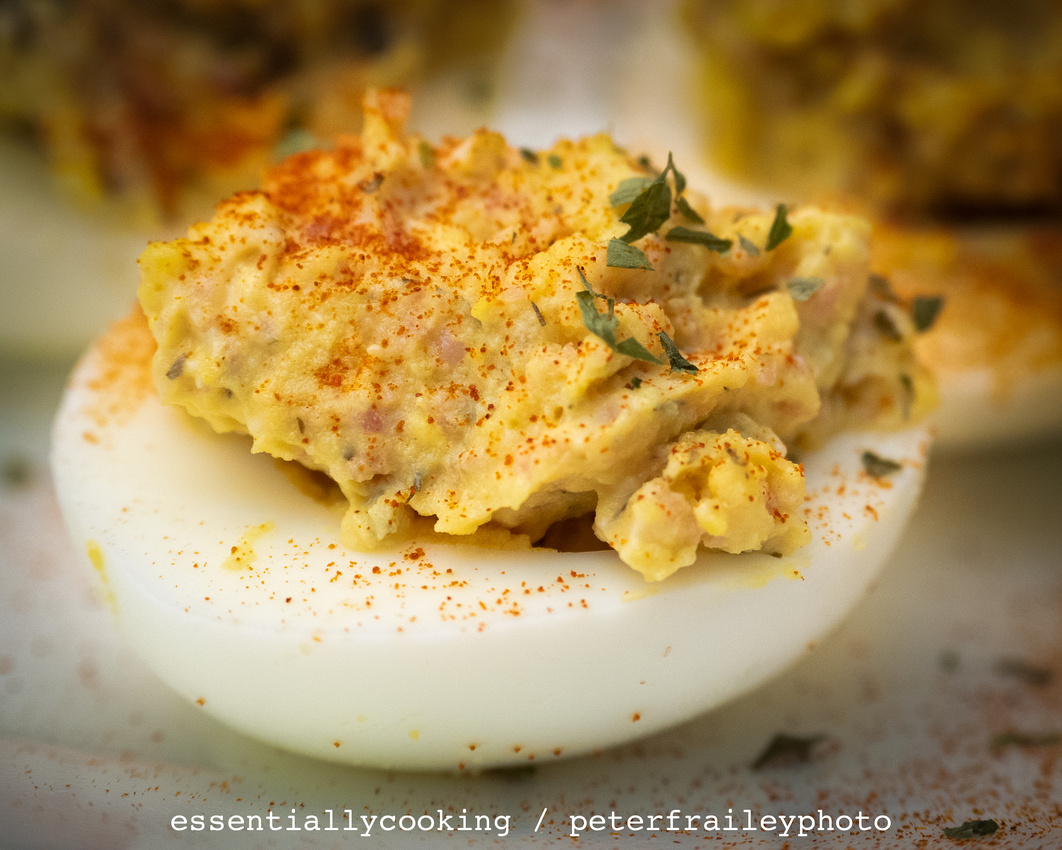
The ingredients are simple but I can't help with the amounts:
- Hard boiled eggs (four in this case)
- Ham salad or chopped ham
- Lemon Herb Aioli (for moisture, rather than mayonnaise)
- Chopped parsley as garnish
- Paprika as garnish
A few step by step photos:
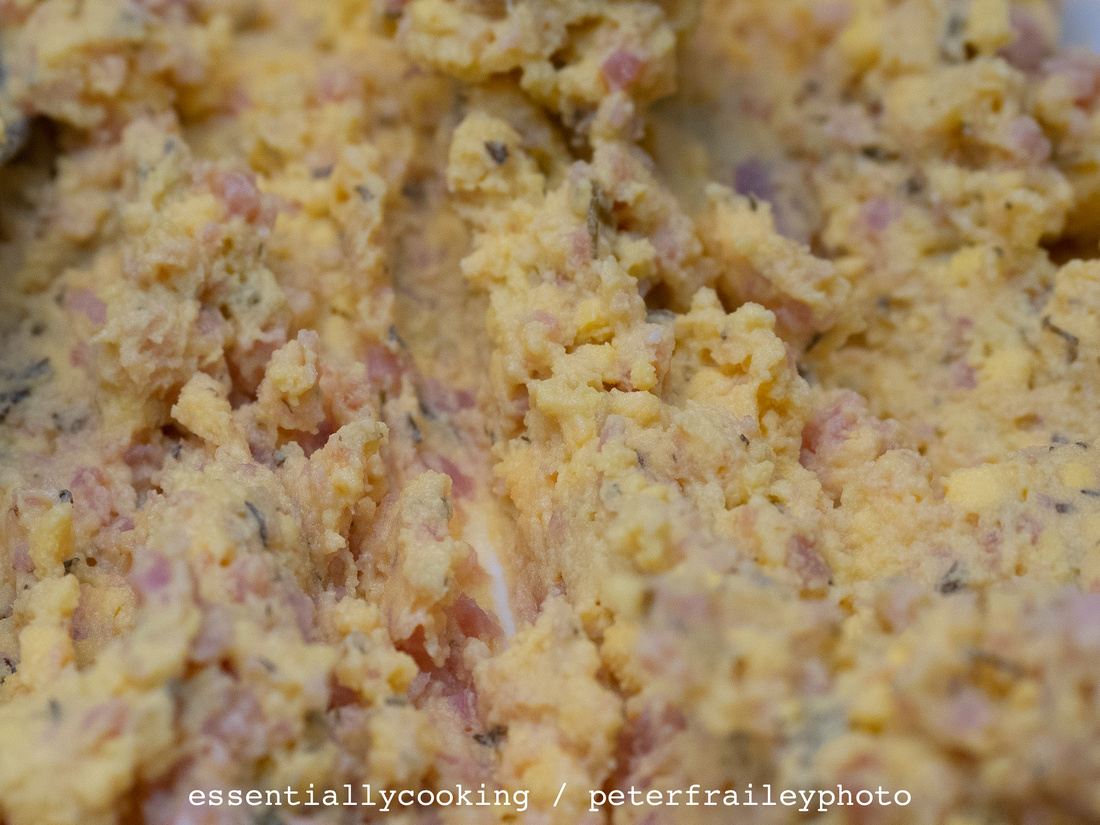
Simply mash up the eggs, ham salad and Aioli
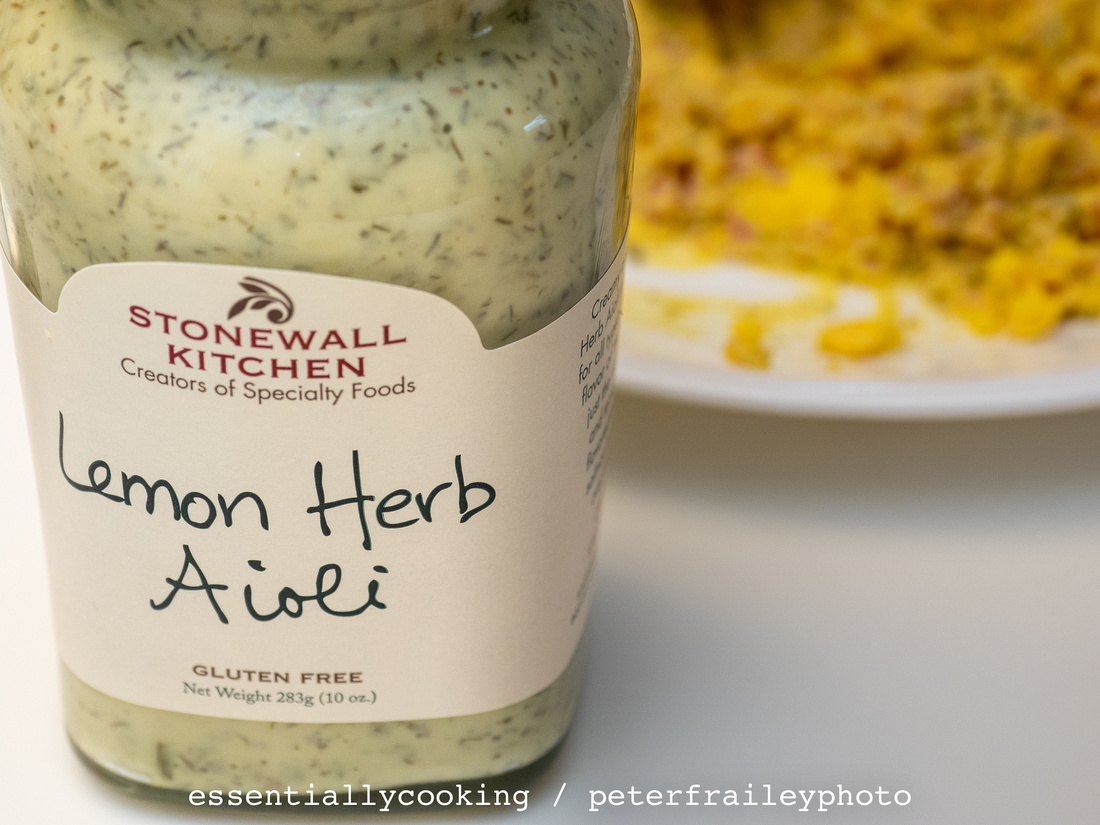 This is the Aioli used (ingredients include garlic, dill, and tarragon)
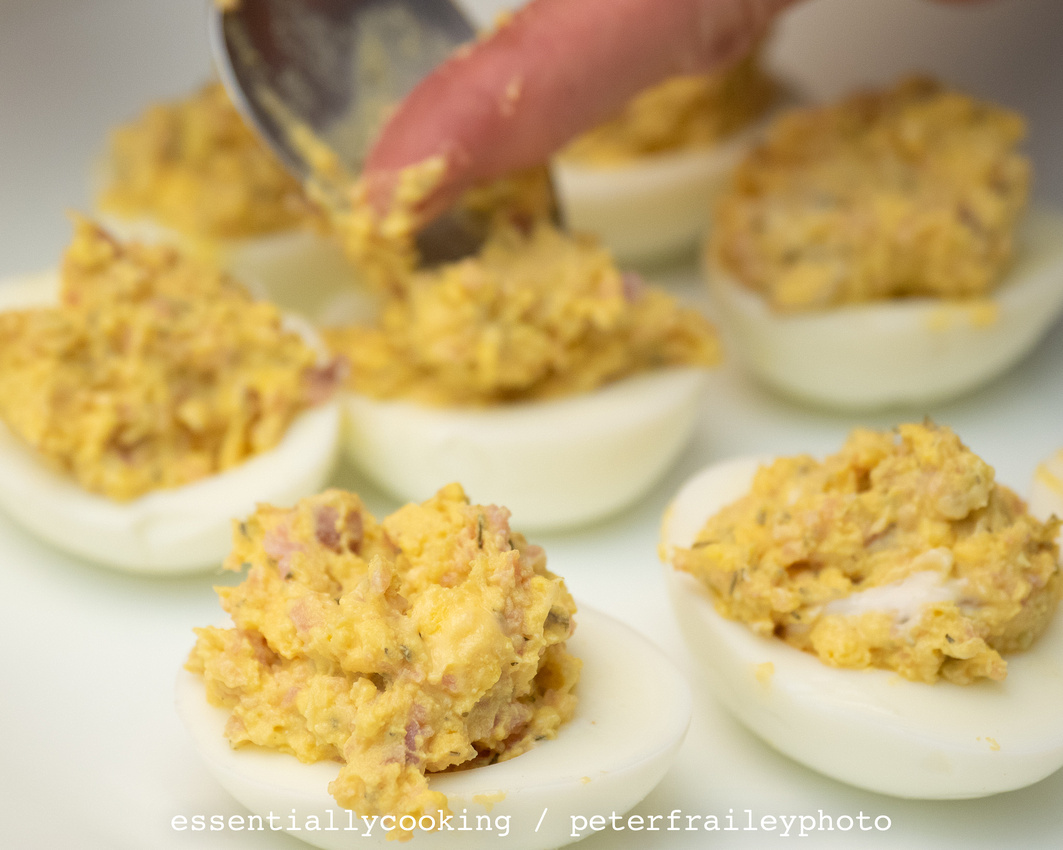
Spoon into the egg halves

Add the parsley
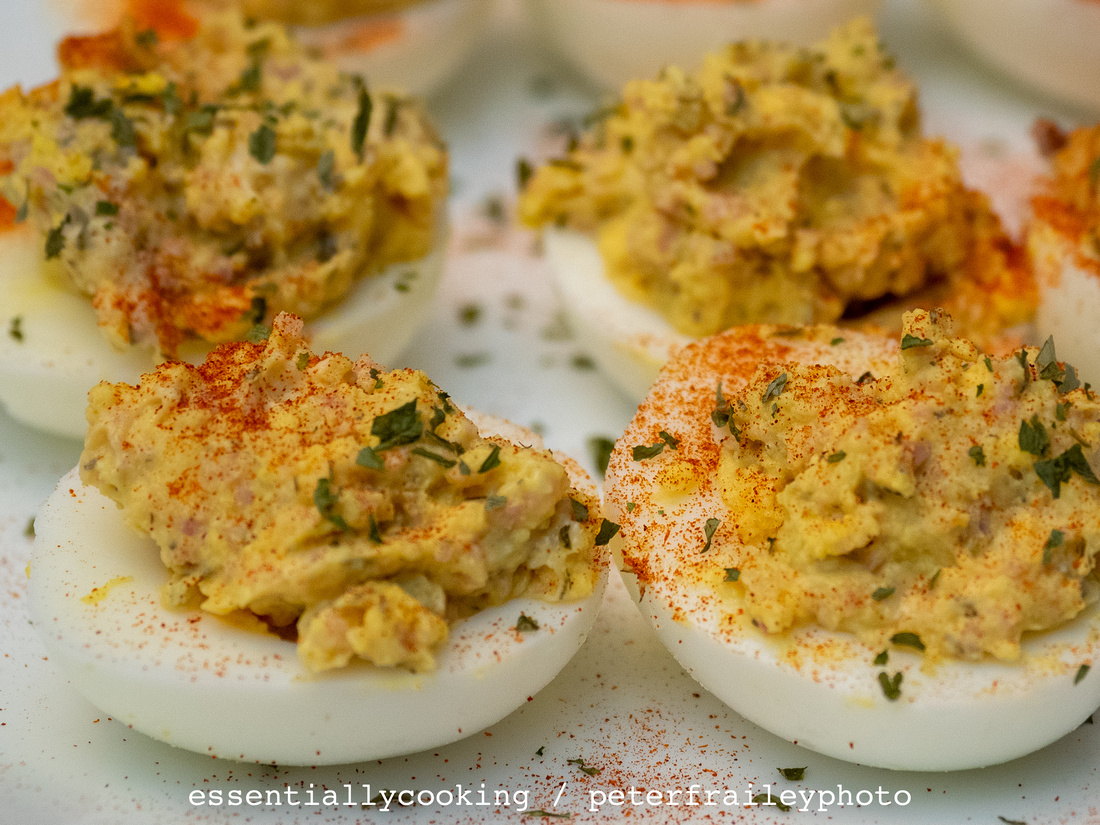
Add the paprika
Job done
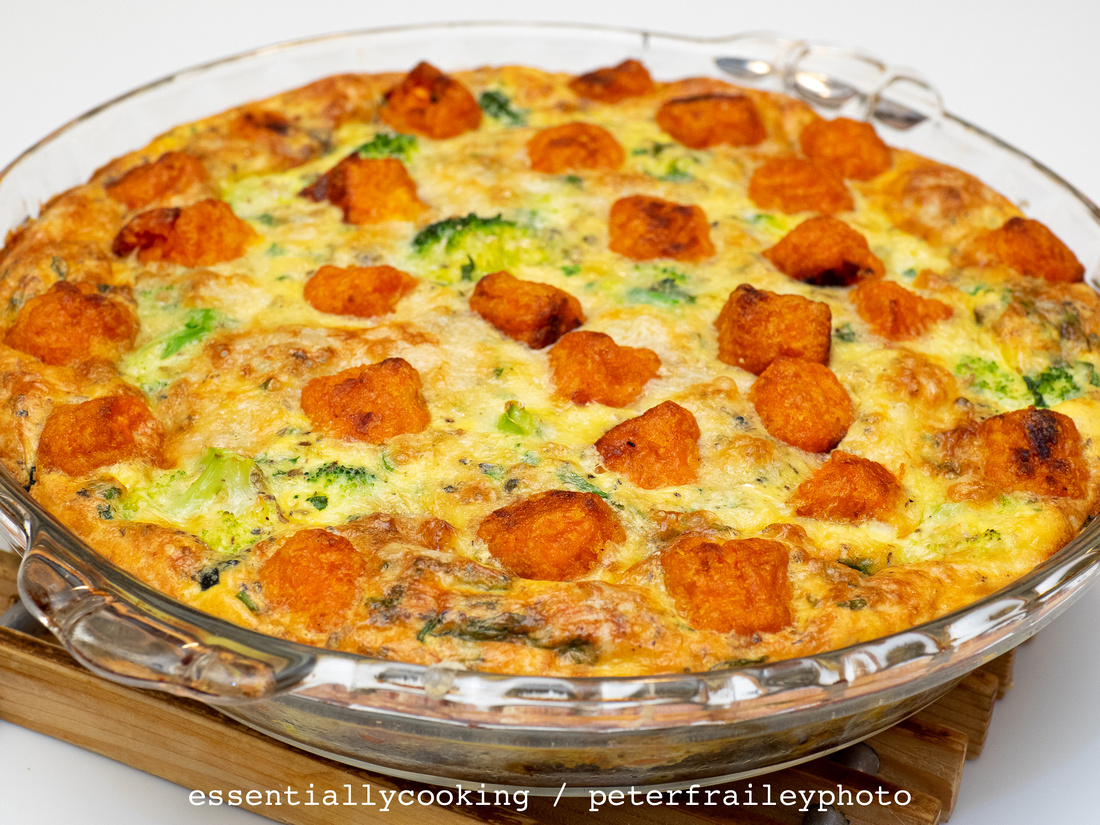
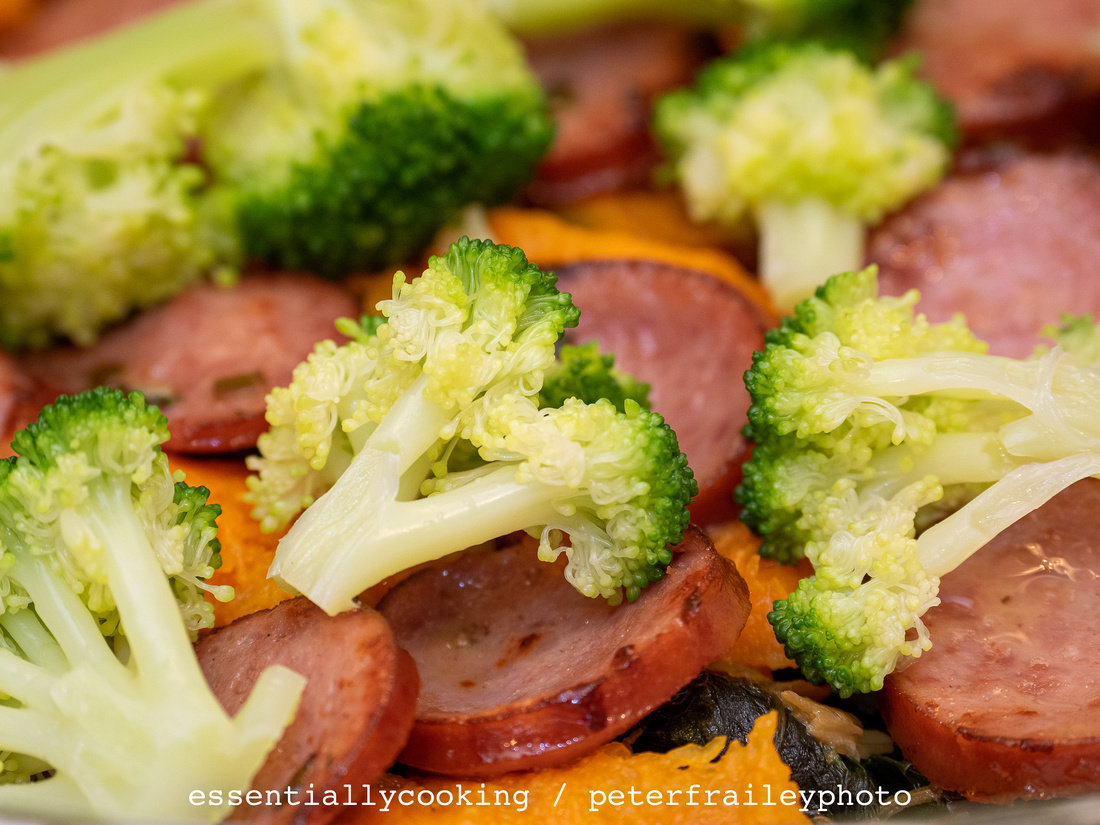
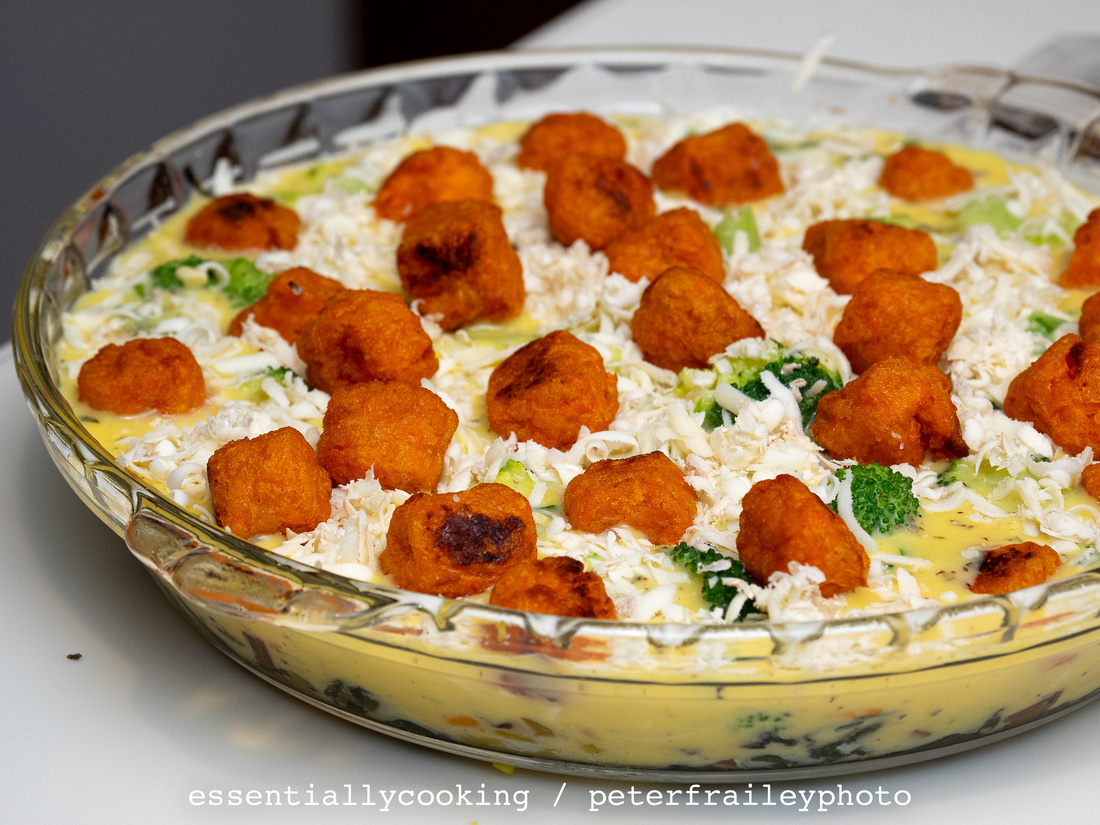
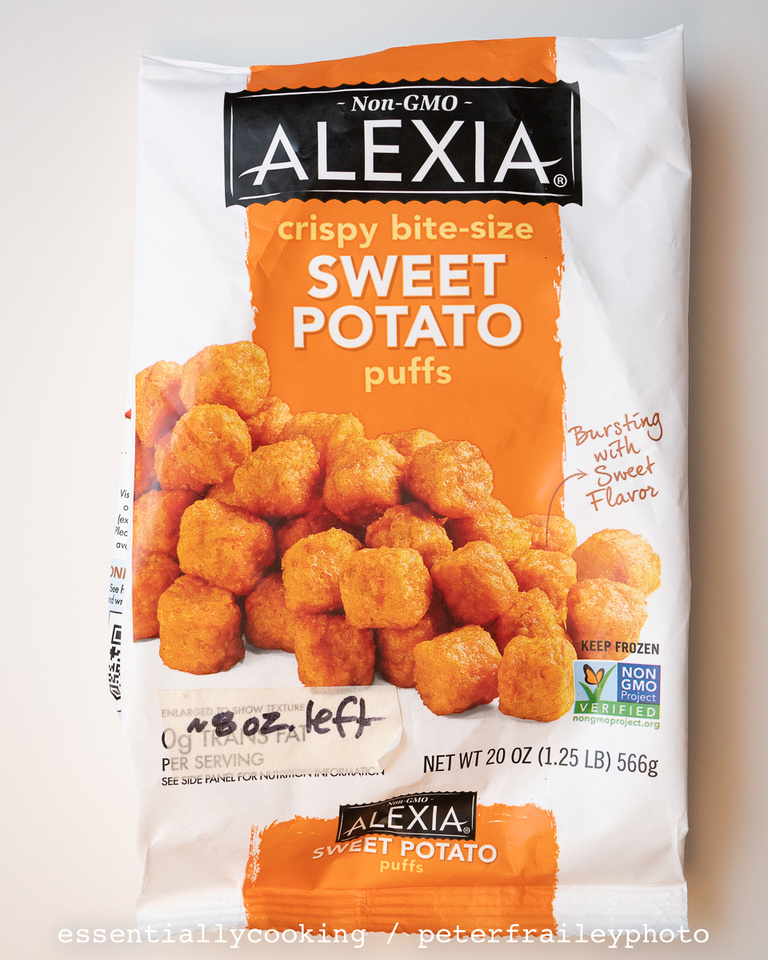
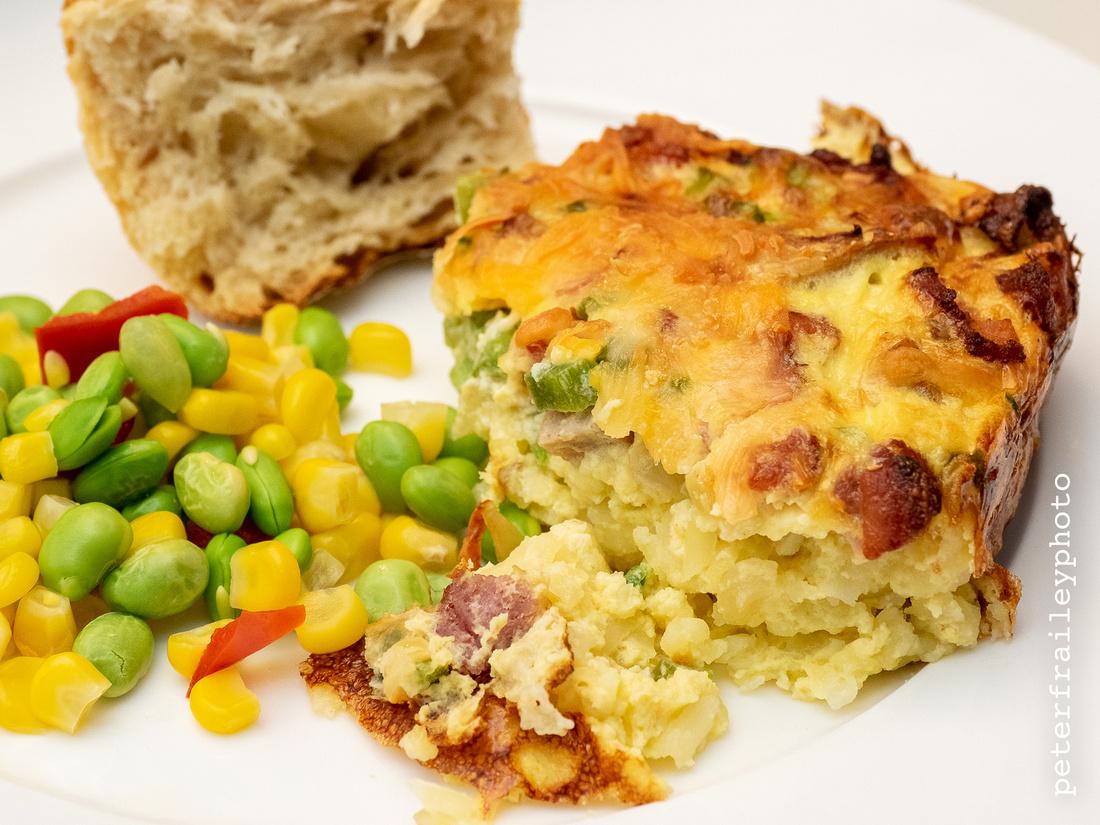
So tonight, starting with a sweet potato frittata recipe posted on simplebites.net, she replaced the sweet potato cubes used as a first layer in the frittata with cubes of left-over butternut squash. Eight ounces of sweet potato puffs were added to the recipe as a topping.
Because this is a time to be resourceful with food on hand, Laurie added kielbasa and left-over steamed broccoli. I'm sure if she had found left-over sautéd peppers in the refrigerator, she would have added them too.
What you will need:
-
2 Tablespoon olive oil
-
2 Tablespoons unsalted butter, divided
-
1 cup (plus or minus) butternut squash, peeled and cubed (or substitute sweet potato cubes)
-
1 medium leek washed and drained
-
1 bunch chard washed and drained
-
1 cup (plus or minus) broccoli florets, steamed (optional, we had leftovers to use)
-
1 cup Kielbasa “pennies”
----------
-
8 large eggs
-
1/3 cup sour cream
-
1/2 teaspoon Dijon mustard
-
1/2 teaspoon dried oregano (or 1 tsp chopped fresh)
-
1 teaspoon fine sea salt
-
1/4 teaspoon freshly grated nutmeg
-
1/2 teaspoon freshly ground black pepper
----------
- 8 ounces Alexia brand sweet potato puffs
- 1 cup grated cheddar cheese (or more... your mileage may vary)
What to do:
- Preheat the oven to 375°F.
- In a large skillet over medium-high heat, melt 1 tablespoon of butter together with the 1 tablespoon of olive oil, and add the cubed butternut squash. While stirring occasionally, cut the leeks crosswise into 1/4”pieces. You will want about 1 ½ cups.
- Add and sauté the leek pieces with the butternut squash. When the butternut squash is soft and the leek pieces are bright green, dump them both into the pie dish and spread evenly.
- Chop the chard stems crosswise into 1/2” pieces. Roll up the leaves and slice them into ribbons. Add the remaining 1 tablespoon of butter to the skillet. Cook the chard stems for about 2 minutes. Add the chard leaves and cook a few more minutes. Dump the cooked chard into the pie dish and spread evenly over the other ingredients.
- Sauté the kielbasa “pennies” in the remaining 1 tablespoon of olive oil, to get them a bit crispy on the outside. Dump them into the pie dish and spread more or less evenly over the prior ingredients.
- Steam the broccoli florets, dump them into the pie dish, and spread more or less evenly over the previous ingredients. (Laurie used a container of left-over broccoli from the refrigerator. If steaming and getting another pot dirty is a pain, just skip the broccoli; though it does add some nice color.)
- Sprinkle some of the cheese over the top (about 1/3 of the cheese)
- Whisk together the eggs, sour cream, mustard, oregano, salt, nutmeg and black pepper. Pour the mixture over everything in the pie dish.
- Top with the remaining grated cheese.
- Top with the cooked sweet potato puffs.
- Place the pan in the oven and bake for 20-25 minutes, or until slightly puffed and firm in the center. Remove from oven and let it cool and settle slightly before slicing.
A few of the steps illustrated:
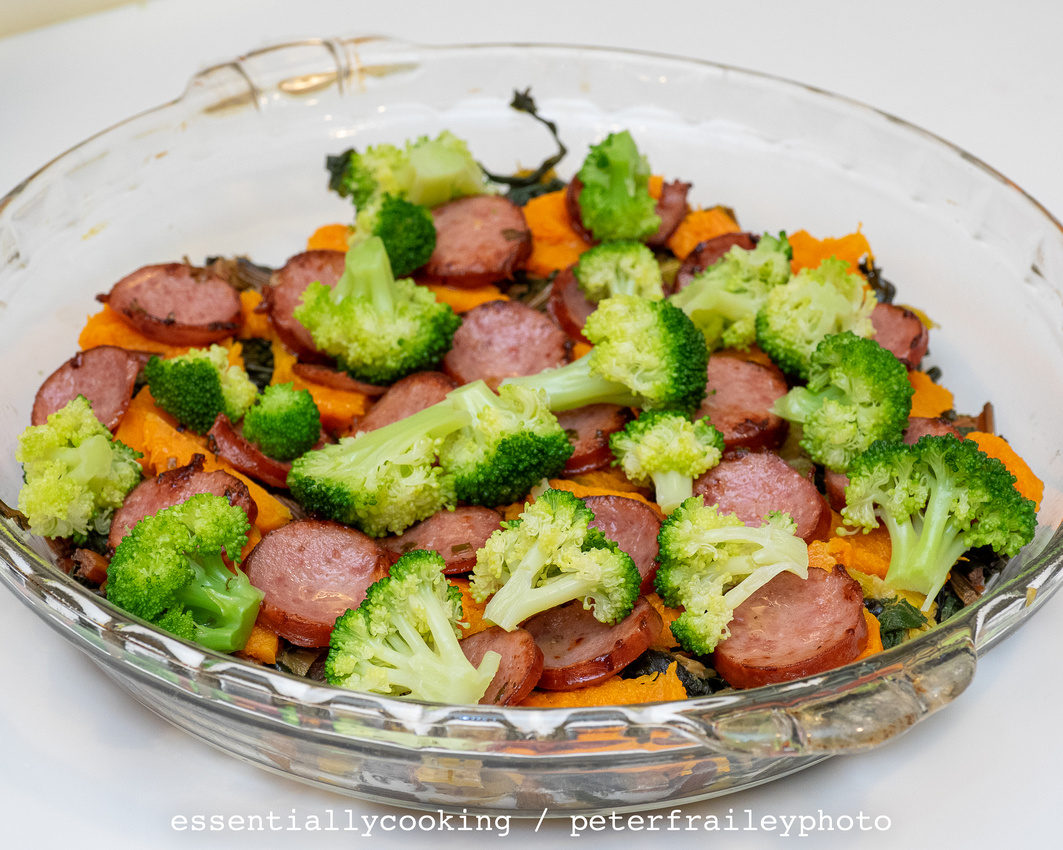
Butternut squash, chard and leeks, kielbasa, and broccoli, in layers
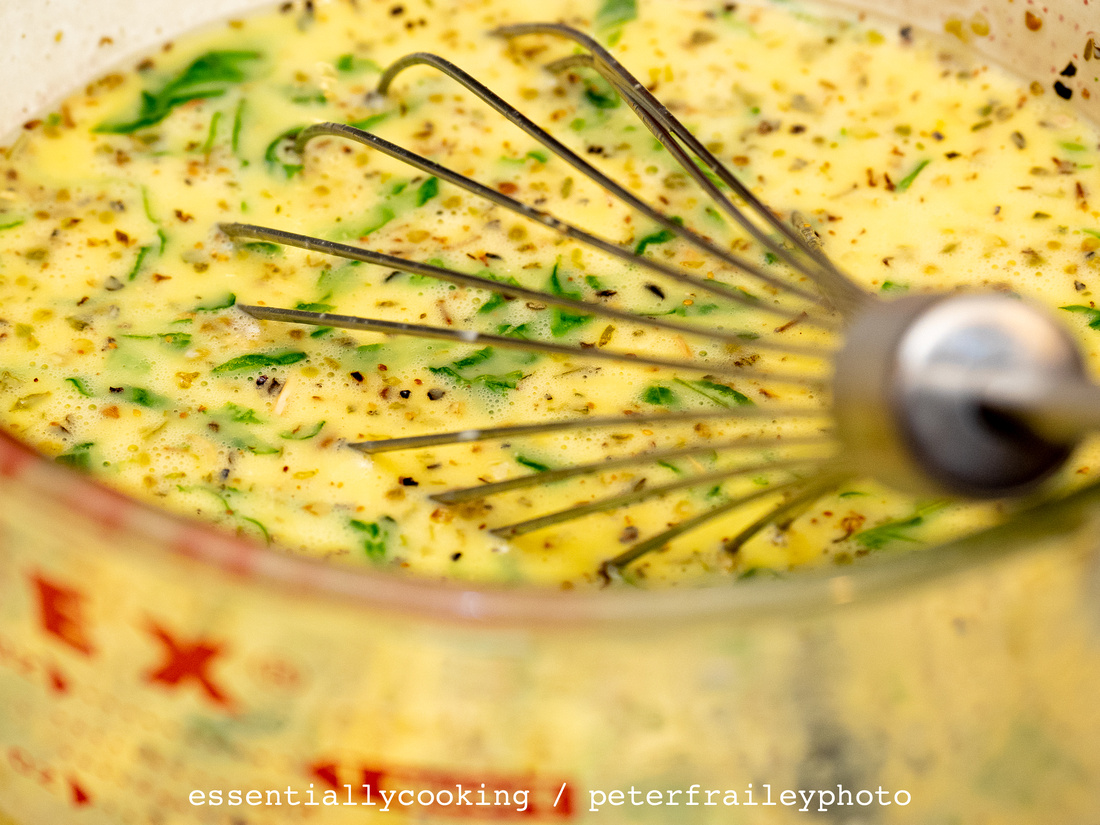
Egg mixture.
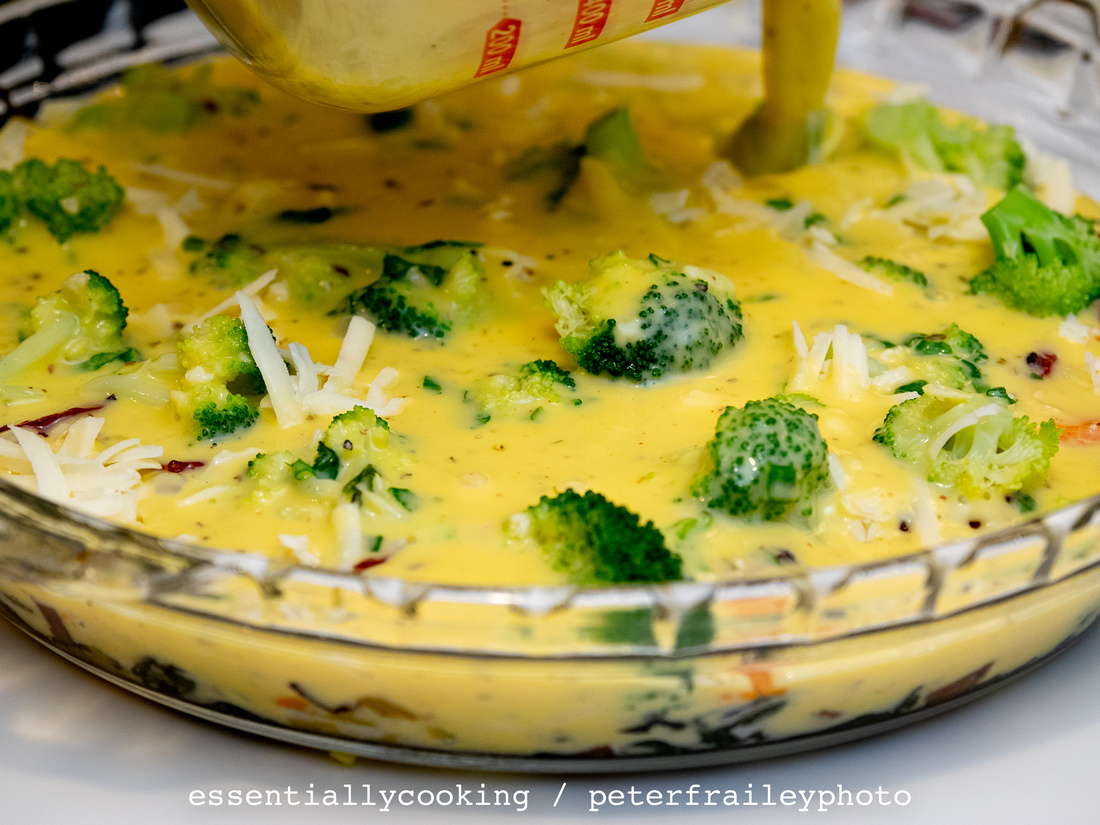
Sprinkle with 1/3 the cheese. Pour egg mixture.
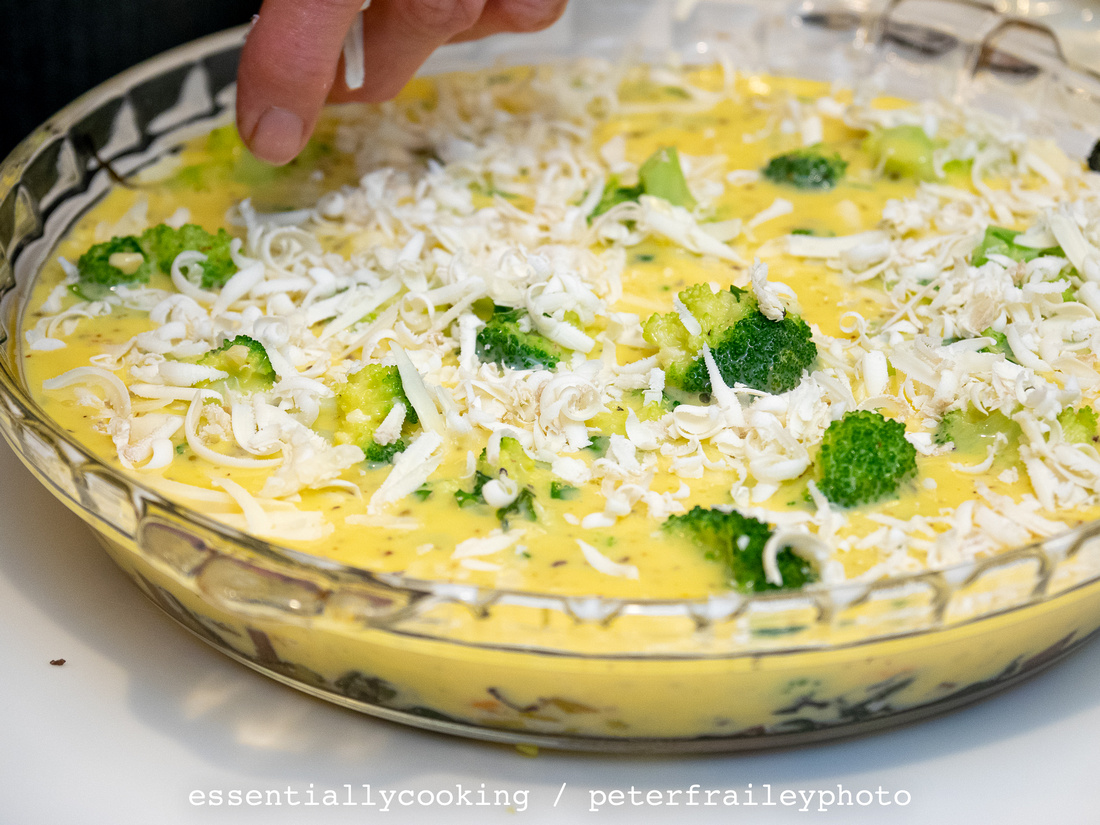
Remaining cheese sprinkled on top.
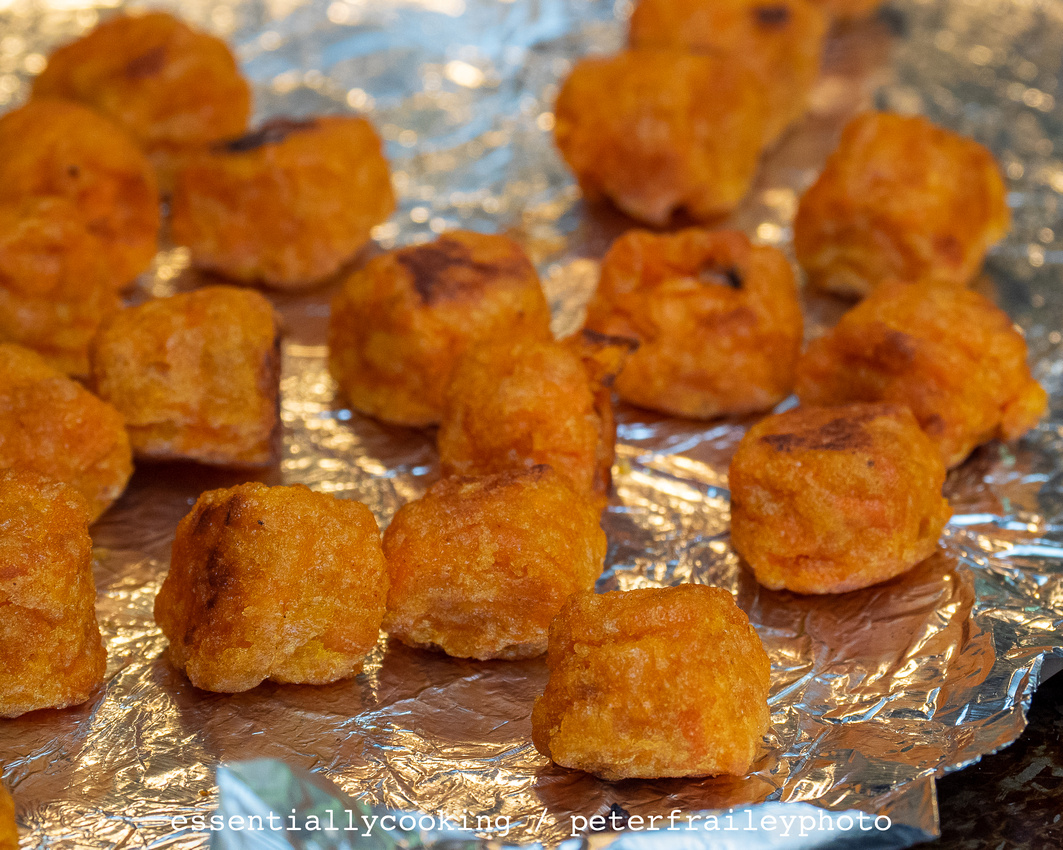
Baked potato puffs
Place potato puffs over the top, evenly distributed.
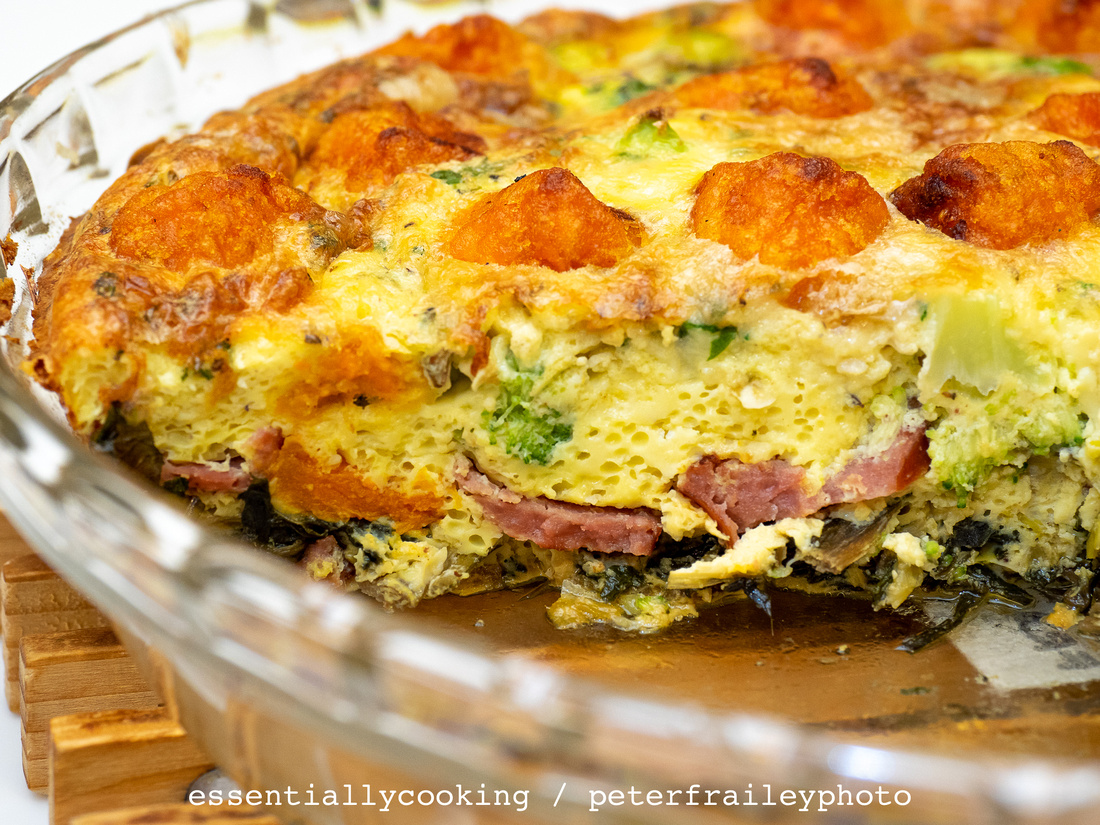
Out of the oven and the first piece taken.
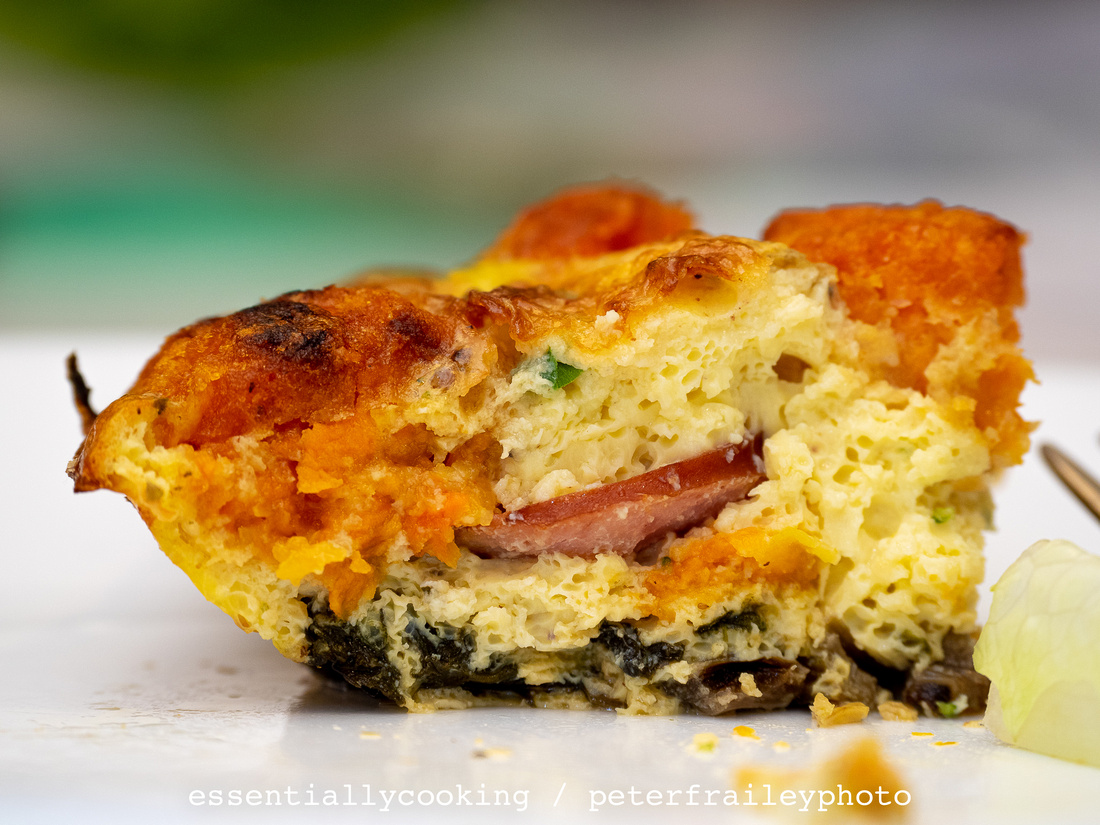
Yummy.
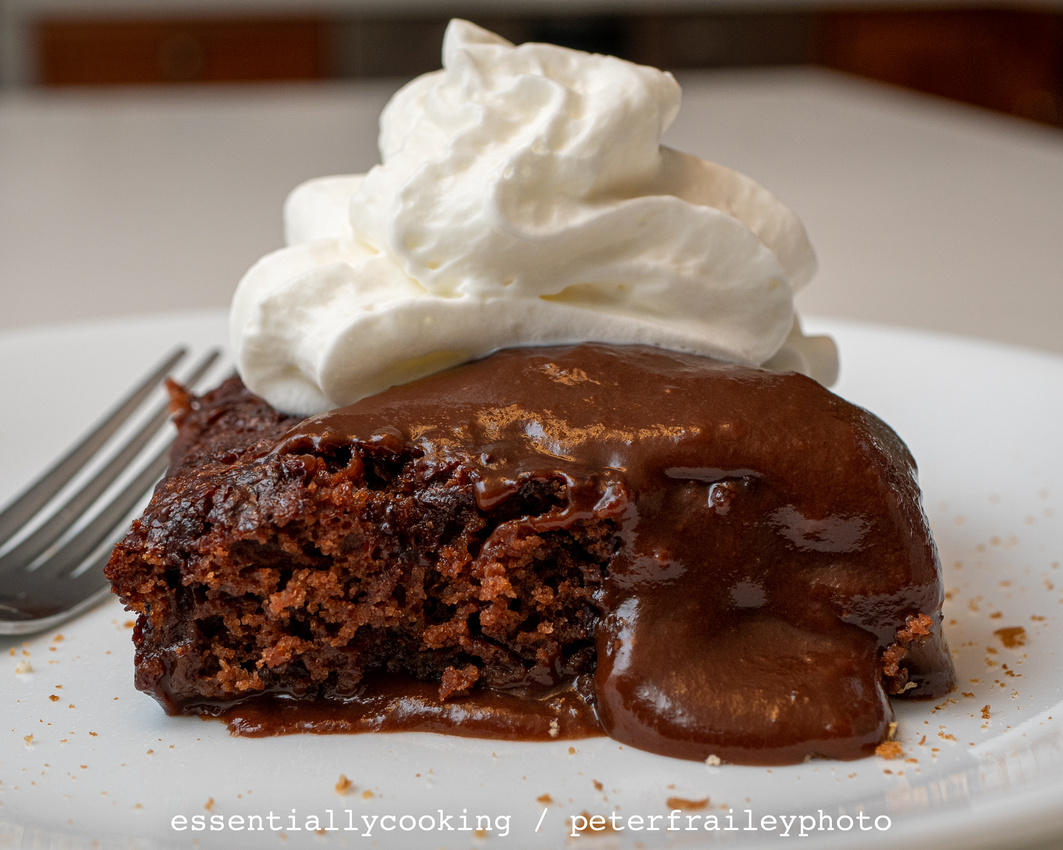
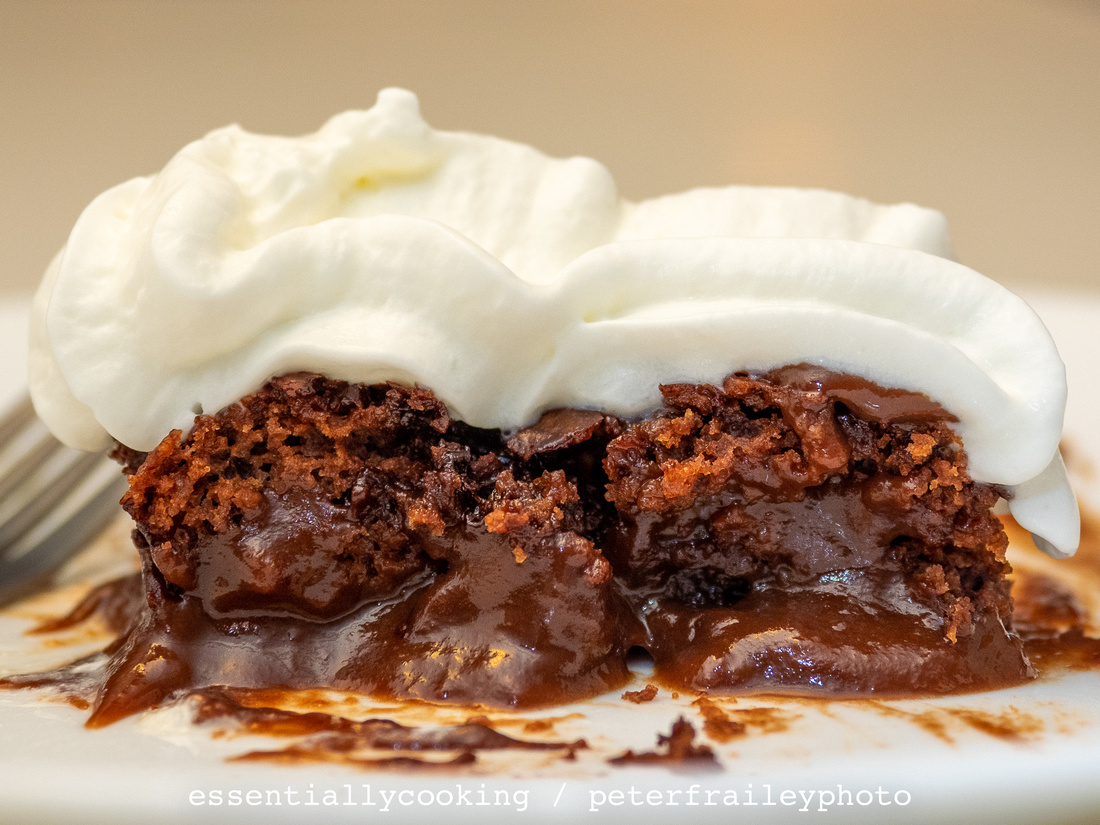
A far better choice than my usual 11 a.m. Oreo cookie break, I so enjoyed slicing off pieces of this cake throughout the weekend. I especially enjoy "evening up the edges".
The only problem this time is that since we are relying on others for our grocery shopping, we otherwise would have driven downtown to get some vanilla ice cream to dollop on top. Oh well, Reddi Wip, left over from perhaps a jello dessert with the grandkids, had to suffice for a topping. We had no complaints.
There are many chocolate pudding cake recipes on the Internet, basically with the same ingredients but perhaps in different amounts. I saw several that added some vanilla extract to the cake mix. I can't see doing anything different from what Laurie did. Her starting point was a recipe here: https://www.theprairiehomestead.com/2020/01/chocolate-pudding-cake-recipe.html
 What you need:
cake:
- 1 cup all-purpose flour
- 2 tablespoons cocoa powder
- 2 teaspoons baking powder
- 1/2 cup milk... whole milk is probably best, but if you don't have it, mix skim milk and half-and-half
- 3/4 cup brown sugar
- 2 tablespoons butter, melted
Pudding:
- 1 cup brown sugar
- 1/4 cup cocoa powder
- 1 3/4 cups hot tap water
What to do:
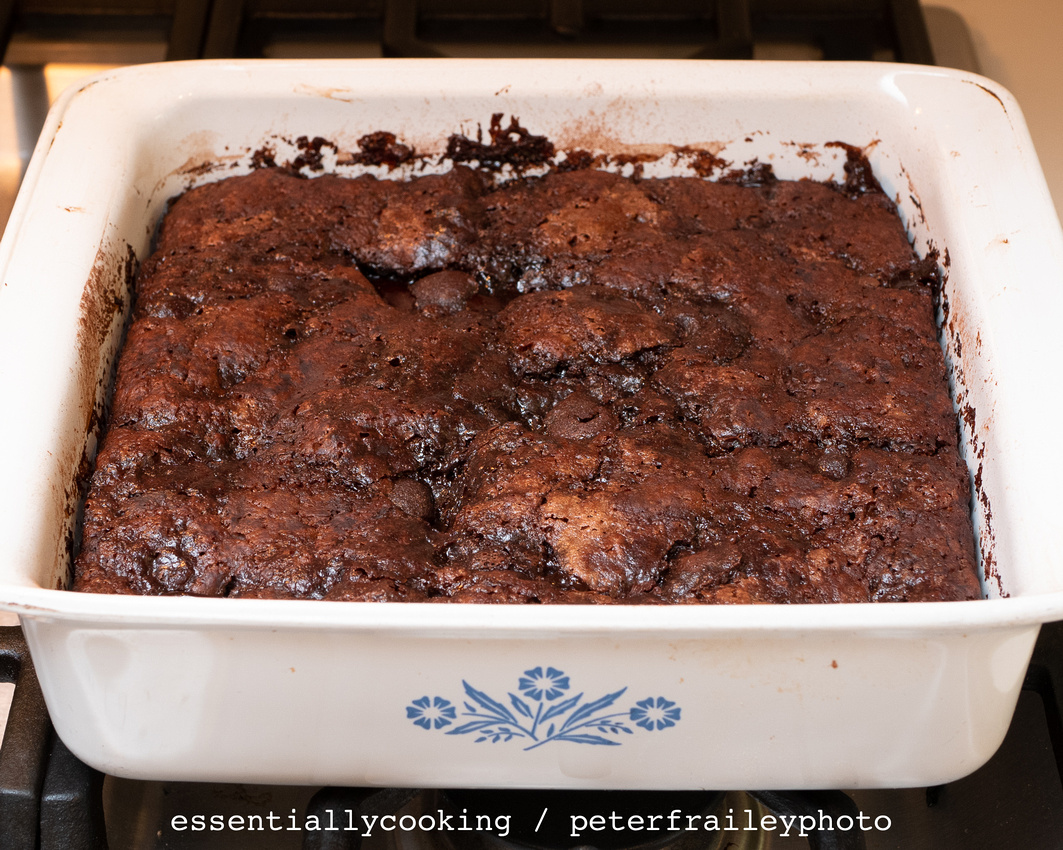
- Preheat the oven to 350°.
- For the cake, combine all of the cake batter ingredients and spread them into a 9×9-inch baking dish.
- For the pudding, mix 1 cup of brown sugar and the 1/4 cup of cocoa powder in a small bowl. Sprinkle this mixture over the top of the cake batter mixture.
- Pour 1 3/4 cups of hot tap water over everything.
- Bake until the top of the cake is firm. Perhaps 45 minutes. When done it will look like the image below.
]]>
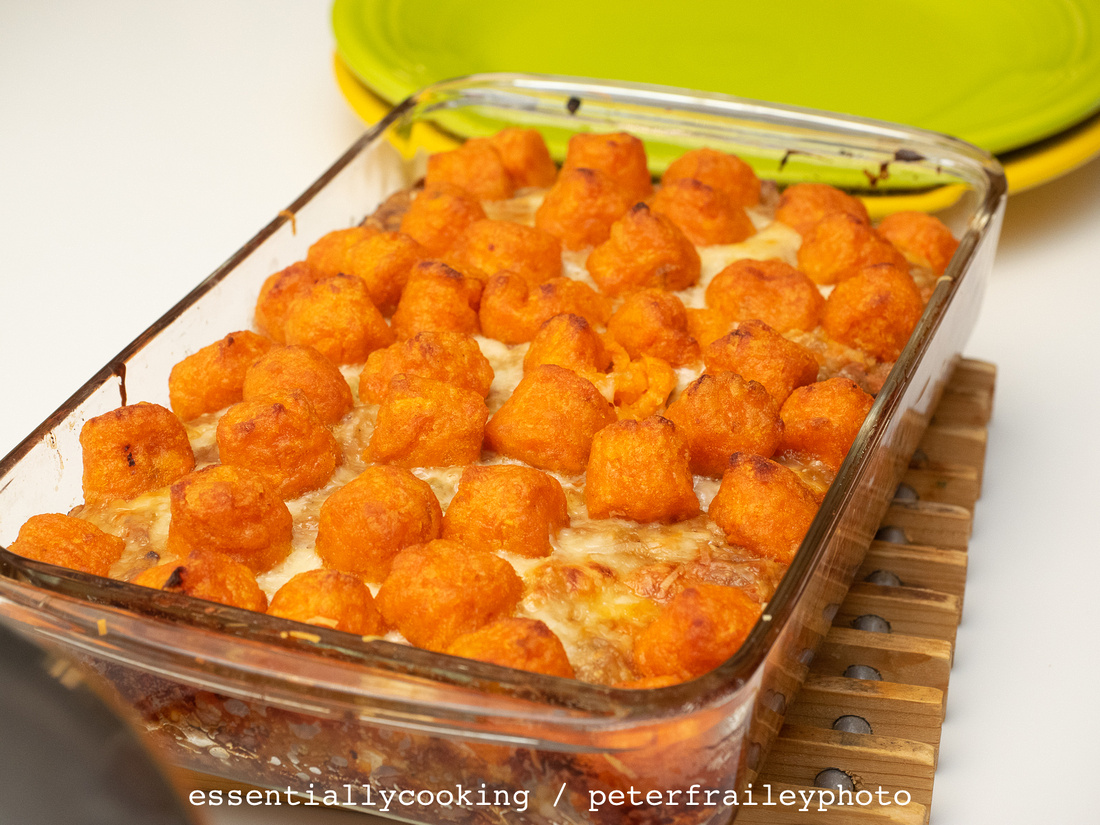
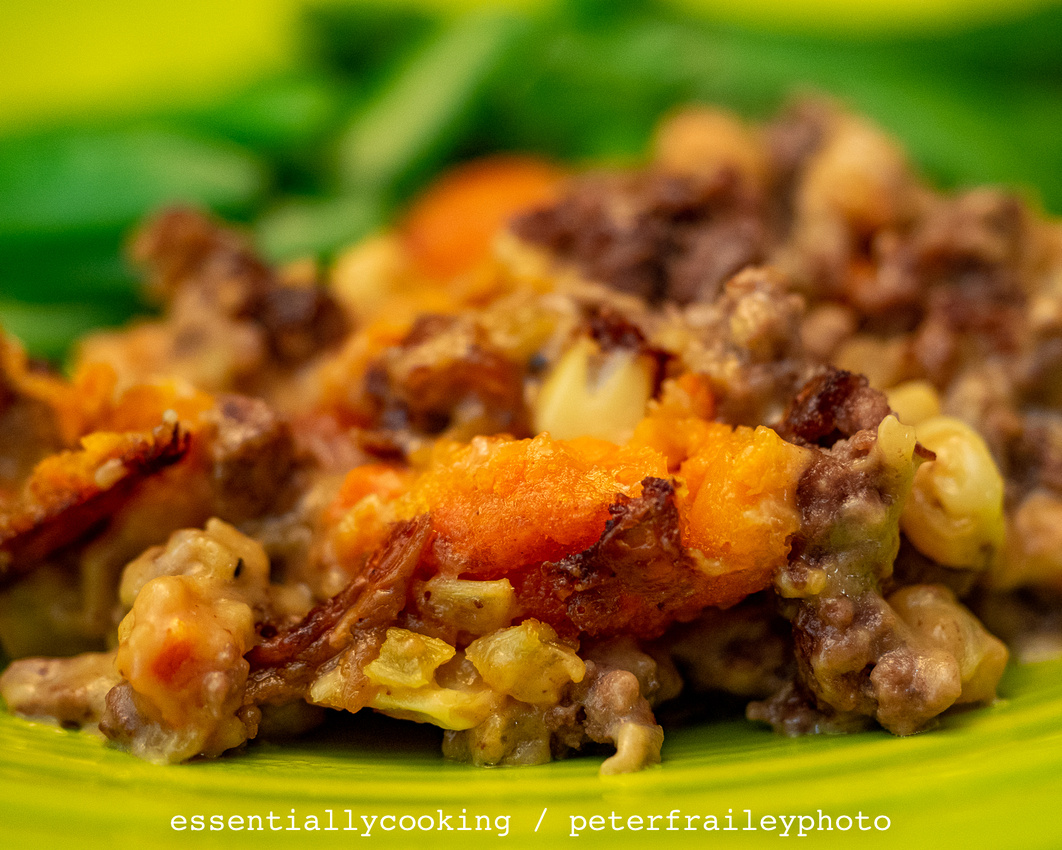
I changed a couple of things: (1) I halved the recipe, and baked it in an 11” by 7” Pyrex dish, which was perfect for two meals for the two of us, plus a tiny bit leftover for a lunch; and (2) I used Alexia (brand) “crispy bite-size sweet potato puffs” (which made it fantastic!) instead of Tater Tots, because I already had sweet potato puffs in the freezer, which is the reason for that serendipitous substitution!
For a 4+ servings casserole you will need:
- 1/4 cup unsalted butter
- 1 carrot, peeled and finely chopped
- 1 celery stalk, finely chopped
- 1 medium white or yellow onion, finely chopped
- pinches of salt and black pepper
- 3/8 cup all-purpose flour
- 1 1/2 cups whole milk
- 1 tablespoons chicken broth
- 1 pound ground beef
- 4 1/2 ounces frozen corn
- 12 ounces frozen sweet potato puffs
- 1/2 cup (or more!) shredded Cheddar cheese
What to do:
- Heat the oven to 400°F.
- Create soup mixture: In a large pot, melt 3 tablespoons of butter over medium-high heat. Add the chopped carrot, celery, and half the onion. Cook and stir until soft. Stir in the flour and cook for a minute. Add half the milk. Cook and stir until thick. Add the remaining milk. Cook and stir until very thick. Stir in chicken broth. Throughout this recipe, add salt and pepper to taste. Pour into an oven-proof bowl and set aside.
- Create beef mixture: Use the same large pot over medium-high heat. Melt the remaining tablespoon of butter, then add the remaining onion. Cook and stir until soft. Add the ground beef and break it up so you can cook it evenly. Stir in the corn. Drain and discard any excess liquid from the beef mixture.
- Transfer half the beef mixture to a 7" x 11" glass baking dish and spread it out evenly.
- Pour and spread half the soup mixture on top.
- Add the remaining beef mixture on top and spread evenly.
- Pour and spread the remaining soup mixture on top.
- Cover with potato puffs.
- Sprinkle with cheese.
- Bake until the puffs are golden brown and crispy on top, about 45 minutes. Let cool slightly.

]]>
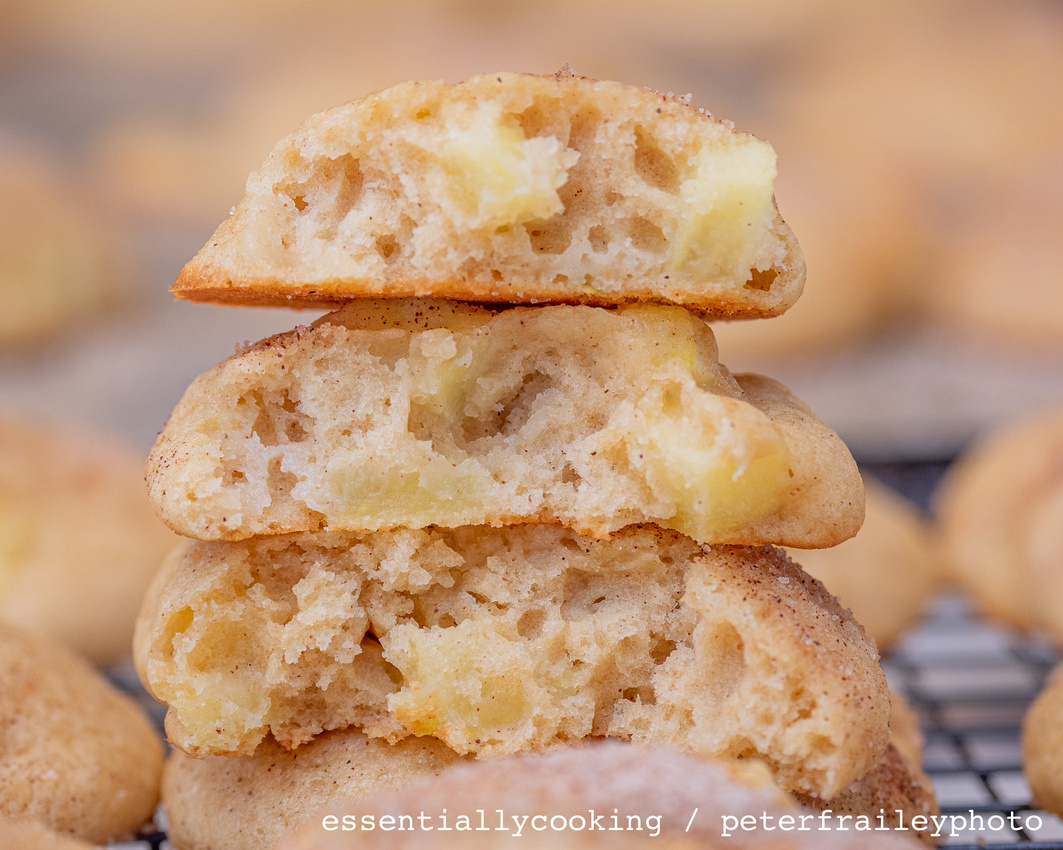
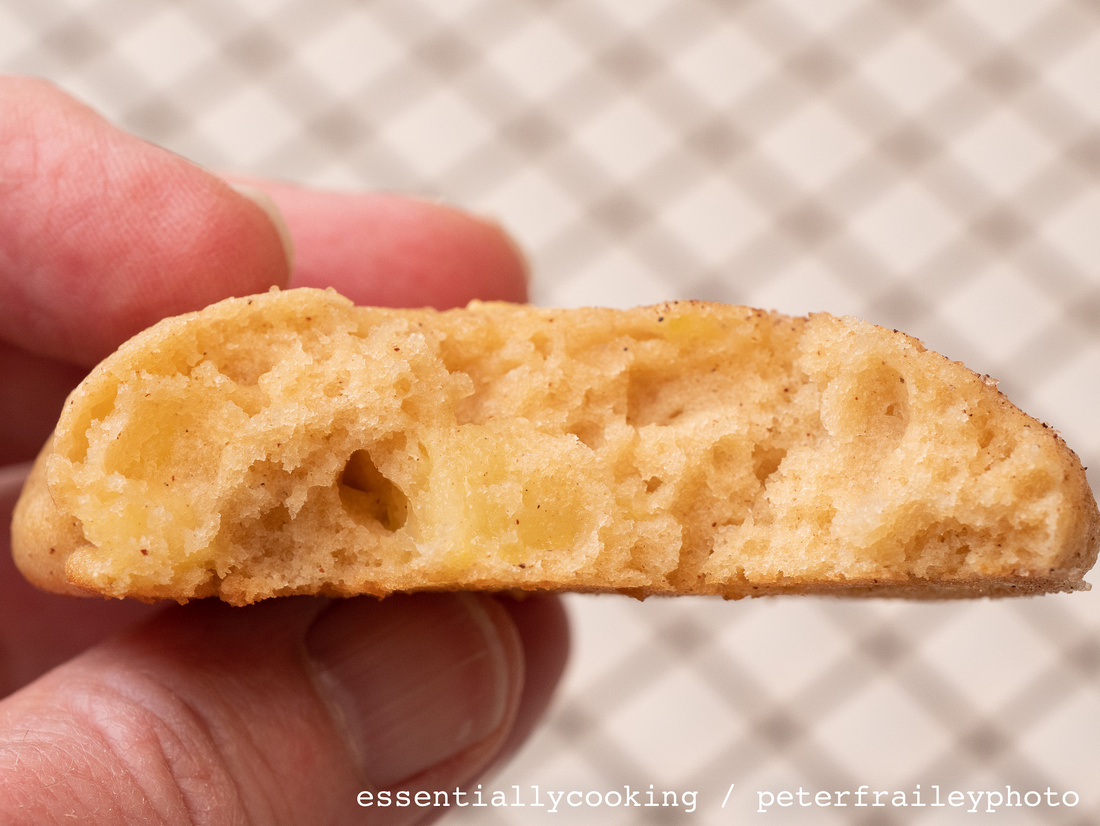
This all started with a "banana drop cookie" recipe I found at lovefoodies.com. I changed up the sugar a bit, by replacing some of the white sugar with brown sugar, replaced two mashed bananas with one cup of apple sauce, and added one diced apple.
Although I started with a "cookie" recipe, I am reluctant to call these cookies. They are softer and less dense than a cookie, and frankly taste more like a muffin. I figured since they spread out on the cookie sheet, and look like the tops of muffins, I'd just call them that... muffins tops.
I used a convection oven. For crisper edges, use a conventional oven.
 What is needed:
- 2 1/4 cup flour
- 2 teaspoons baking powder
- 1/4 teaspoon baking soda
- 1/2 teaspoon salt (or 1/4 teaspoon if you use salted butter)
- 1/2 teaspoon cinnamon
- 1/2 cup white sugar
- 3/4 cup brown sugar
- 2/3 cup butter, softened
- 1 teaspoon vanilla
- 1 cup apple sauce
- 2 eggs, beaten
- 1 diced apple (optional)
topping:
- 1/8 cup sugar
- 1/2 teaspoon cinnamon
What to do:
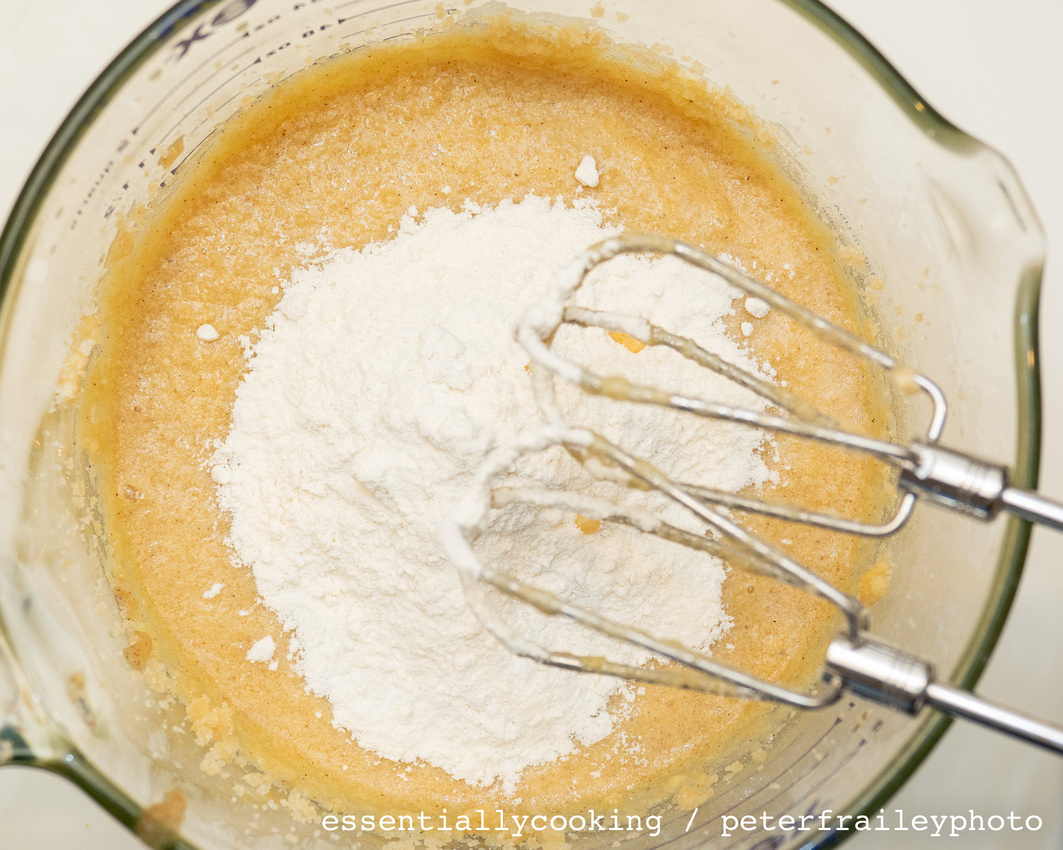
- In one bowl add the dry ingredients and whisk together: flour, baking powder, baking soda, salt, and 1/2 teaspoon cinnamon. (I forgot to add the cinnamon so instead I stirred it into the 1 cup of apple sauce.)
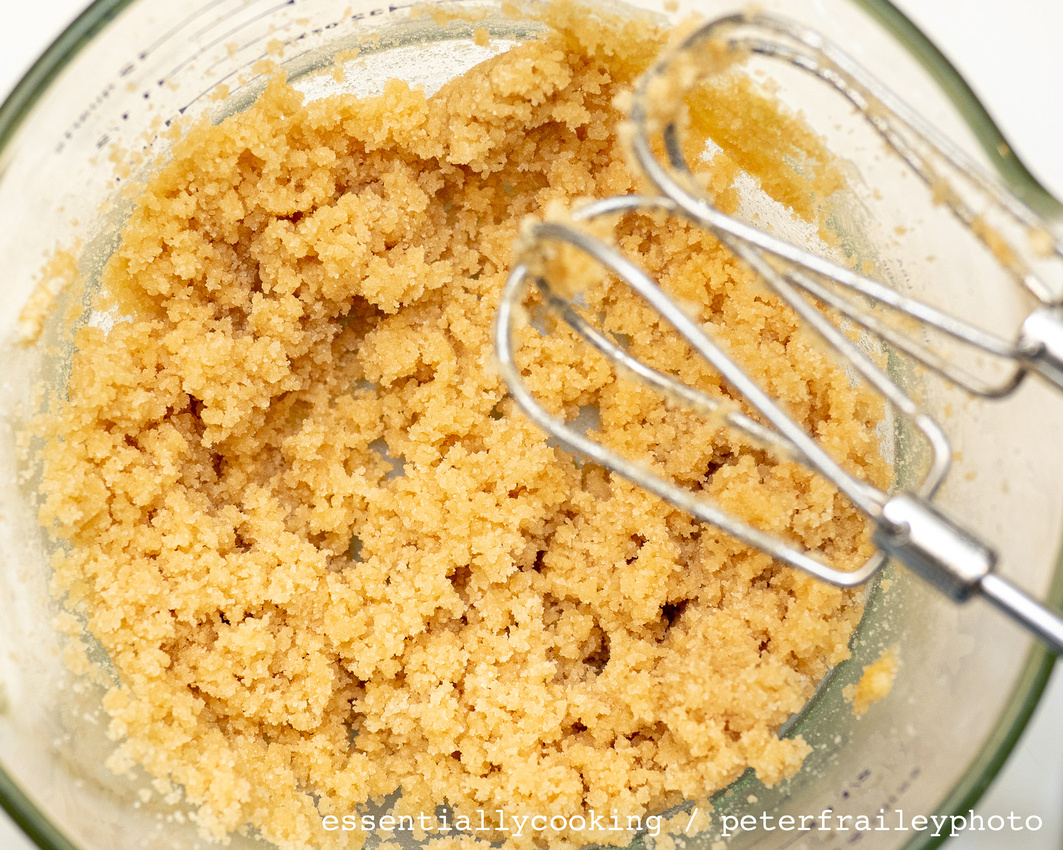
- In a second bowl, combine white and brown sugar, butter (softened; our microwave has a "soften butter" setting), and vanilla. Cream together until the mixture gets light and fluffy.
- Add eggs and beat well.
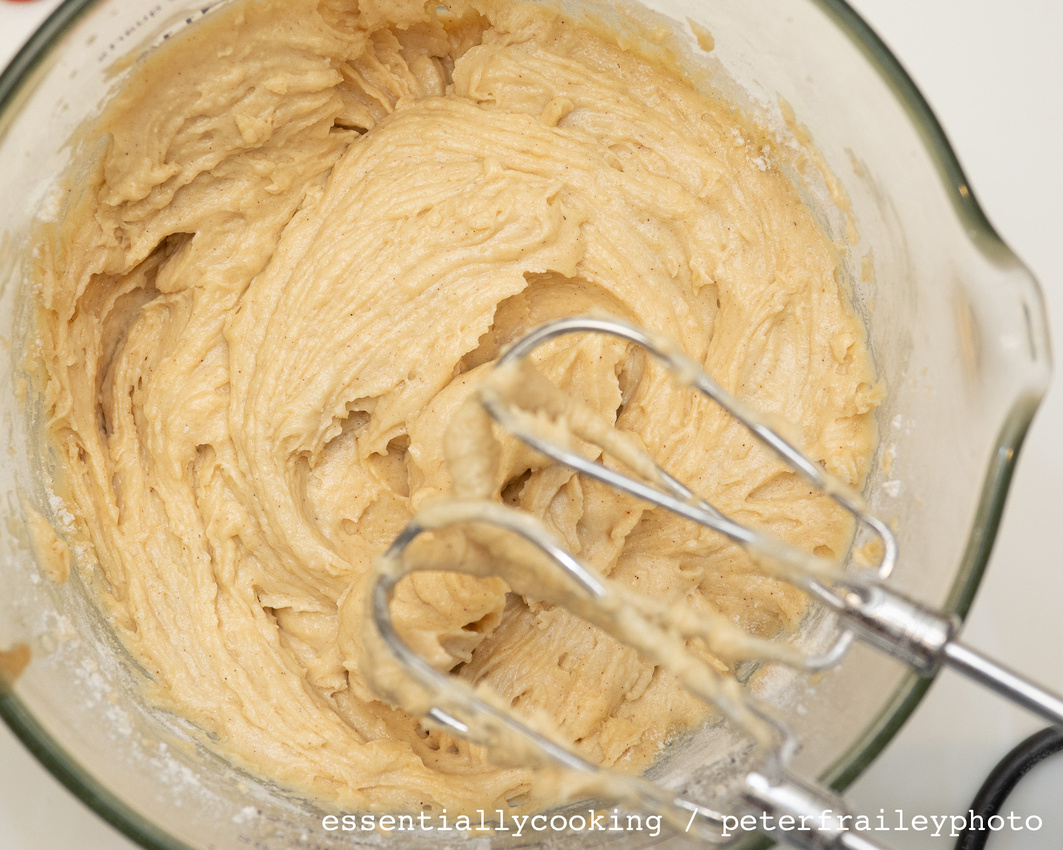
- Add apple sauce.
- Dump dry ingredients from step one into the wet ingredients and mix together.
- Chill in refrigerator for 30 minutes. After the first 15 minutes, grease your cookie sheets and preheat the oven to 400F. (375F for convection cooking.)
- I use an ice cream scooper (the kind with a release lever) to drop batter onto the cookie sheets, about 2" apart (they will spread more than, say, toll house cookies)
- Sprinkle with the topping (sugar/cinnamon mixed together)
- Bake 8-10 minutes, depending on your oven.
- Cool 2 minutes before moving the cookies with a pancake flipper to a cooling rack.
A few of the steps with photos:
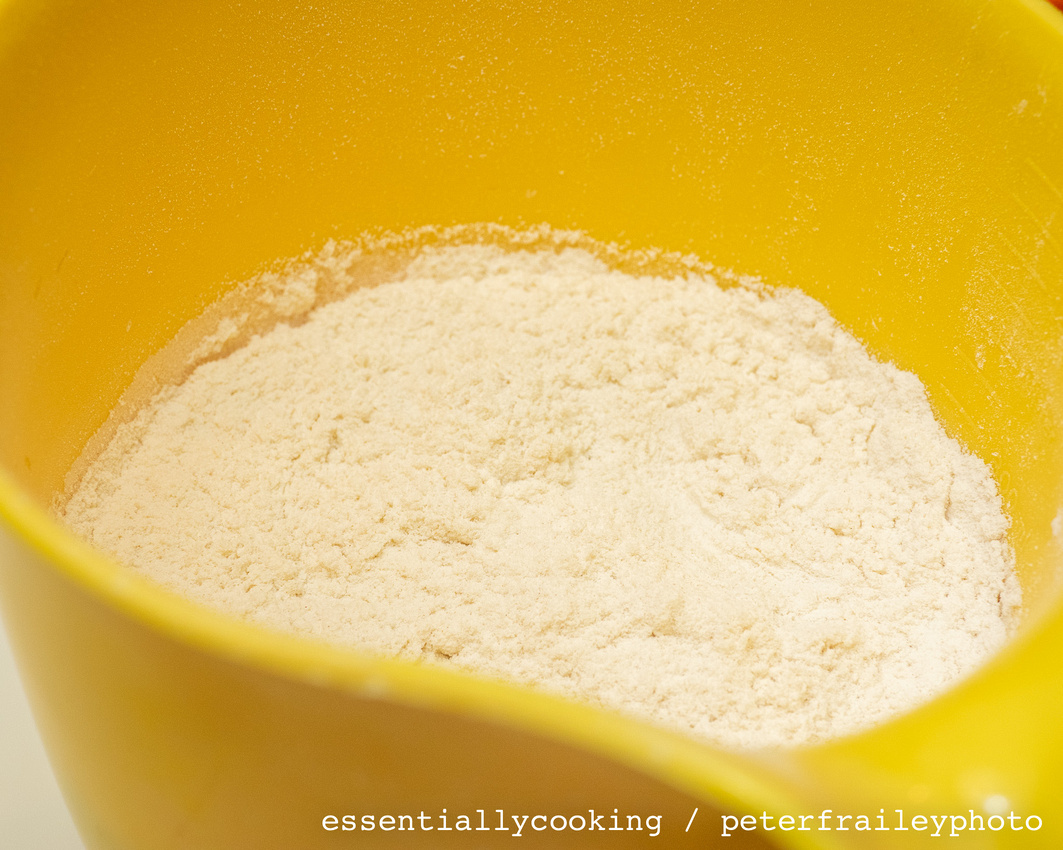
Dry ingredients whisked together.
(I forgot to add the cinnamon, so instead I added it to the apple sauce)
This is what the sugar, butter, and vanilla should look like once mixed.
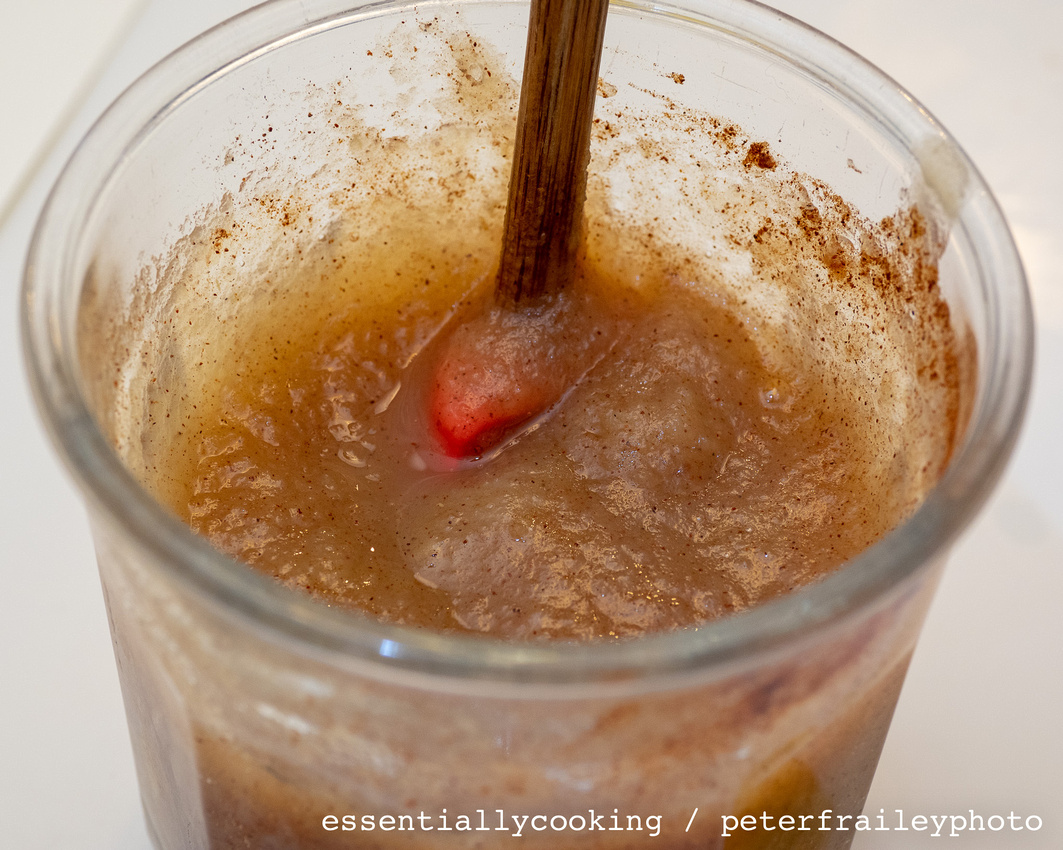
One cup of apple sauce with 1/2 teaspoon cinnamon mixed into it.
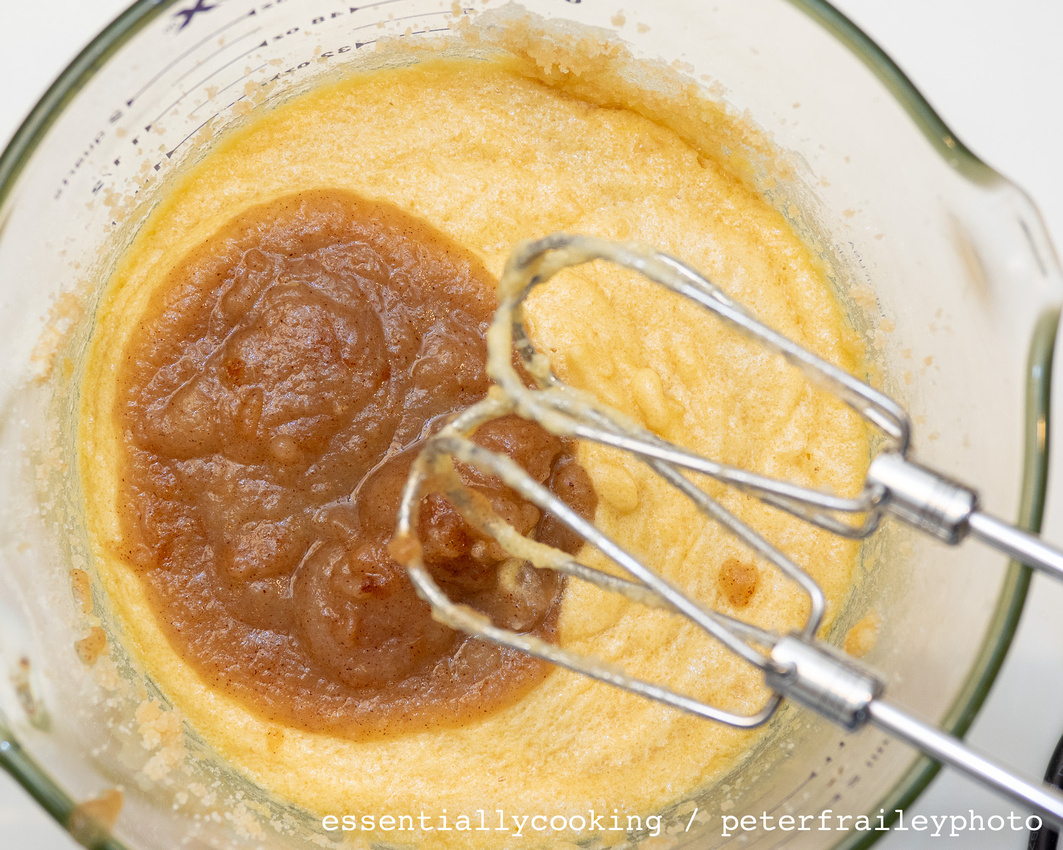
Apple sauce added. Mix together.

Beaten eggs added.
After mixing in the eggs.
Add the dry mixture.
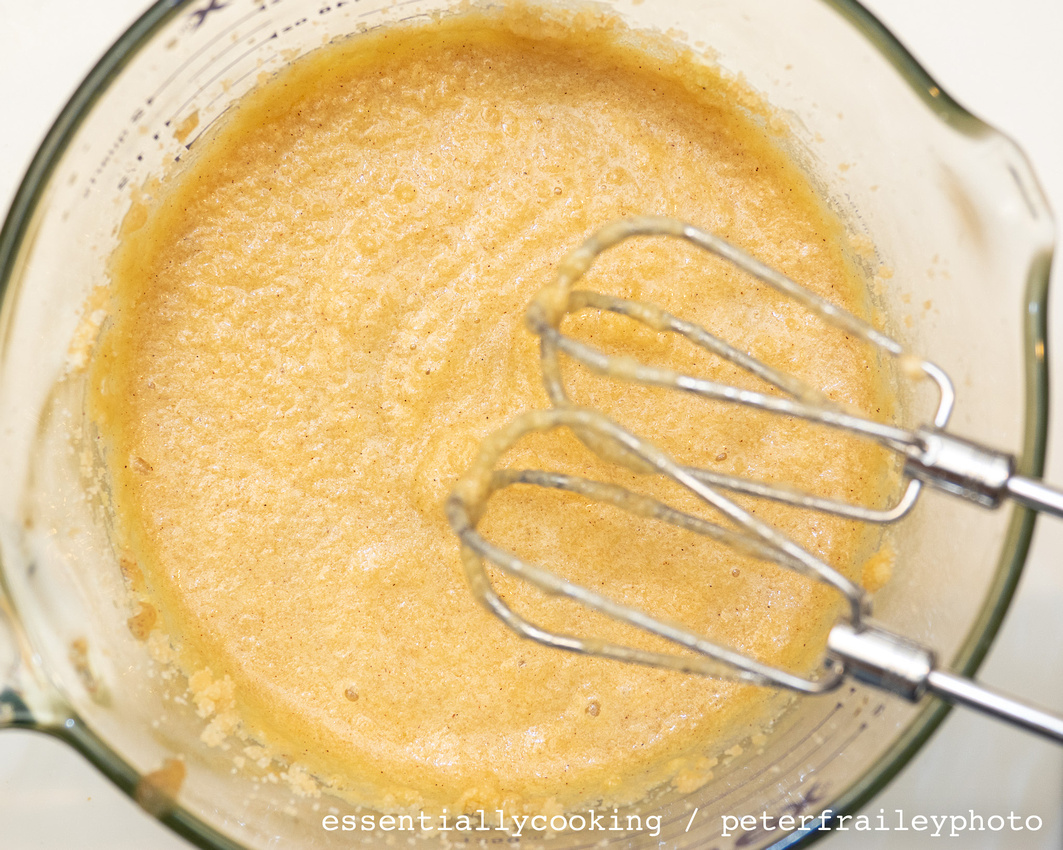
Batter should look like this.
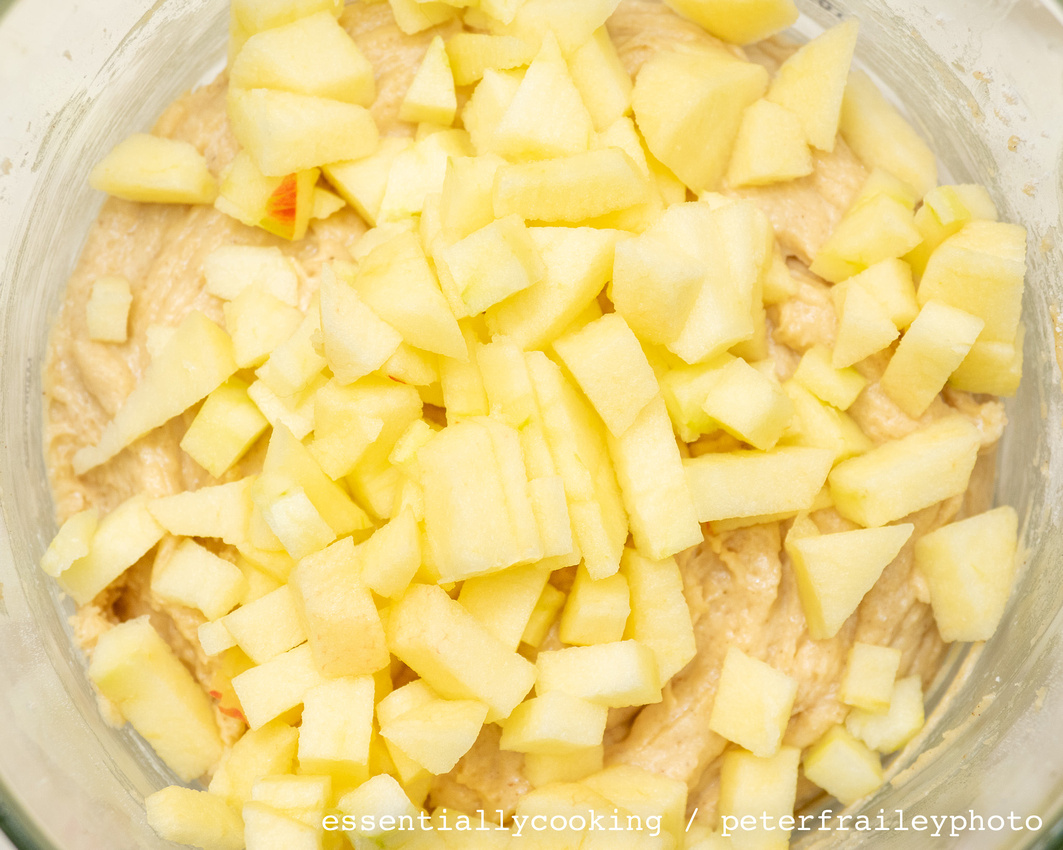
Mix in one diced apple using a spatula or wooden spoon.
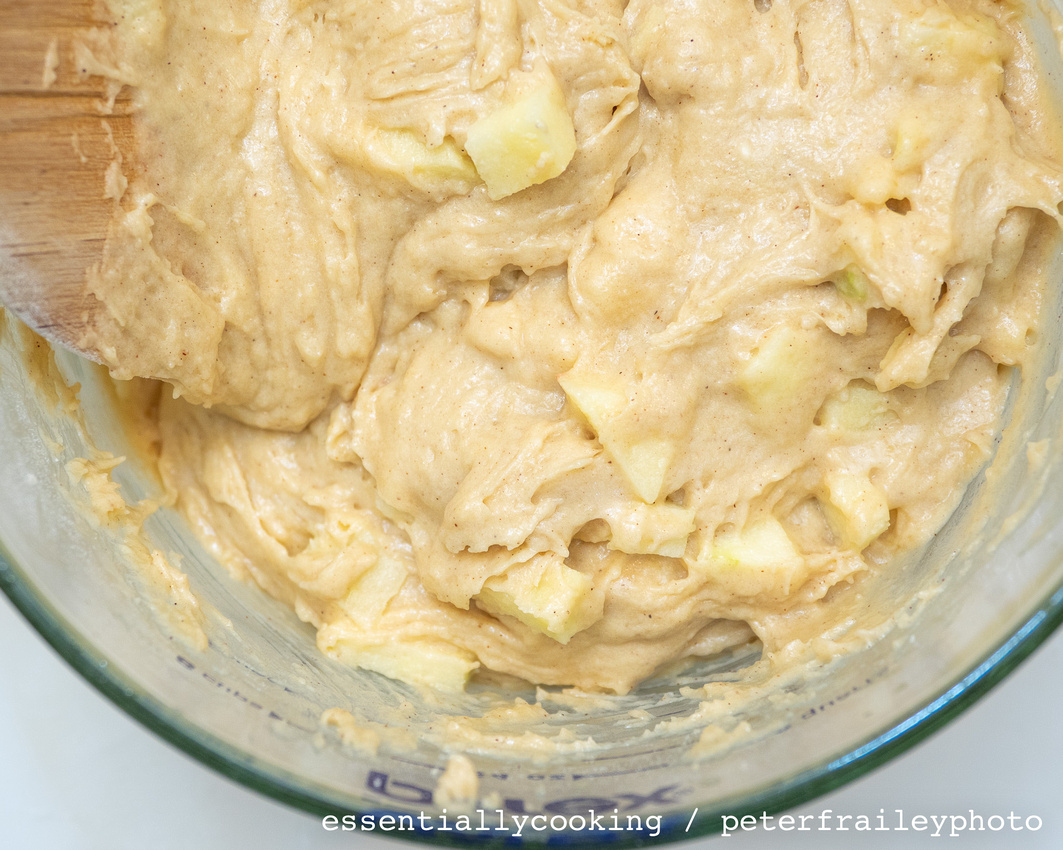
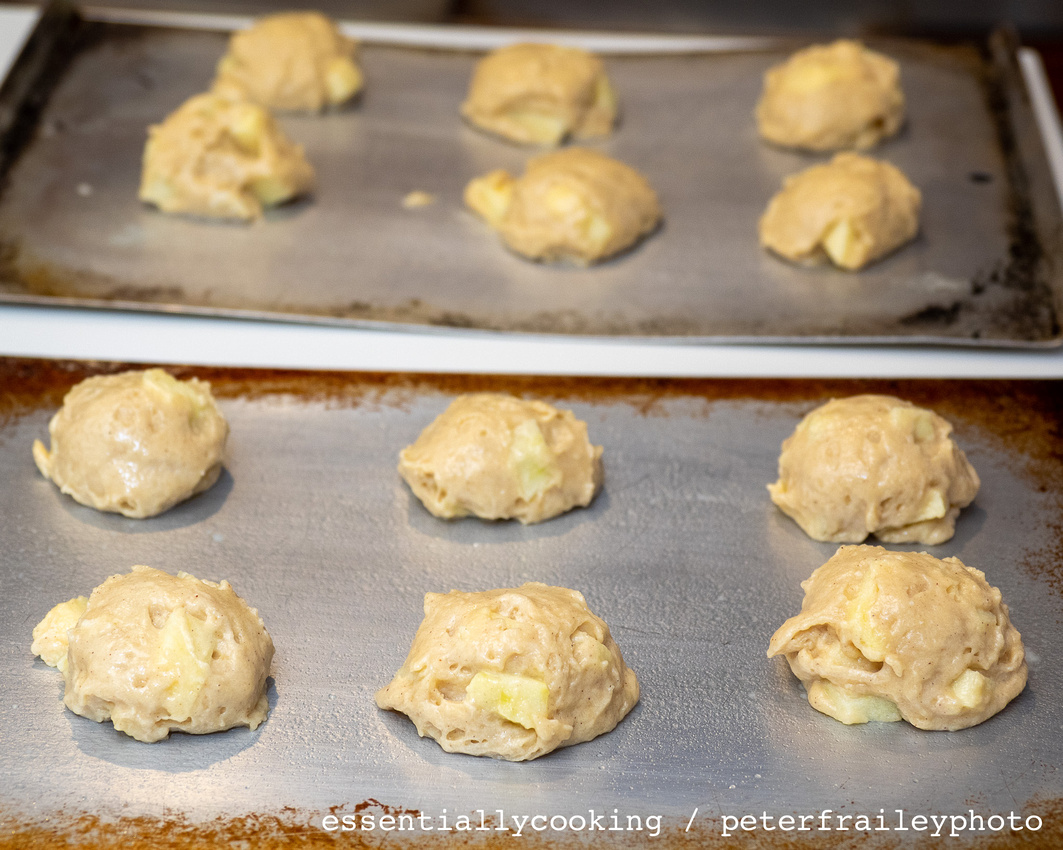
Ready for the oven

All done!
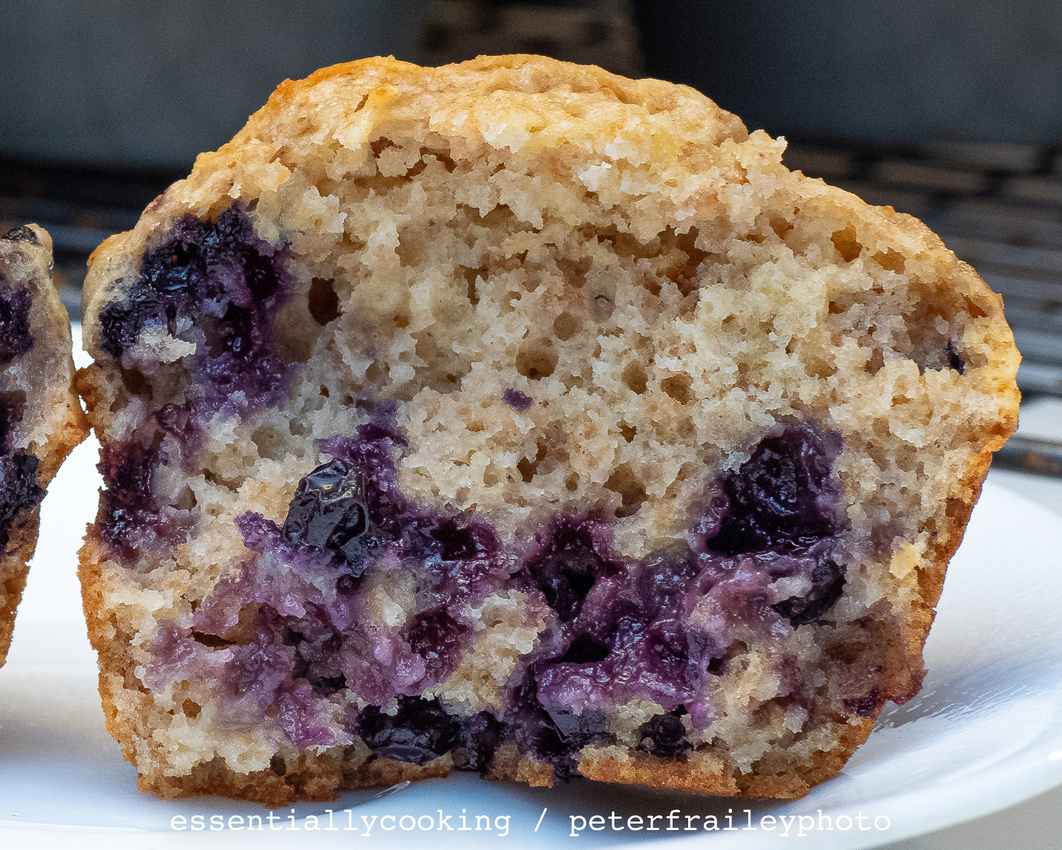
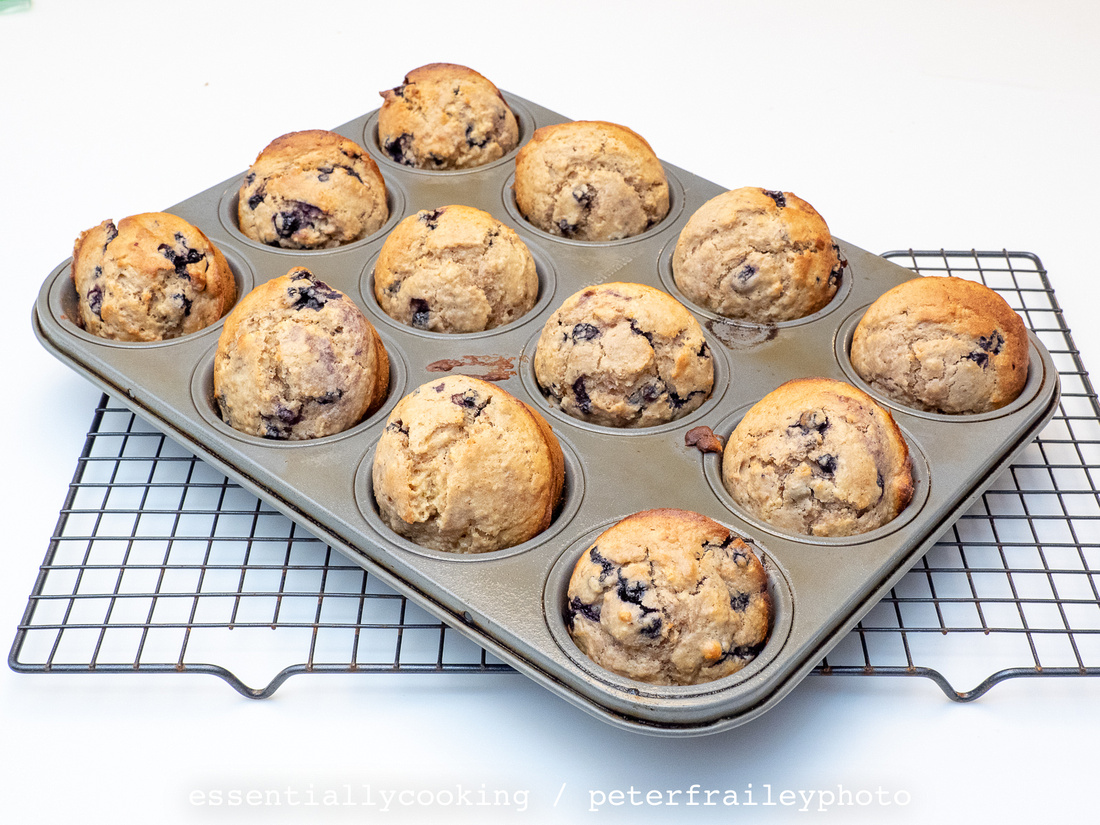
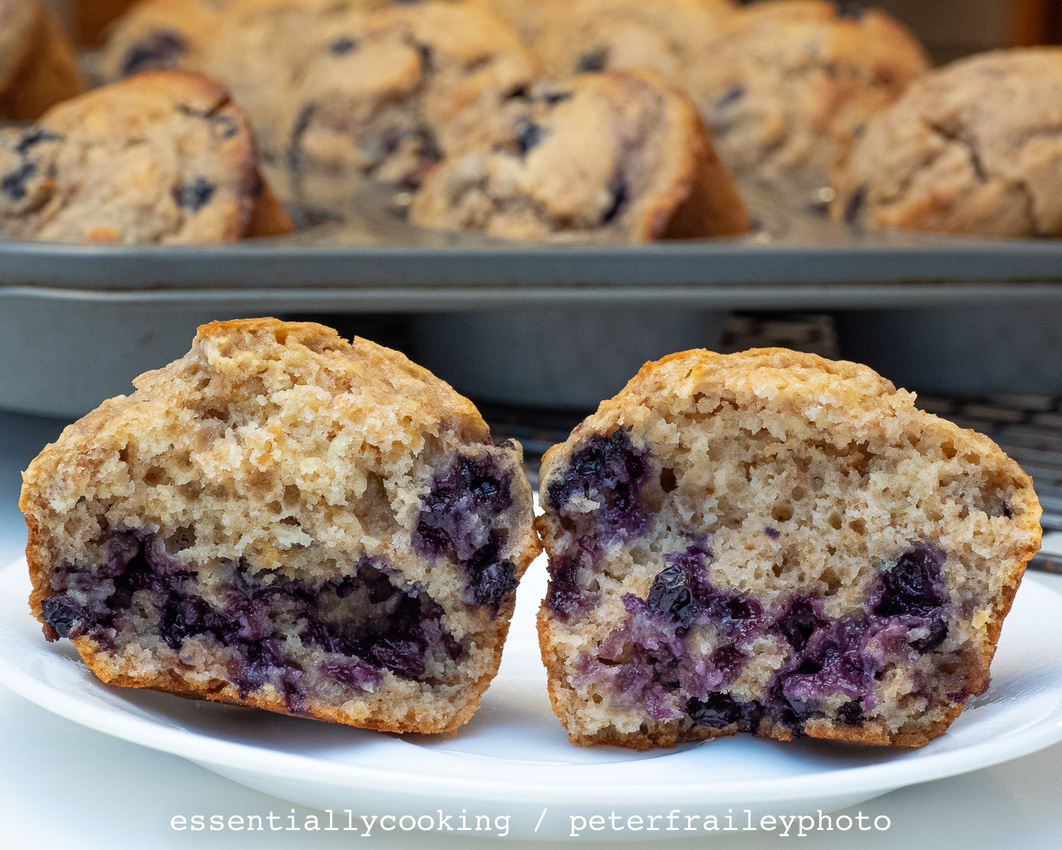
I thought I would use up some Maine blueberries we purchased at a roadside stand last summer and froze in zip freezer bags. This muffin recipe is one that I have been using consistently for more than 10 years. It was created by combining a recipe on the side of a box of All Bran Cereal with a basic muffin recipe from the Joy of Cooking (I think). The All Bran Cereal (one cup) gives it a healthy taste and texture. In addition I have reduced the sugar and oil as far as I dare.
In this batch I used 2 cups of blueberries, but I love them with fresh strawberries or ripe bananas (or why not combine the two ?). Occasionally I sweeten them up with a cup of mini chocolate chips. (I think the mini chocolate chips are less likely to sink to the bottom during cooking.)
What is needed:
- 12 cup muffin pan
- 2 mixing bowls
- 1 1/2 cups flour
- 1/3 cup sugar
- 2 1/2 teaspoons baking powder
- 1/4 teaspoon salt
- 1 cup All Bran cereal (or crunched Wheat Chex or similar cereal)
- 1 cup milk
- 1 egg
- 1/4 cup oil
What to do:
1. Preheat oven to 400F. Lightly grease the muffin pan.
2. Mix several of the dry ingredients in the first mixing bowl: flour, sugar, baking powder, salt
3. In the second mixing bowl add the cereal and milk. Let it sit for 3 minutes to soften the cereal.
4. Mix the egg and oil into the cereal/milk mixture. Mix thoroughly
5. Pour the dry mixture from the first mixing bowl into the wet mixture in the second mixing bowl.
6. Beat with a hand mixture until everything is blended.
7. Add blueberries and mix into the batter with a spoon.
8. Fill 12 muffin cups
9. Bake 15-18 minutes
Notes:
I like to use a convection oven for muffins. This means, for most ovens, dropping the temperature to 375F and checking the muffins in 15 minutes. Convection cooking is a bit tricky at first. Even when fully cooked, the muffins appear to the eye to be undercooked.
]]>
The recipe started with one from ourbestbites.com and can be expanded based on what you have in the cupboard or refrigerator.
Though labeled a "breakfast pizza", likely due to the role of eggs, we nevertheless first had it for dinner with broccoli on the side. For breakfast it is a handy make-ahead recipe. Just cook a batch and freeze them.
The two photos below represent two variations, made at different times.The first photo is more of a dinner orientation and the second is more of a breakfast orientation. Your mileage may vary. (I'm responsible for the lack of onions, sorry.)
Laurie did not forget the cheese. In both cases above, the final ingredient before placing in the oven is, of course, cheese! You can pick and choose the other ingredients based on preference, but cheese is a requirement. In this case it was non-fat shredded cheddar.
One neat thing about this recipe are the eggs, a staple for breakfast fare. You will not notice any eggs in the images. Yet they are there!
The secret is to soak both sides of the English muffins in a pie plate with a mix of eggs, milk, and salt. This reminds me of making French toast. I should point out that though the original recipe prescribes 10 dashes of Tabasco sauce in the egg mix, Laurie did omit this ingredient in deference to me and my sensitivity to spicy food.
 Out of the oven
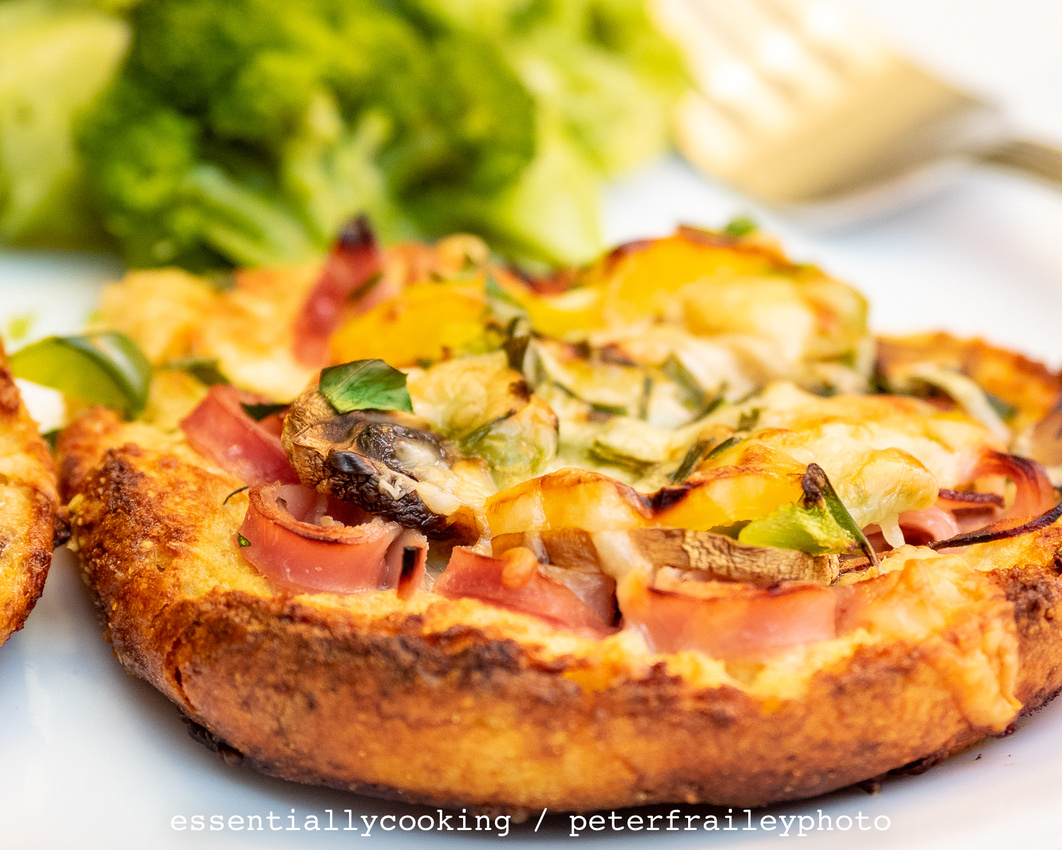 On the plate: Breakfast Pizza and steamed broccoli for dinner
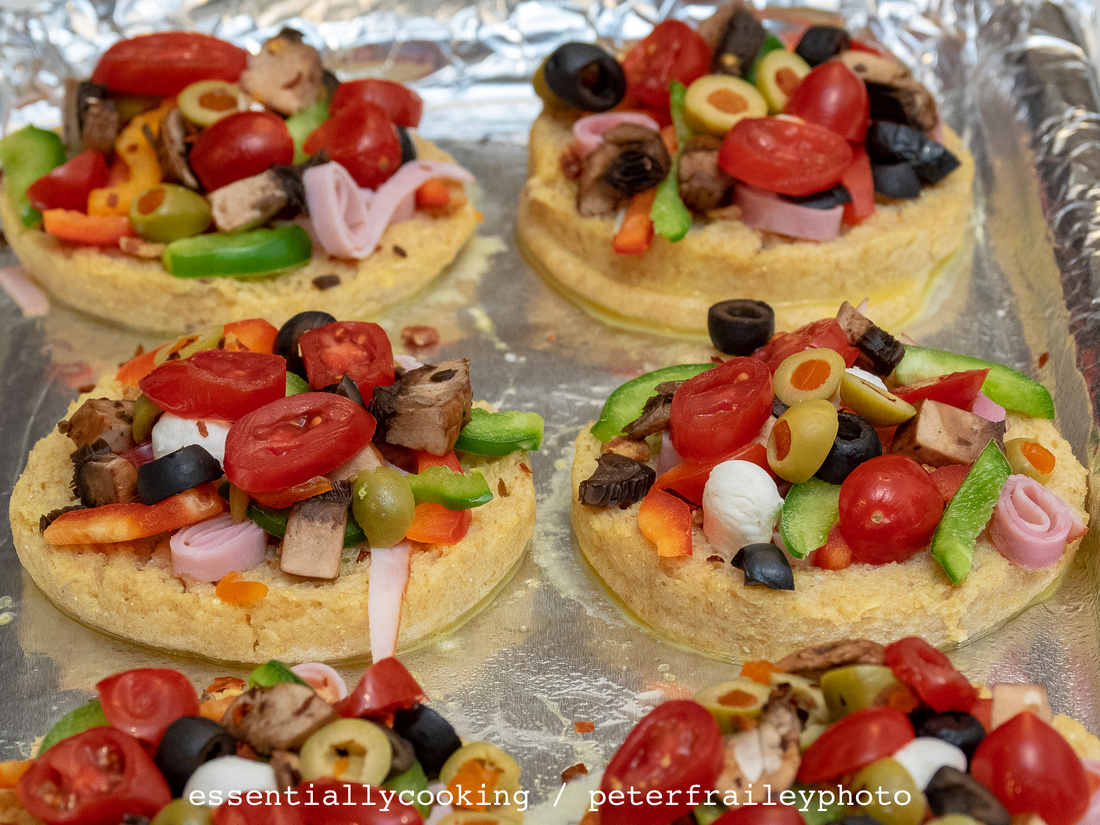
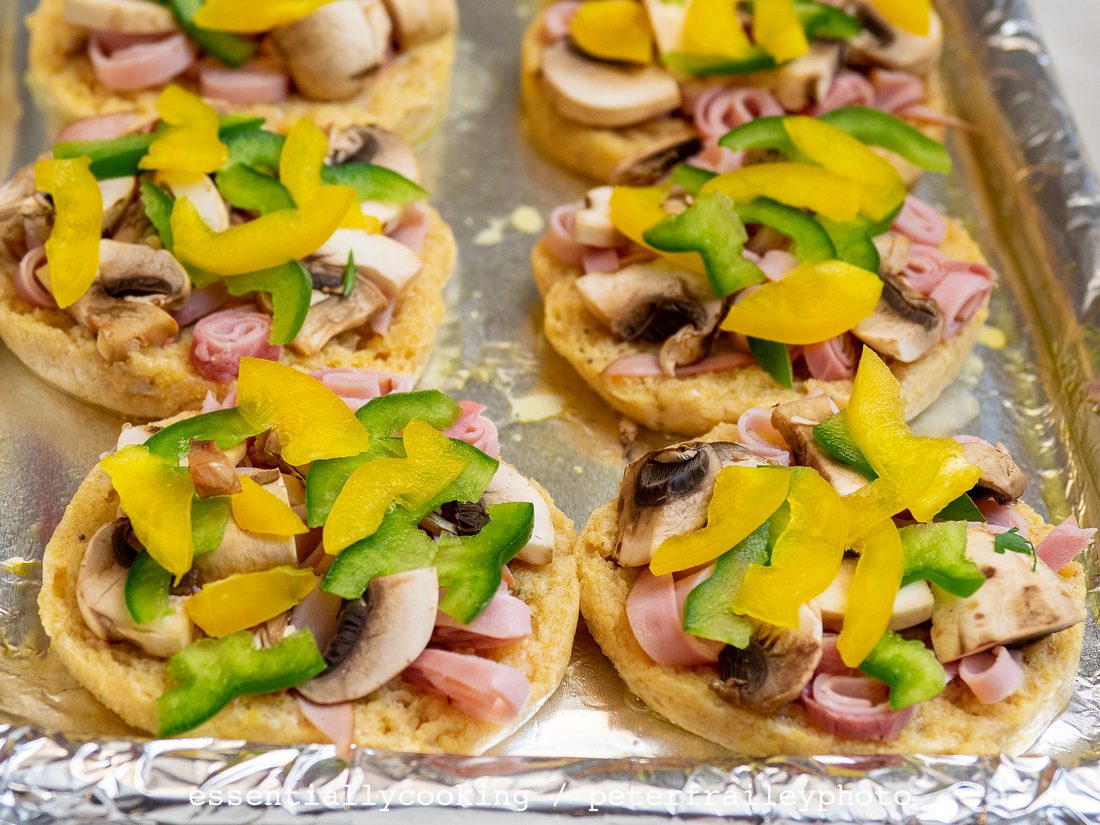
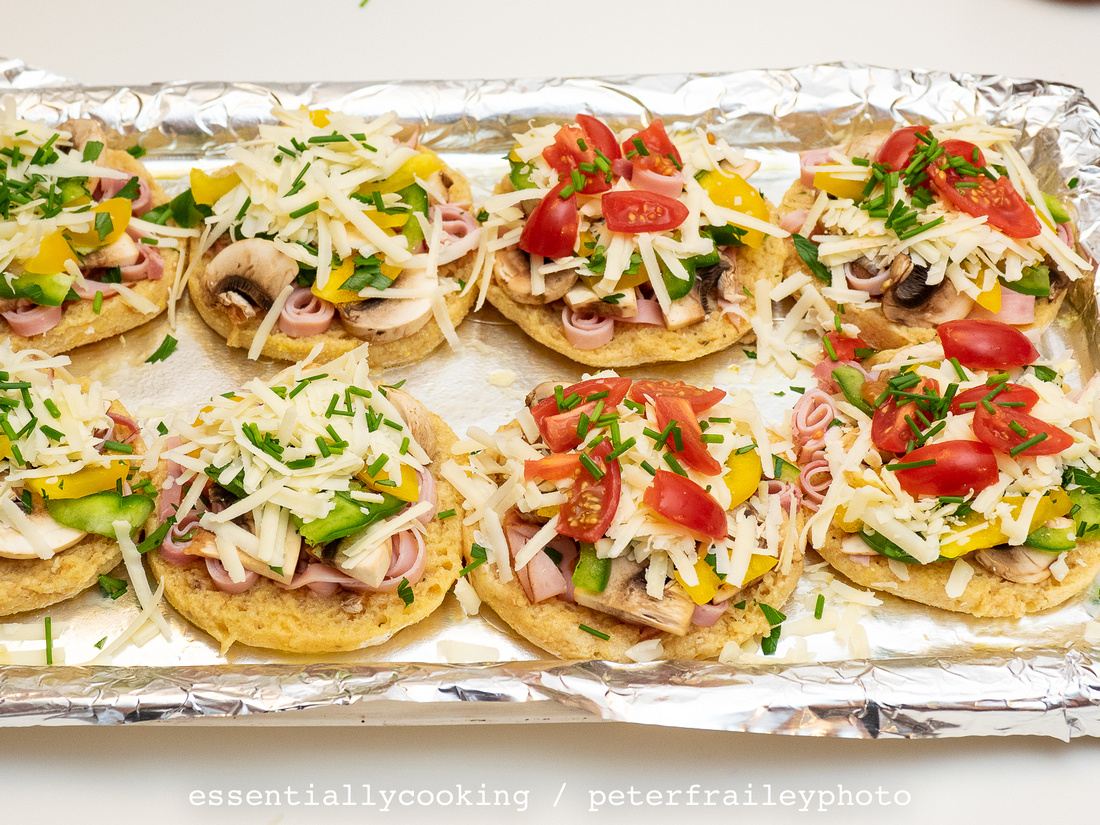
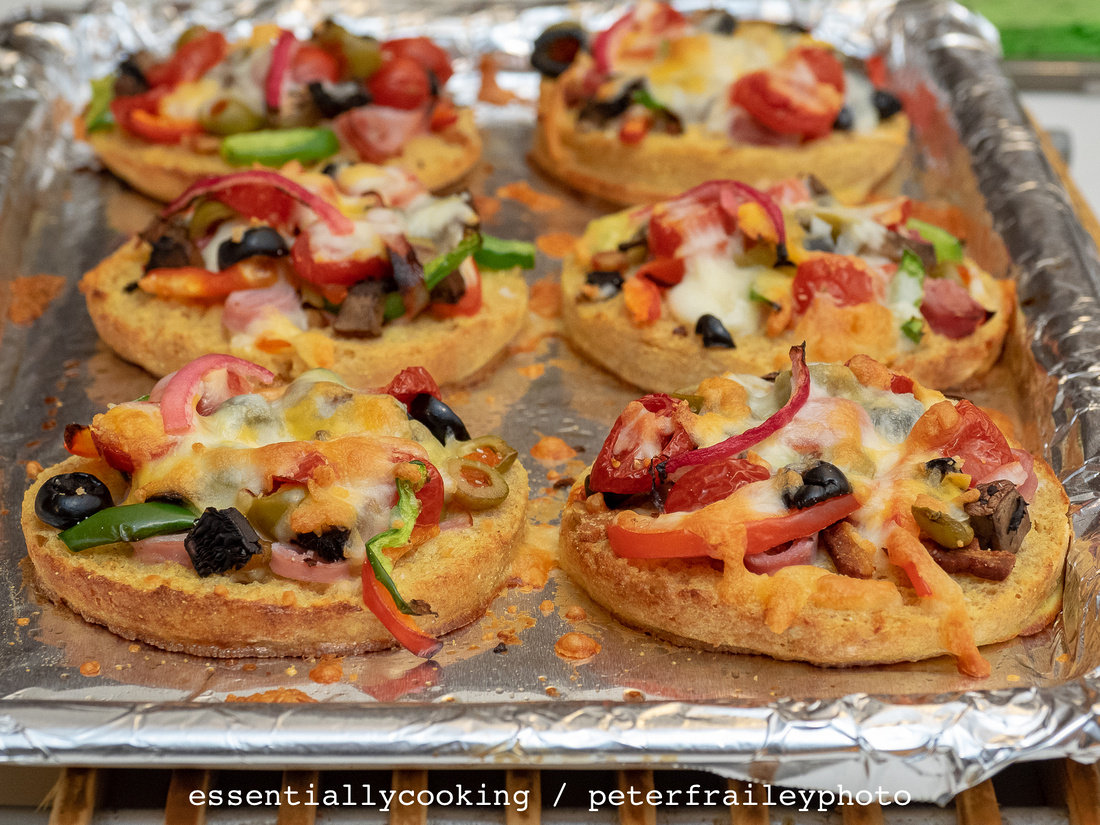
English Muffin Breakfast Pizzas
What is needed:
- 6 English muffins.
- 4 eggs
- 2 tablespoons milk
- 1/4 teaspoon salt
- 12 thin deli slices of ham prepared as indicated below
- 3/4-1 cup shredded cheddar or pepper jack cheese
- Any or all: chopped veggies such as tomatoes, onions, sliced black or green olives, mushrooms, green peppers, red peppers, mozzarella balls
What to do:
- Dredge the 12 English muffin halves through a pie plate (or similar) in which the eggs, milk and salt have been whisked together, just like you'd do with French toast. But don't make the English muffins soggy.
- Place 12 muffin halves on a baking pan lined with foil
- Place all but the cheese on top in any order you desire.
- Add the cheese.
- Bake 15 minutes at 400F.
Ideas and suggestions:
- We did not use the Tabasco sauce.
- Because the melted cheese sticks a bit to the aluminum foil even if sprayed with cooking spray, it might be helpful to use something like Reynolds Wrap non-stick foil.
- We used shredded non-fat cheddar cheese. We worried it would not melt, but it did just fine.
- Note in the photos how the ham was prepared in little curls or wheels. To look like that, each slice of ham was rolled up, then cut in 1/4" slices. (Try this technique for chief's salads too.)
- Chopped chives were sprinkled over the top of the cheese.
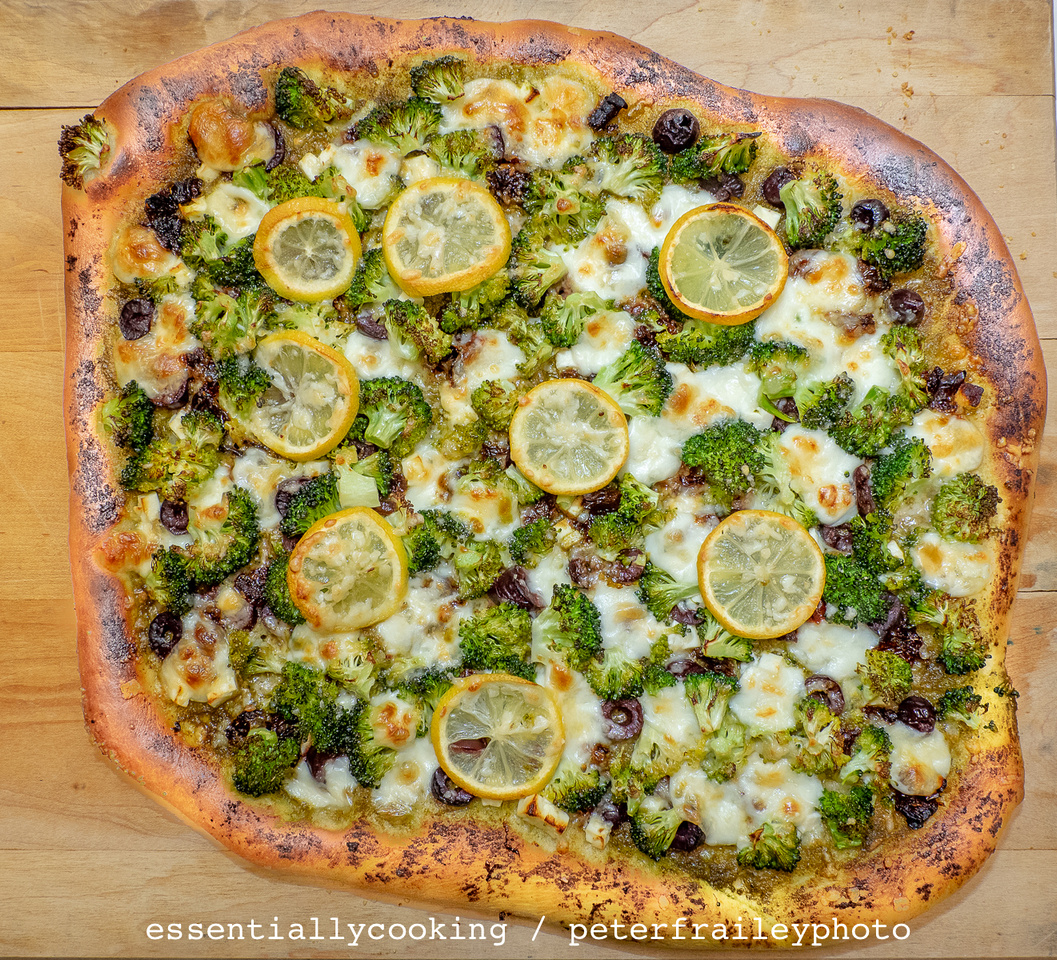
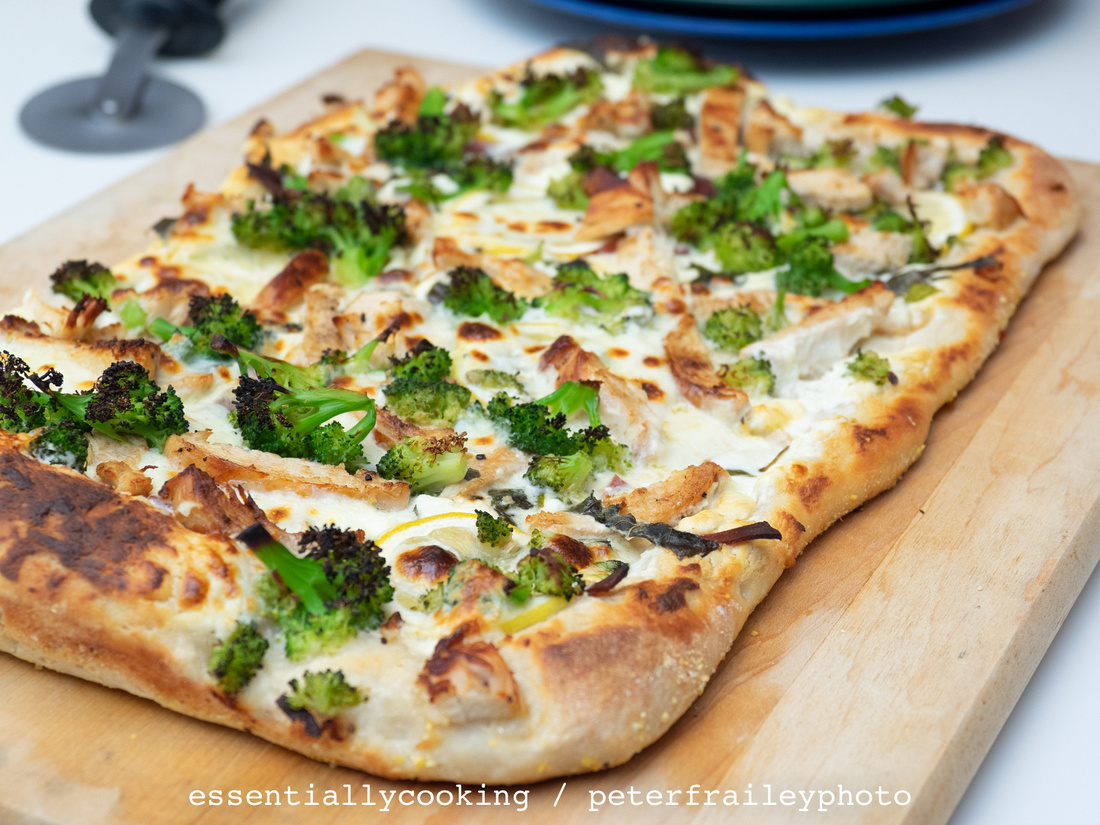
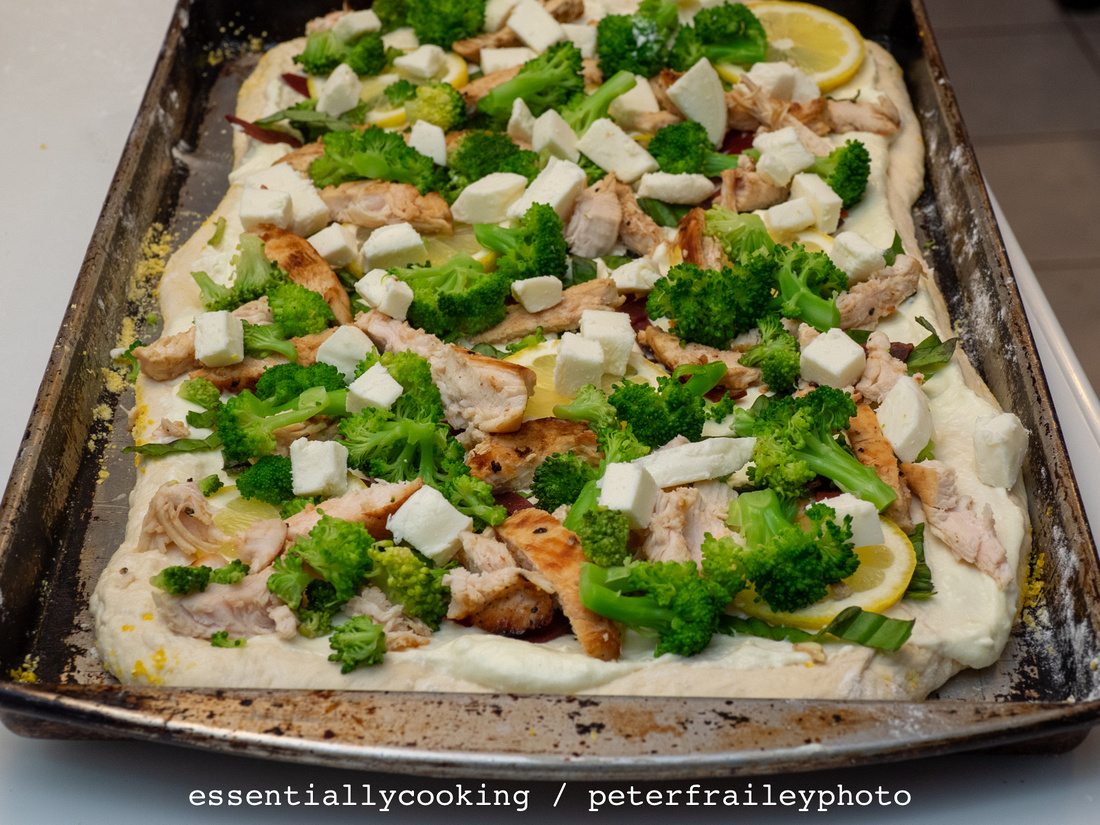
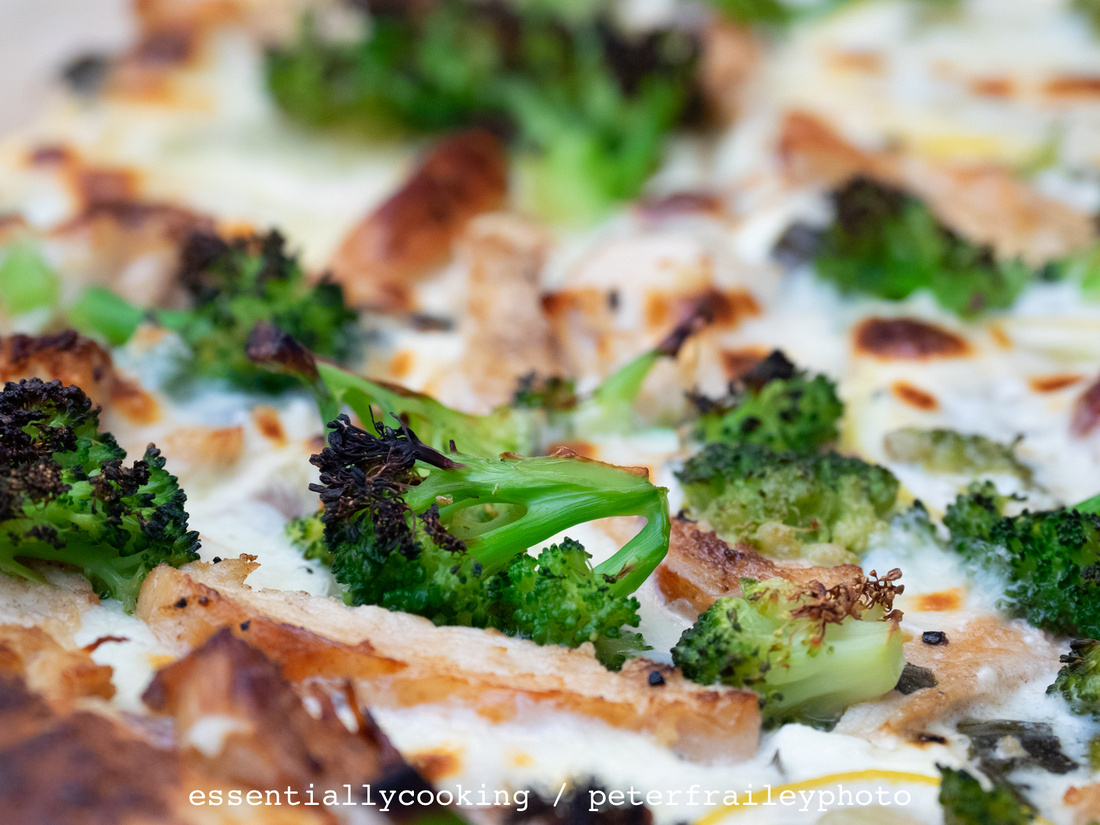
The starting point of this recipe was from halfbakedharvest at https://www.halfbakedharvest.com/whole-wheat-lemon-roasted-broccoli-pizza/. A few modifications were made of course, and they are included in the ingredient list below.
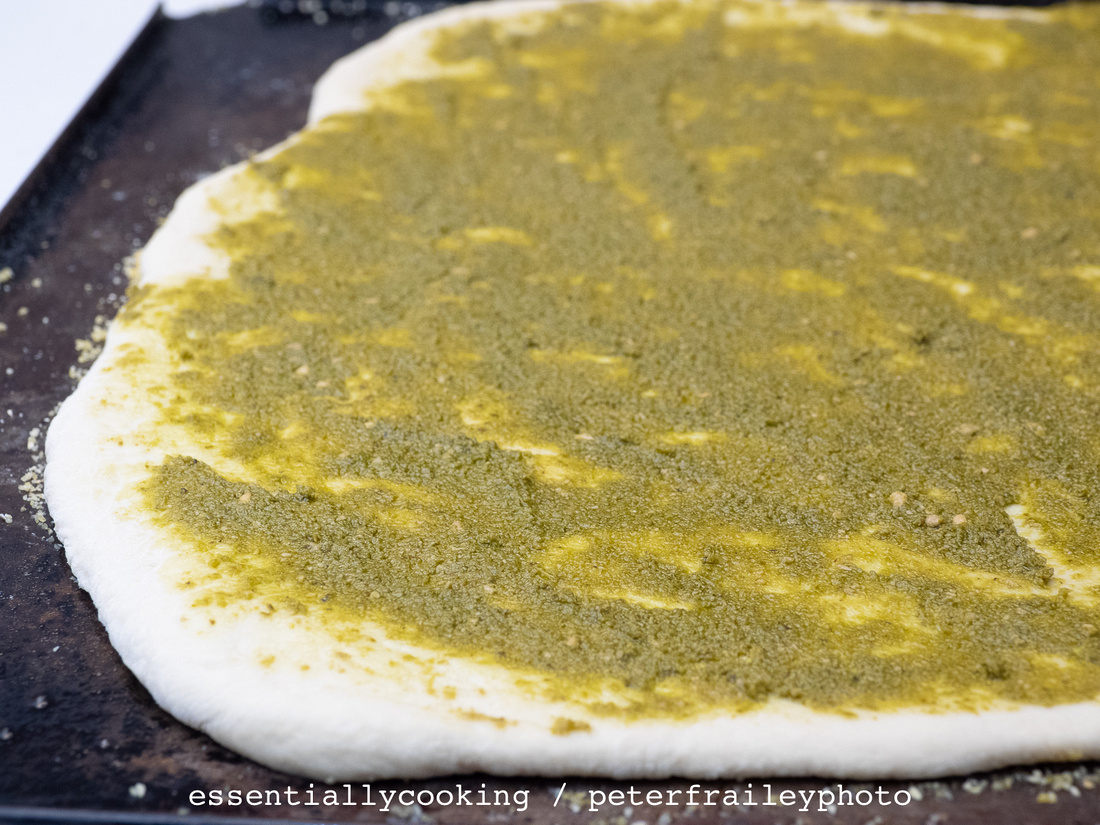
Spread pesto on dough

Sun dried tomatoes
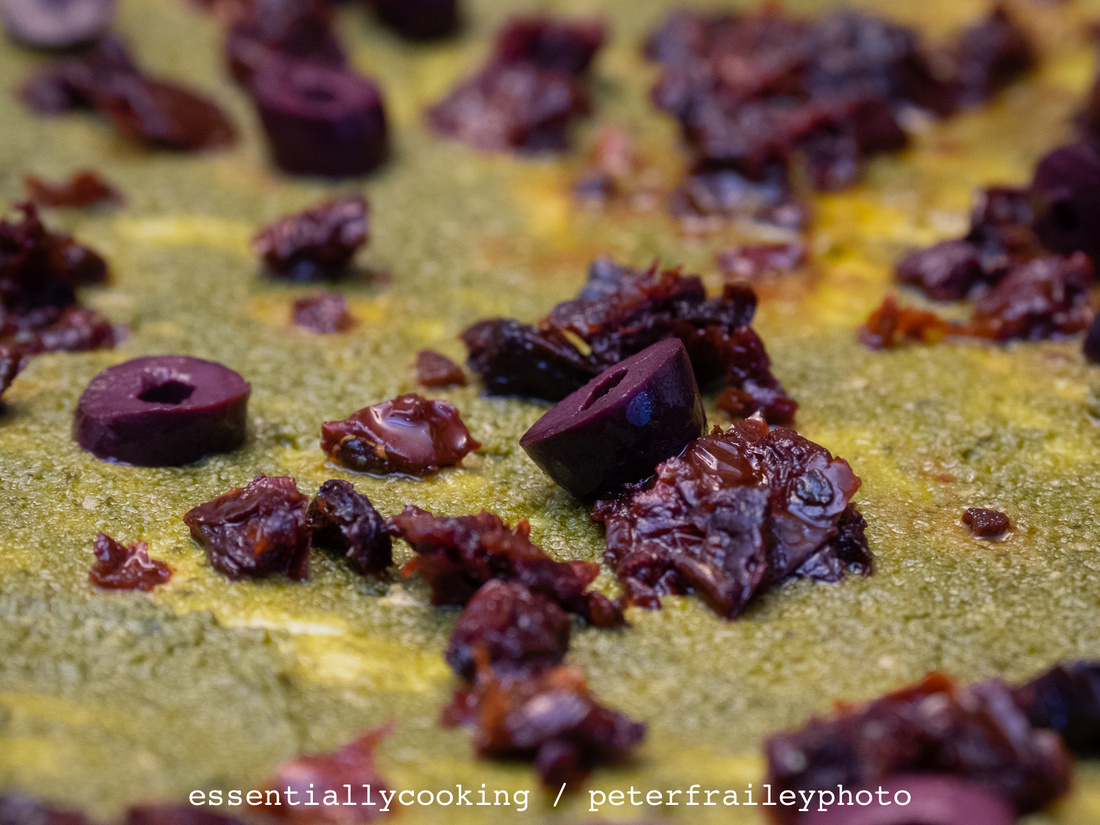
Kalamata Olives added
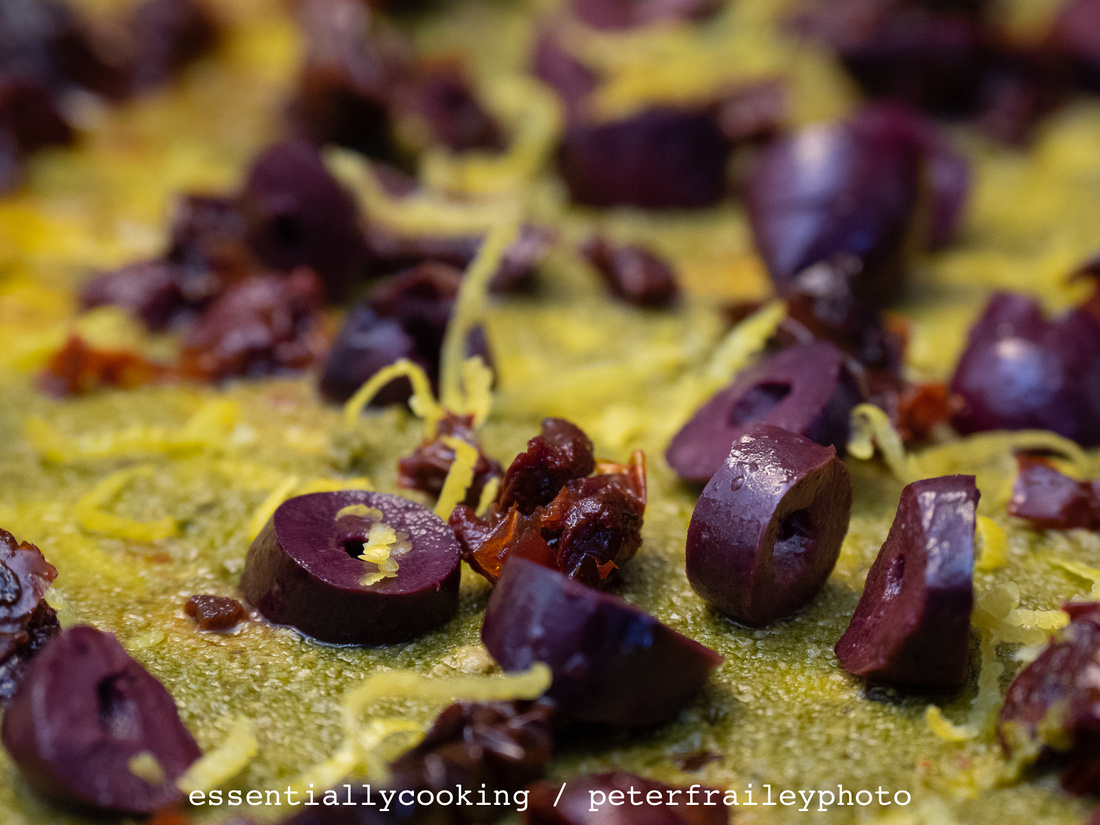
Zest of lemon sprinked all over
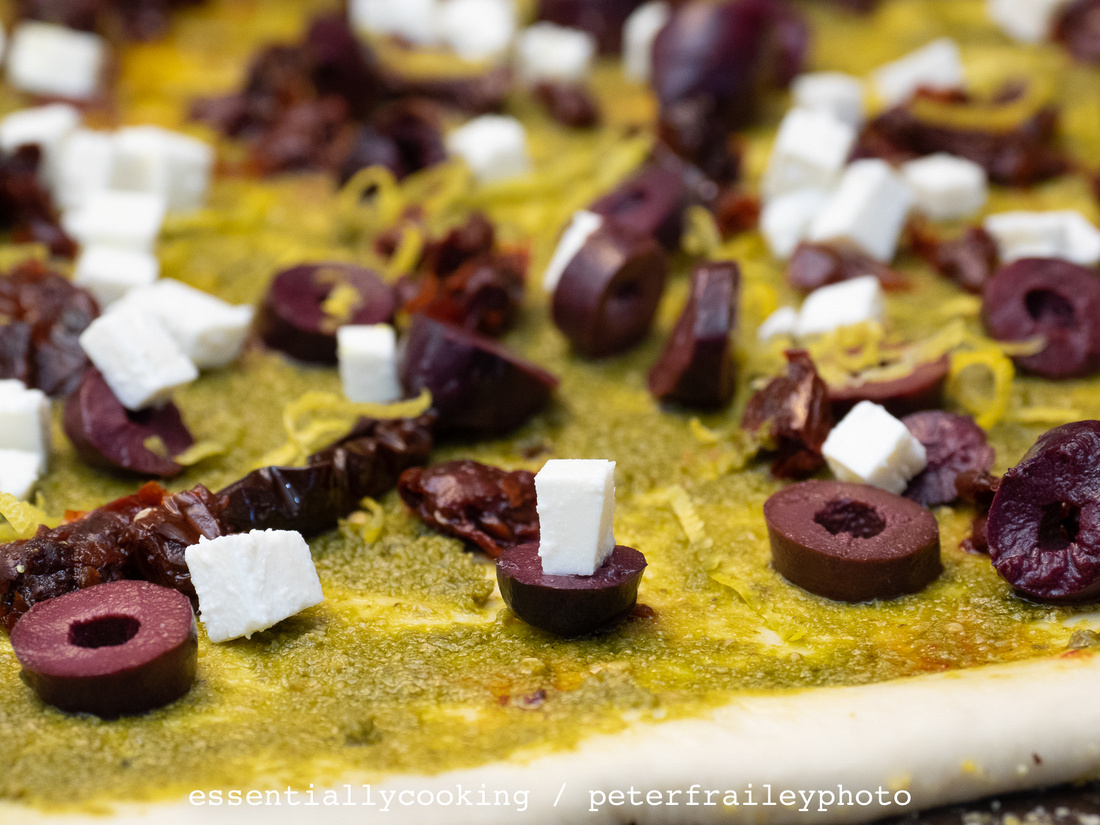
Chunks of feta cheese
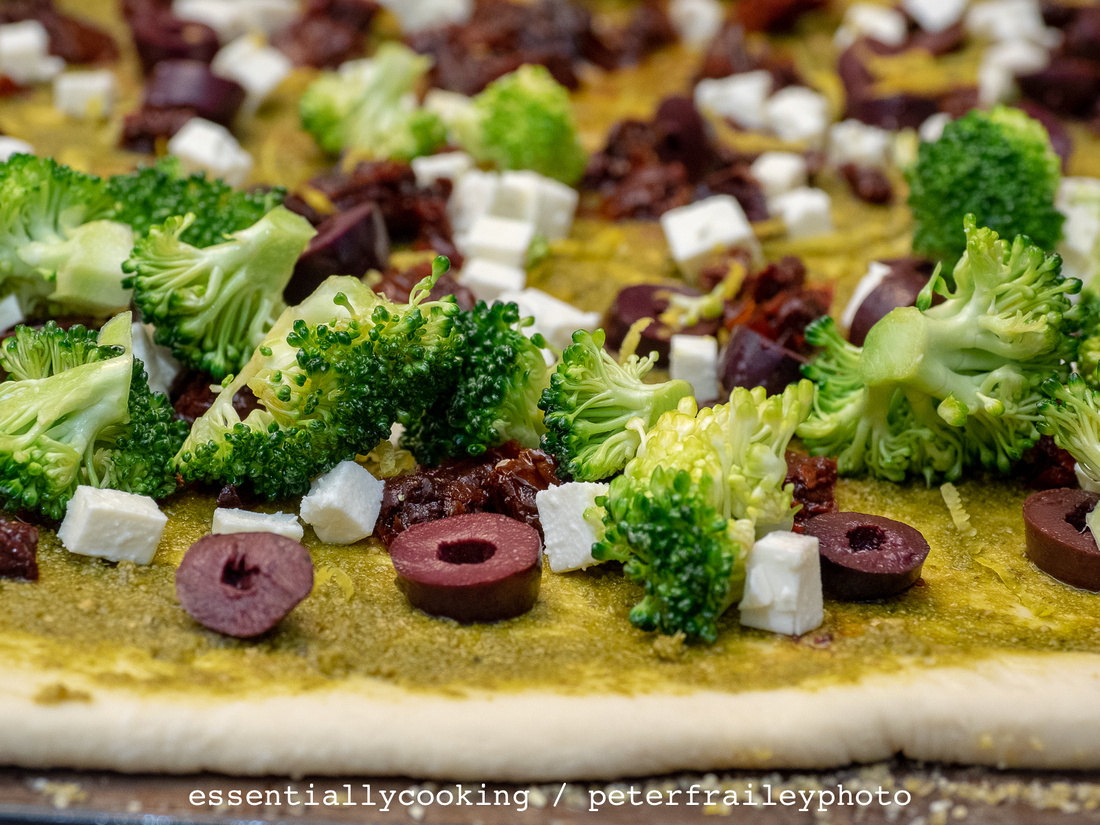
Broccoli
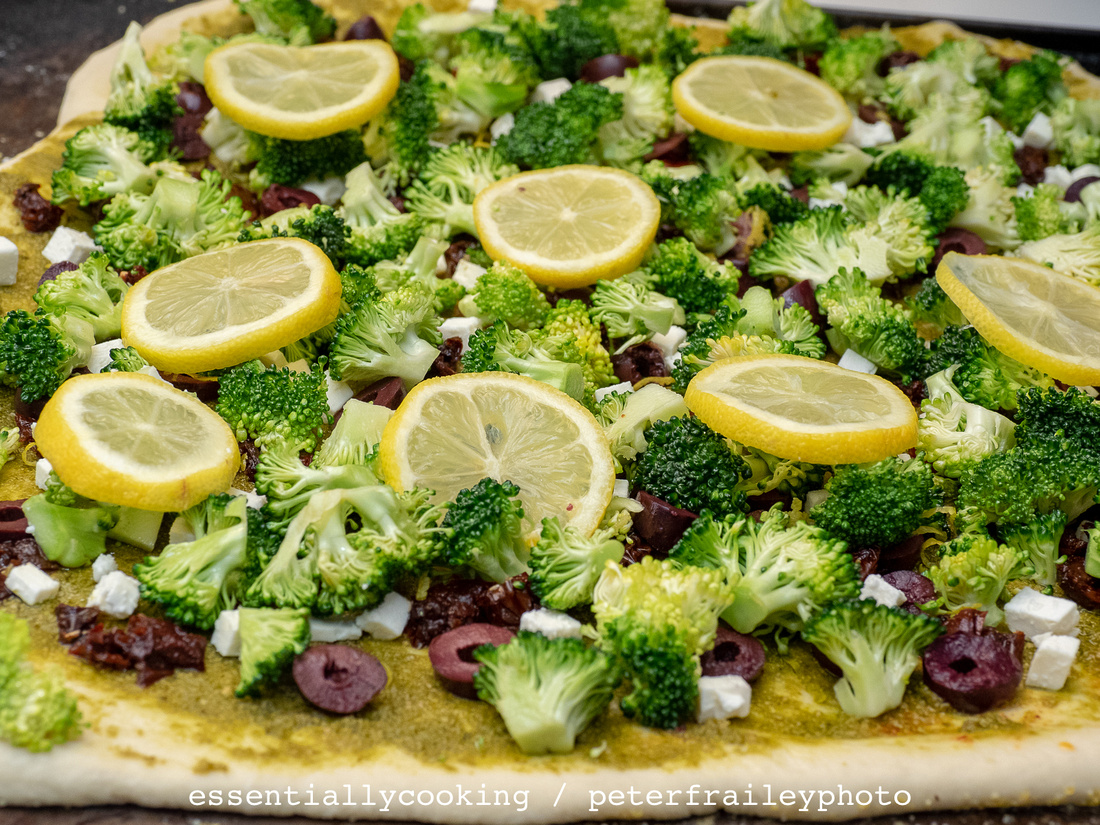 Lemon slices (you can eat them, but I remove before eating)
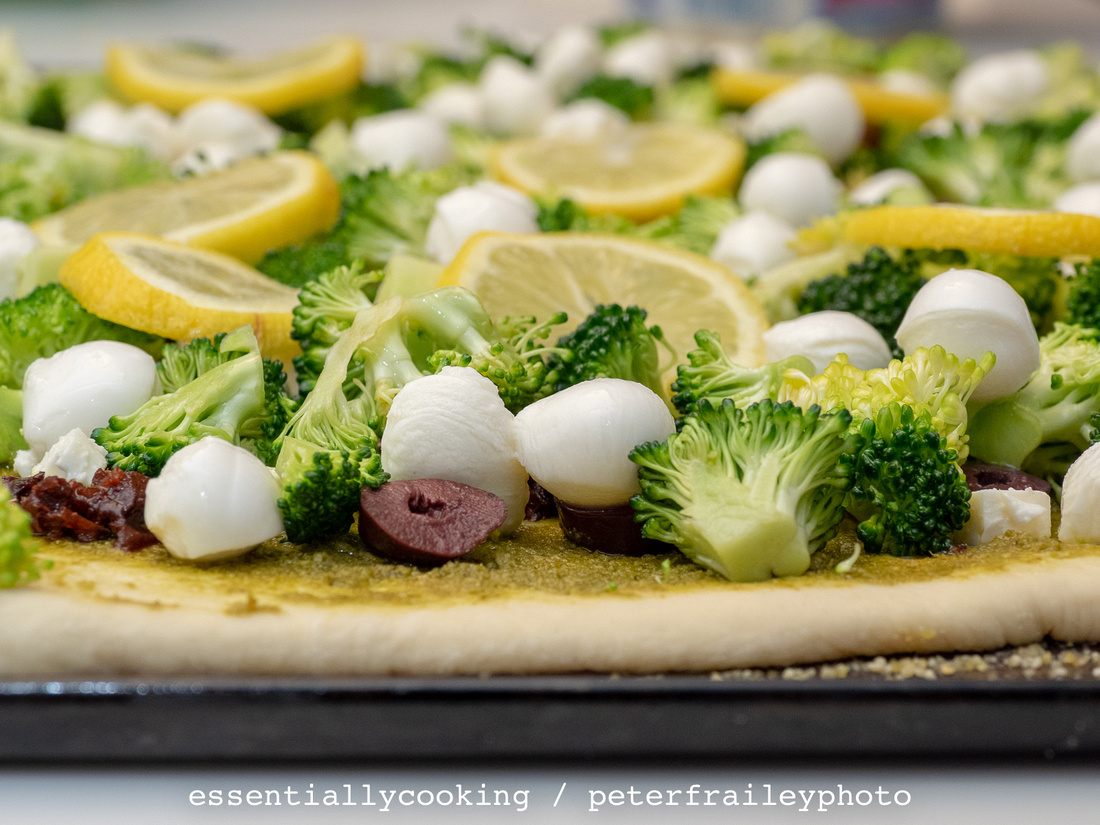 Mozzarella pearls
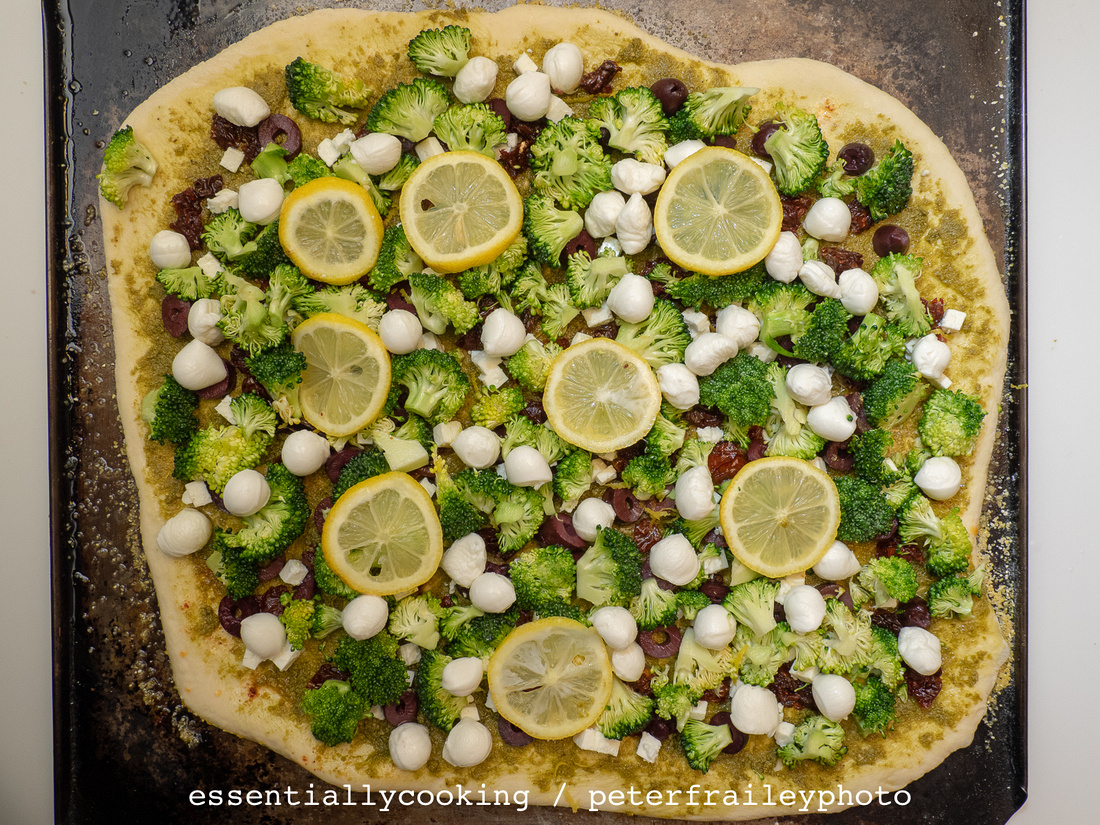
Everything so far
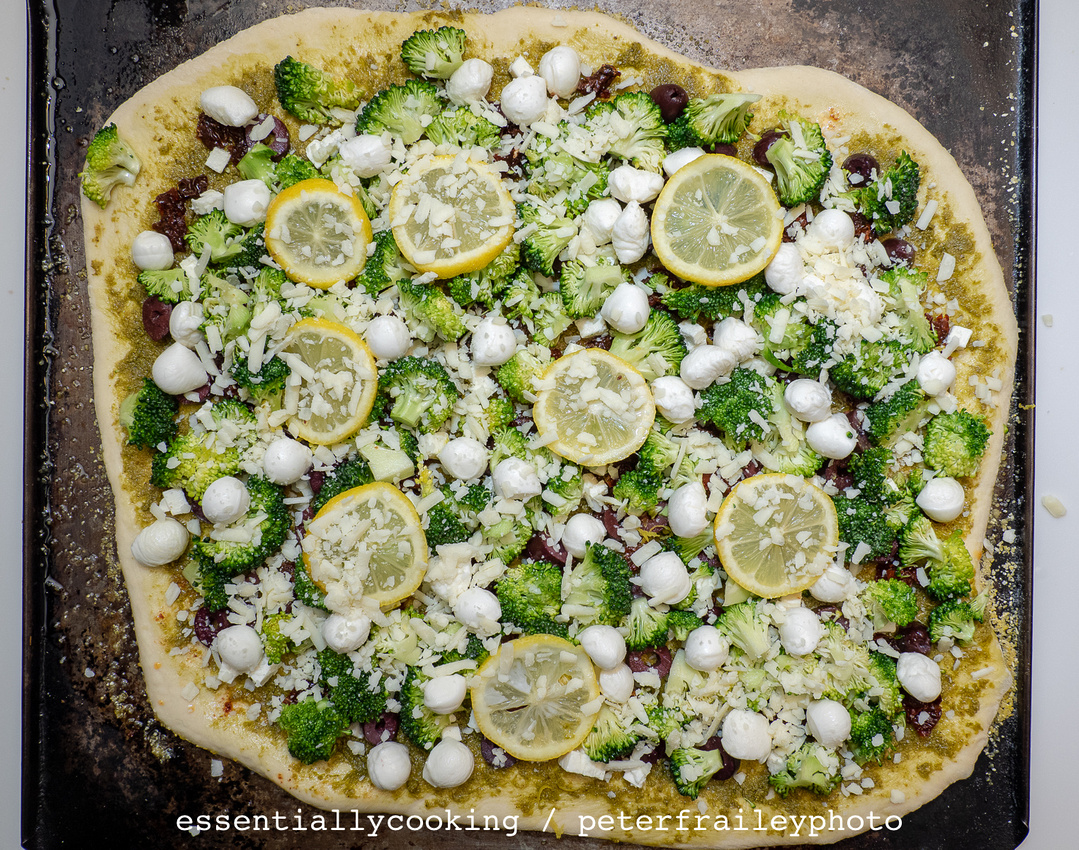
Sprinkled grated cheddar cheese
Out of the oven... though slightly overcooked (new oven!)
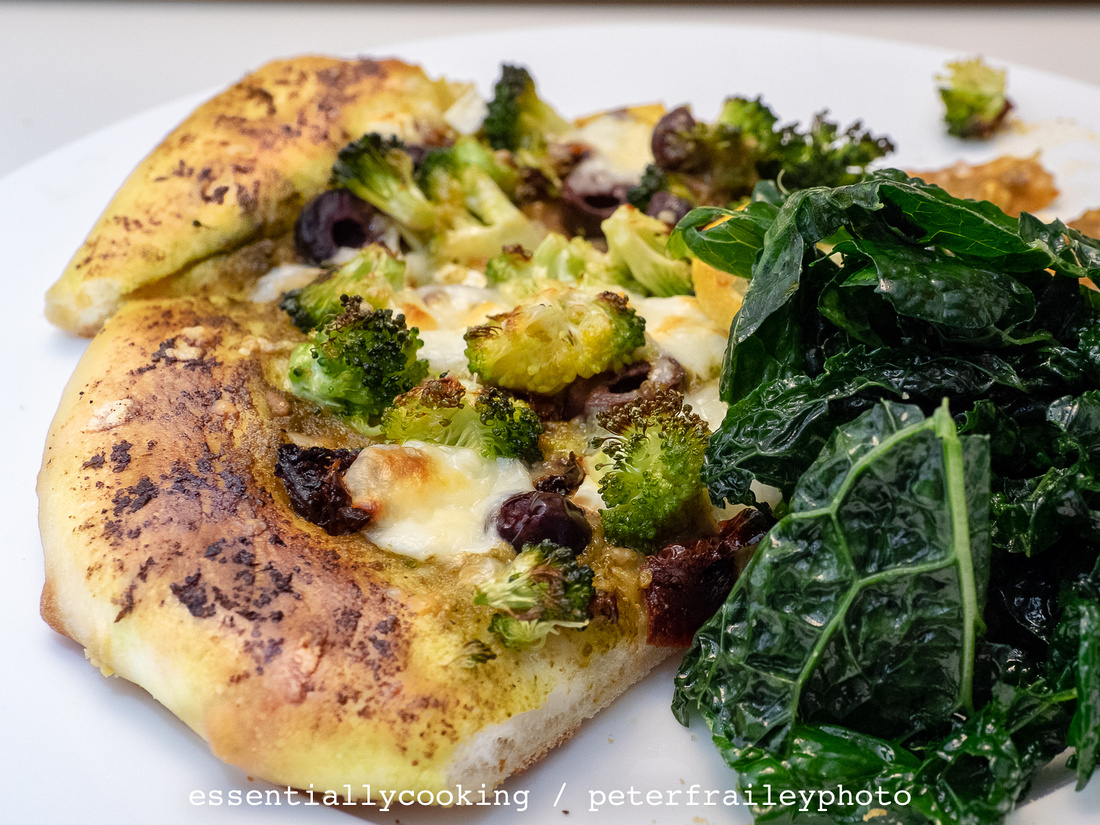
Two slices served with a kale salad
Ingredients Used:
- 1 pound pizza dough
- ¼ cup basil pesto
- ¼ cup oil-packed sun-dried tomatoes, chopped
- ¼ cup pitted kalamata olives, chopped
- zest of 1/2 lemon
- 2 cups broccoli florets, roughly chopped
- 8 ounces fresh mozzarella “pearls”
- ¼ cup diced feta cheese
- 1/2 of a Meyer lemon, thinly sliced
- Shredded cheddar cheese
- Cornmeal to spread under the dough
Directions:
- Preheat oven to 425° F. Grease a baking sheet with olive oil.
- On a lightly floured surface, push/roll the dough out to desired thickness. For thin pizza, divide the dough into two.
- Sprinkle some cornmeal on the baking sheet.
- Transfer the rolled-out dough to the baking sheet.
- Spread the pesto over the dough.
- Add the sun-dried tomatoes, olives, and lemon zest.
- Add the diced feta cheese.
- Pour 1 tablespoon of oil from the sun-dried tomatoes over the broccoli.
- Add the broccoli
- Add mozzarella pearls.
- Top with lemon slices.
- Finish with shredded cheddar cheese.
- Bake 10-15 minutes or until the crust is crisp and the cheese has melted.
]]>
It was terrific for dinner and a hit for breakfast,... but how could anyone expect otherwise? It combines basic good food: eggs, sausage and/or bacon or ham, hash browns, and cheese all in one casserole dish. And include some onion, tomatoes, and bell peppers for veggies, and you've rounded out the food groups.
Bake it all in a 8 x 12” pan (we used glass) and you’re good to go. The recipe started with what's at https://cafedelites.com/breakfast-casserole/and Laurie made a few modifications (see notes and modifications below the directions).
[*We gave this recipe 4 out of 5 stars. Maybe if we try it next time with the hollandaise sauce option, it will get a 5. But 4 is plenty. It means in our minds that the recipe is good enough to cook and enjoy again.]
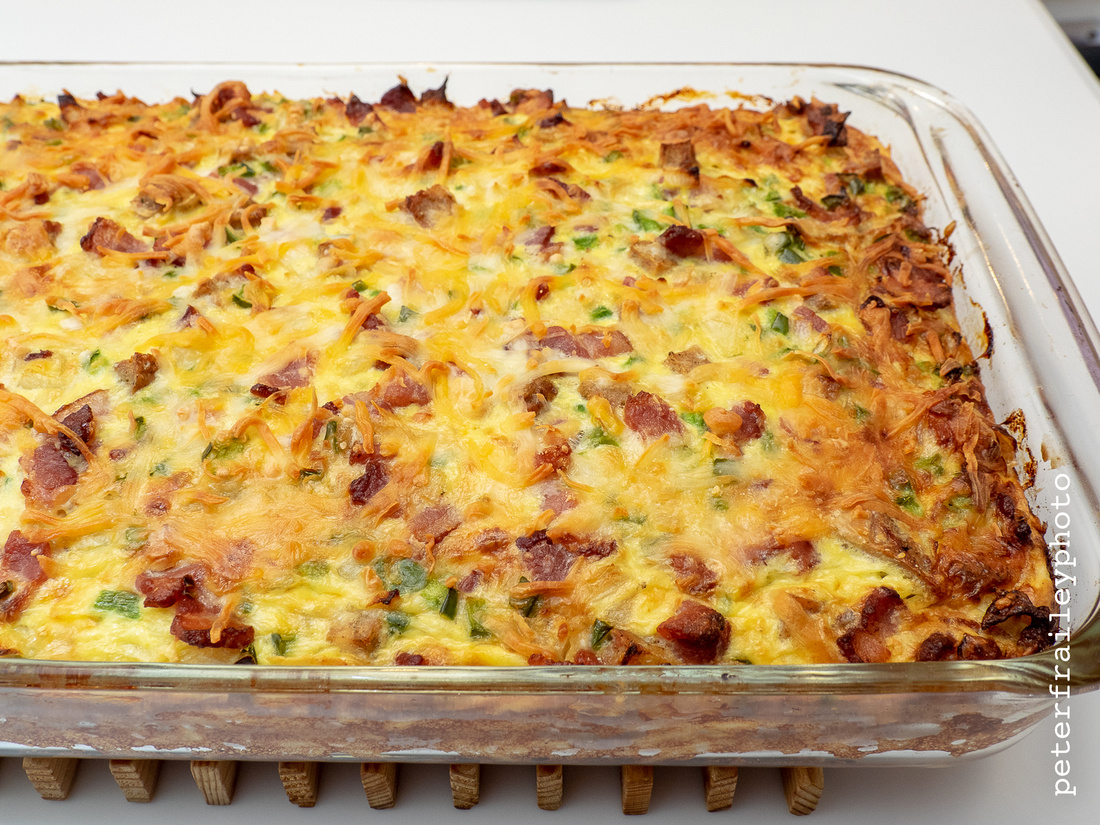
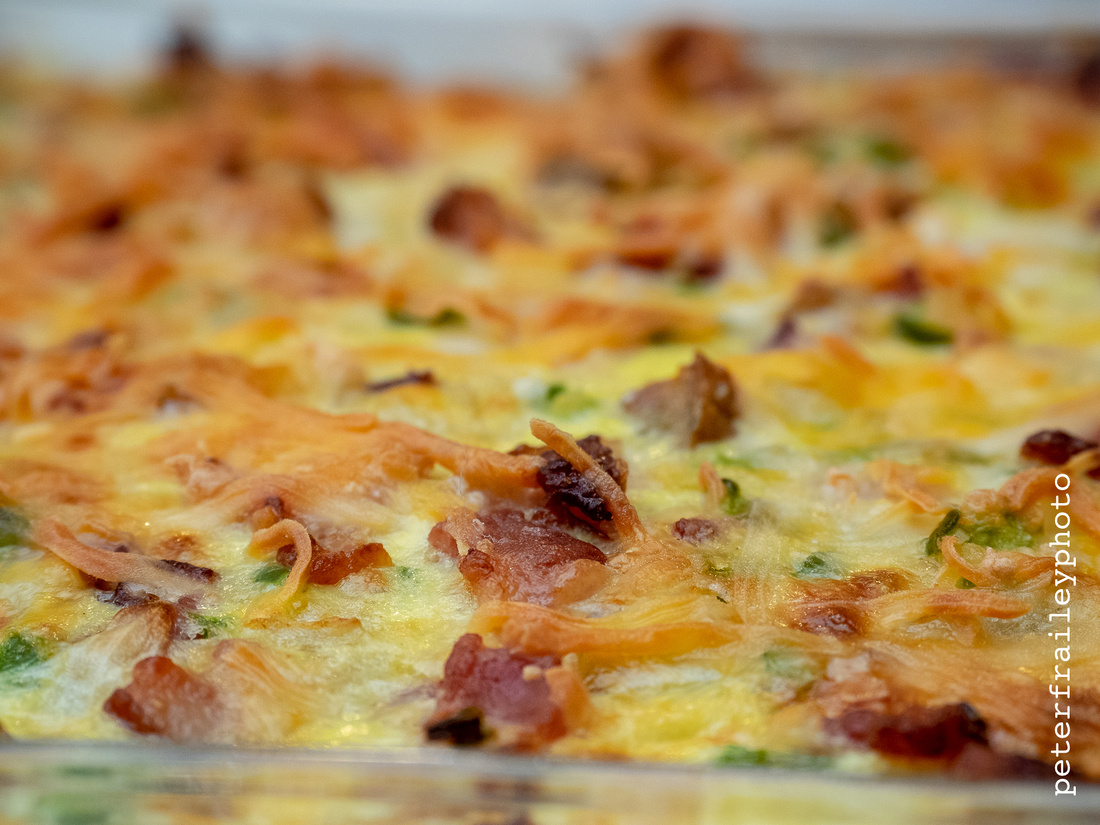
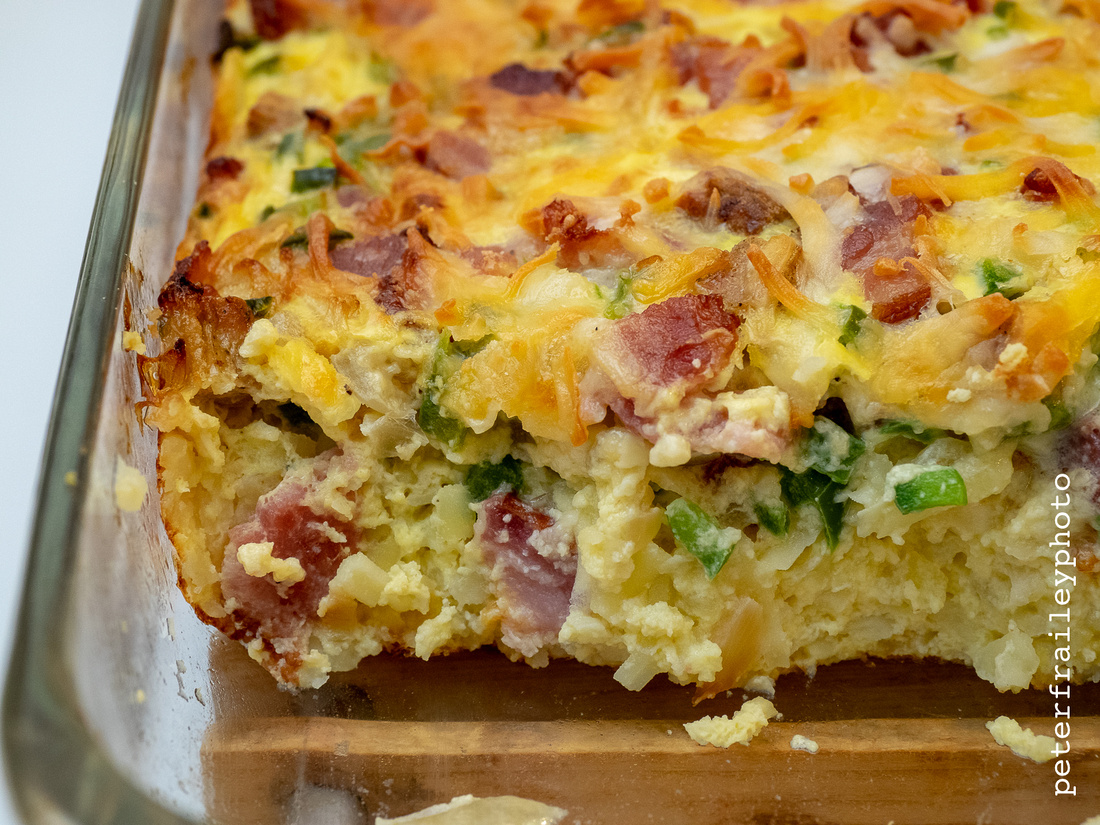
Ingredients:
- 1 pound diced bacon or ham, chopped (or uncooked sausages, casings removed)
- 10 large eggs
- 1 cup milk (half and half or heavy cream)
- 1/2 cup heavy cream (or thickened cream)
- 1 teaspoon garlic powder
- Salt to season
- Fresh cracked black pepper
- 2 Roma tomatoes seeded and chopped
- 1 onion diced
- 1 green bell pepper seeded and chopped
- 1 cup shredded cheddar cheese
- 28 oz shredded hash browns, frozen
- 1/2 cup shredded mozzarella cheese
Directions:
- Preheat oven to 350°F. Lightly grease an 8x12-inch baking dish.
- Cook the diced bacon and/or ham, or crumbled sausage meat in a non-stick skillet until crispy and browned.
- Add the onion and cook until soft and approaching translucent.
- In a large bowl use a whisk to combine together eggs, milk, cream and garlic powder. Season with salt and pepper. Mix in the bacon (or ham or sausage) and onion mixture, tomatoes, bell peppers and cheddar cheese.
- Add a layer of hash browns to the base of the dish.
- Pour the egg mixture over the hash browns.
- Top with the mozzarella.
- Bake until eggs are cooked through (ovens will vary, but likely to be 45 to 50 minutes).
- If desired (we did not do this) add hollandaise sauce. Here's a simple recipe, also from cafe delites: https://cafedelites.com/hollandaise-sauce/
Notes and Modifications from Laurie:
- I used 1¼ c. EggBeaters + 5 eggs instead of 10 eggs.
- For Peter, I left out the tomatoes.
- Since I didn’t have a whole bag of frozen hash browns available — 21 oz. instead of 28 oz. — in the interest of not having MORE leftover frozen hash browns were I to have bought more, I made do with 21 oz. It was fine!
 As served for dinner, with some frozen veggies from Trader Joe and a dinner roll.
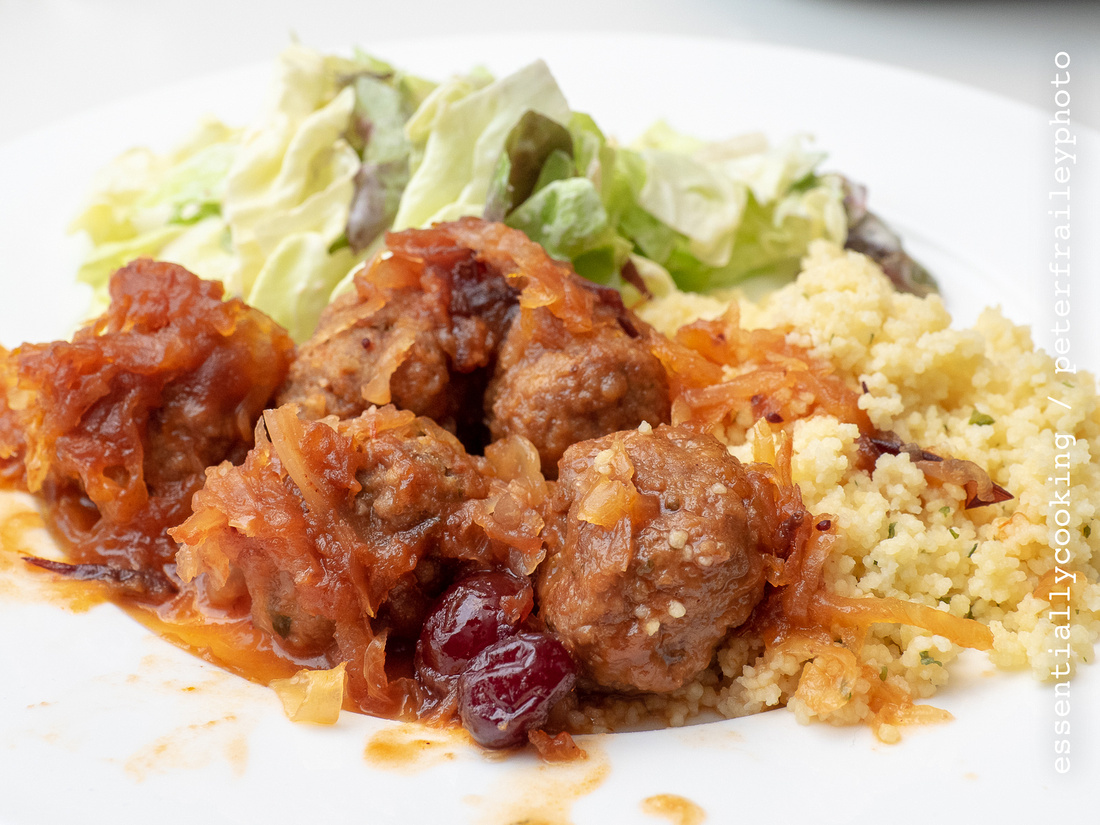
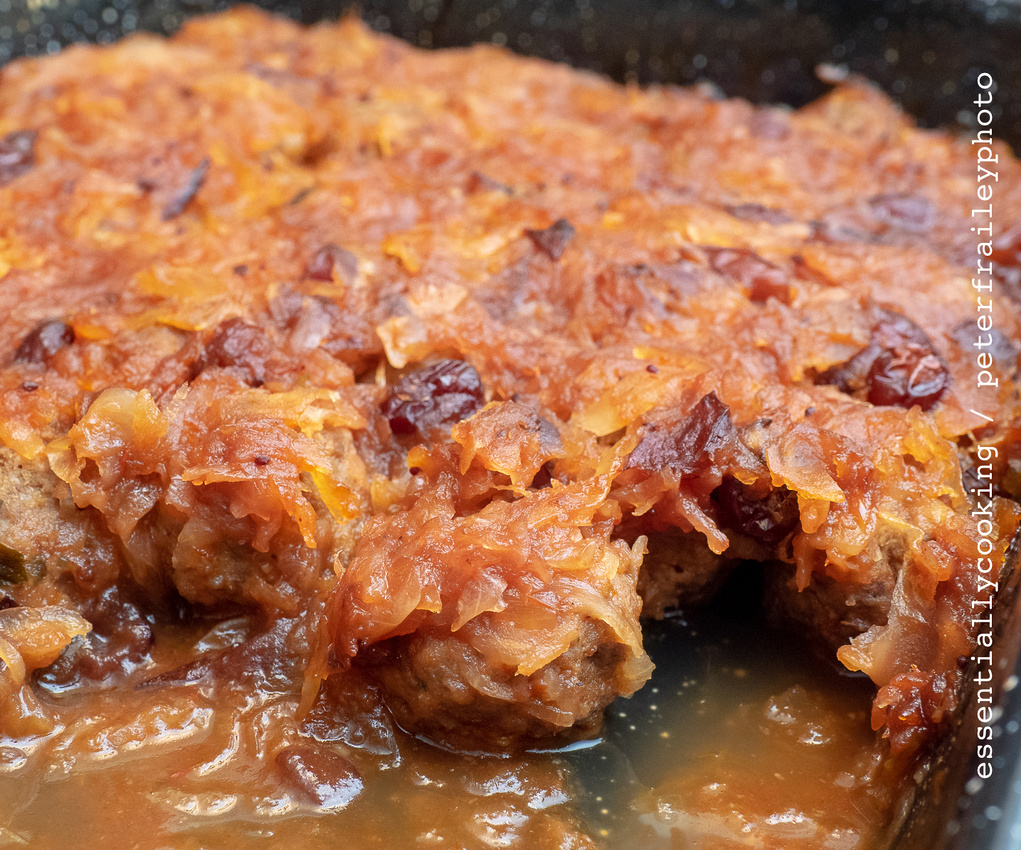
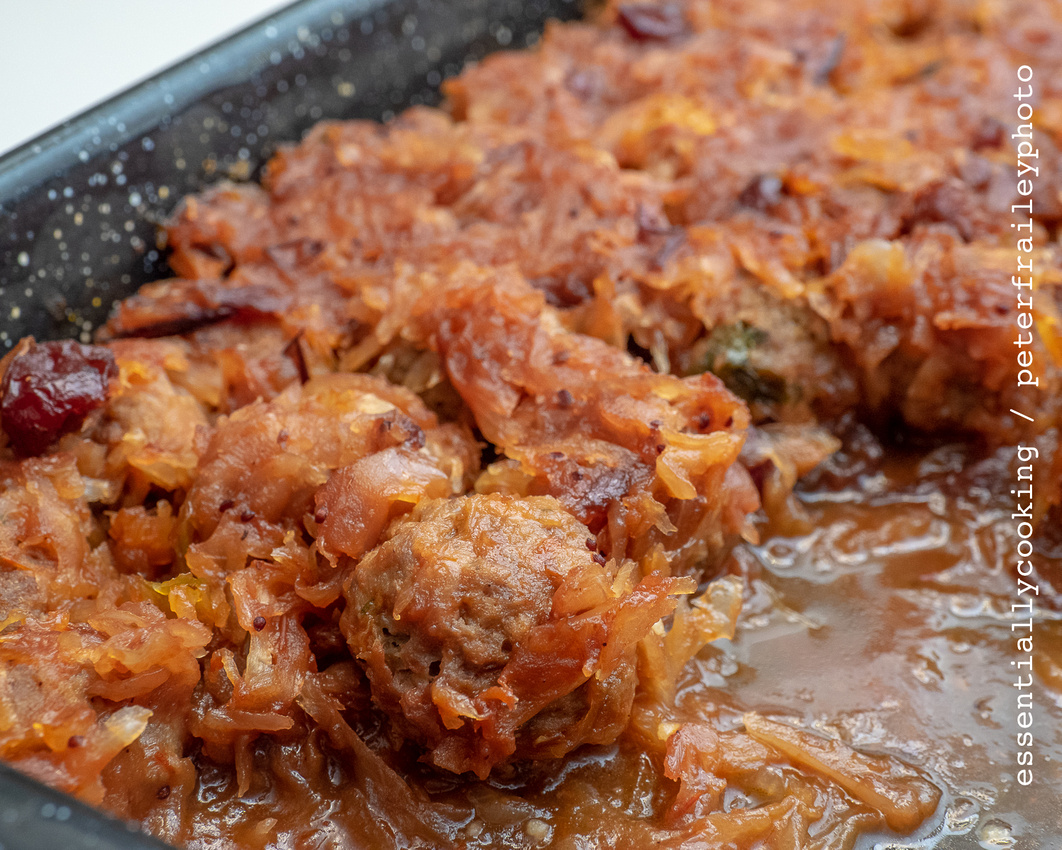
I’d like to link to the page where Laurie found the recipe several years ago on www.laalosh.com, but the blog post there seems to have been deleted. Using Google I did find some other recipes with for "Cranberry Meatballs", but none have this combination of ingredients.
Ingredients:
- 2 large eggs, beaten
- 1 cup breadcrumbs
- 1 lb lean ground beef
- 1 lb ground turkey
- 1 tsp salt
- 1 can whole berry cranberry sauce
- 1 can (14 oz) sauerkraut, rinsed and well drained
- 1/2 cup sweet chilli sauce
- 1 1/4 cups water
What to do:
1. Preheat the oven to 350°F and lightly grease a baking dish. (See notes below)
2. In a large bowl, mix together the eggs, breadcrumbs, beef, turkey and salt. Mix until well combined.
3. Form the meat mixture into balls about 1 inch in diameter.
4. Arrange the meatballs in the prepared baking dish.
5. In a large saucepan, combine the cranberries, sauerkraut, chili sauce and water.
6. Bring to a boil and then remove from the heat.
7. Stir until the sauce is well combined.
8. Pour the sauce over the meatballs.
9. Bake the meatballs, covered (aluminum foil), for 1 hour.
10. Bake for an additional 20 minutes uncovered. Sauce should be thickened.
11. Serve hot.
Notes:
Made 60 1" meatballs. Created 10 x 6 grid in a 9" x 13" black enamel speckled baking pan.
]]>
What you need:
- 1 T. olive oil
- 3 mild Italian sausages (about 2/3 lb.)
- 1 lb. lean ground beef
- 1 large onion, finely chopped
- 1 small fennel bulb, cored and finely chopped
- 2 large garlic cloves, minced
- 2 tsp. ground cumin
- 1 tsp. dried oregano
- ½ tsp. chili powder
- ½ to 1 tsp. Montréal steak seasoning
- ½ tsp. freshly ground black pepper
- 1 cup stock, beef or chicken
- 8 oz. beer, preferably Peak Organic Brewing Co.’s Maple Collaboration
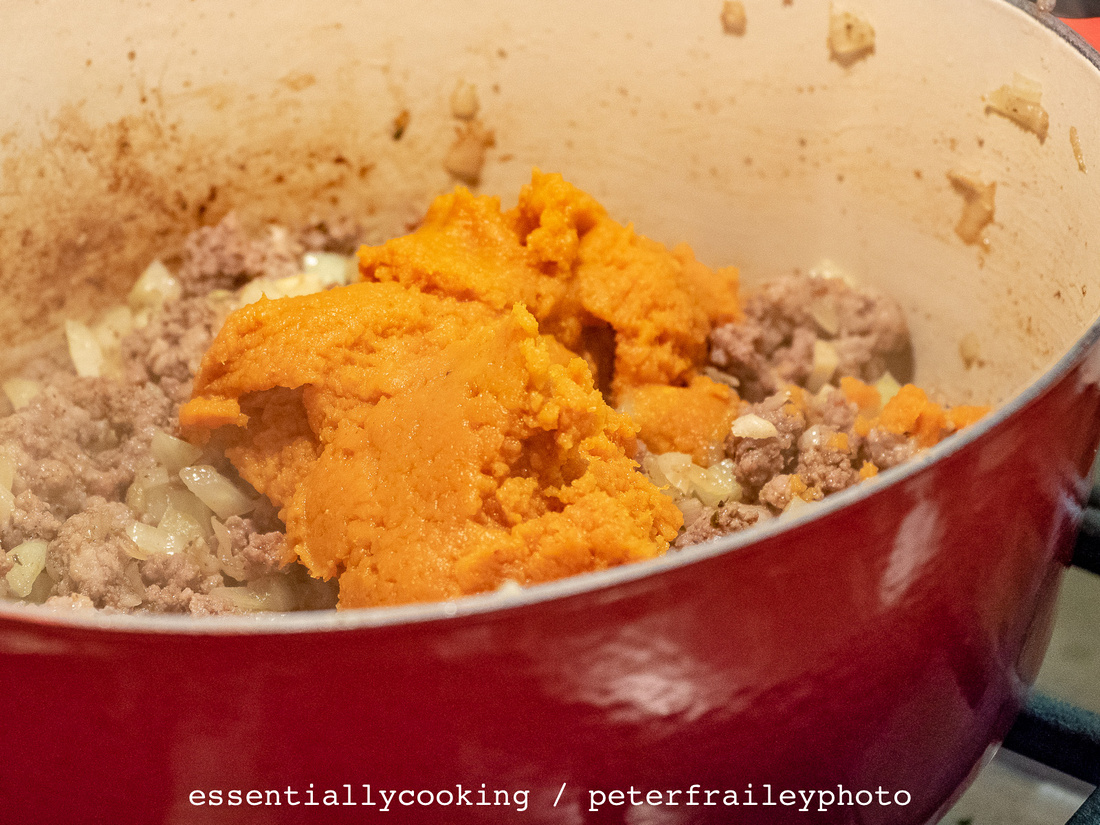
- 1 cup pure pumpkin purée
- 1 can (14 ounces) crushed tomatoes
- 1 can (14 ounces) kidney beans, drained and rinsed
- 2 T. pure maple syrup
- 1 ½ teaspoons Kosher salt
Topping options:
- Baby spinach leaves (Laurie loves adding spinach to many (most?) recipes)
- Avocado
- Sour cream or nonfat plain Greek yogurt
- Cilantro
Three of my favorite ingredients:
Critical ingredient: pumpkin puree
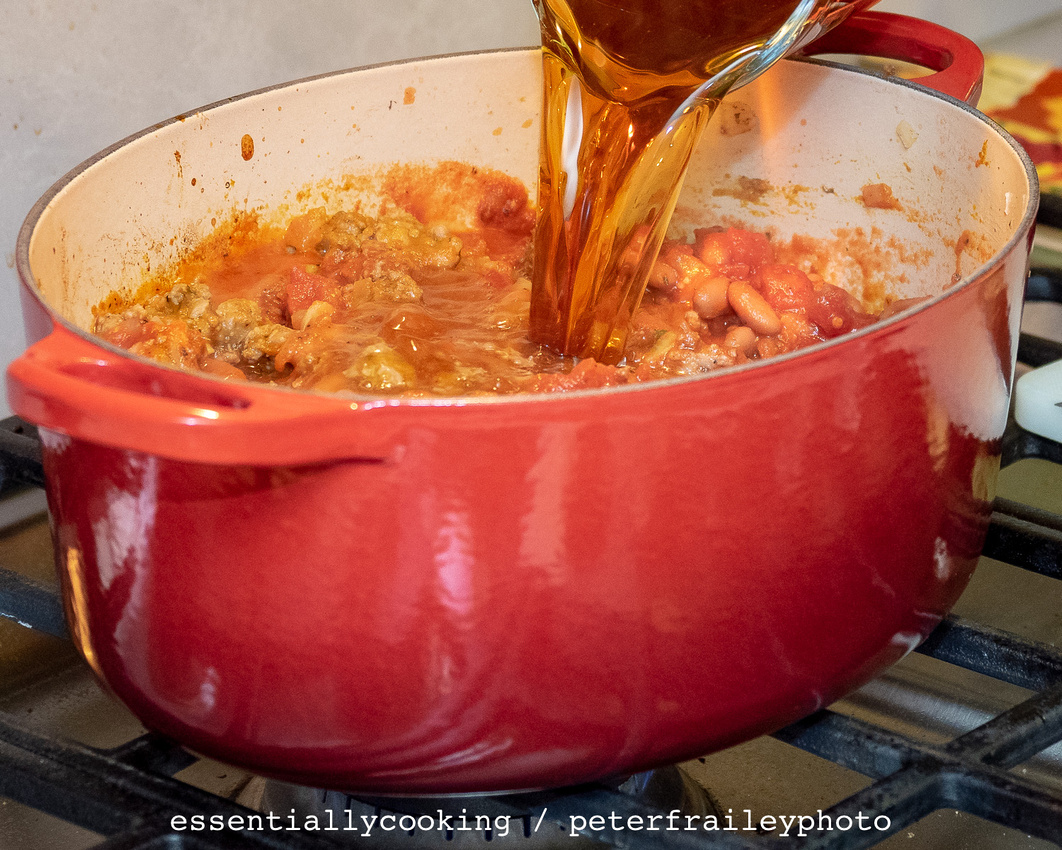
Critical ingredient: Beer
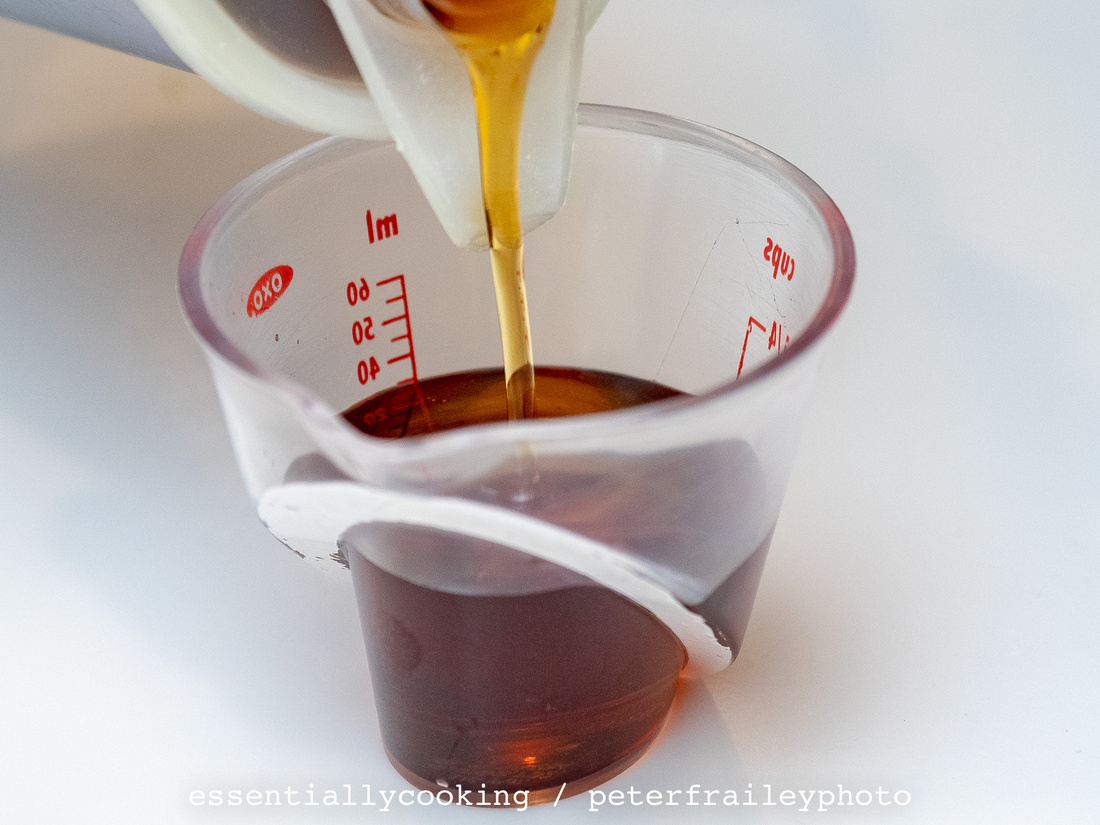
Critical ingredient: maple syrup
What to do:
1. Heat olive oil over medium-high heat in a large, heavy pot like the enamel lined cast iron pot shown above.
2. Slit sausage casings and remove the filling. Discard the casings. Add sausage meat and ground beef to the pot. Cook the meats until they are lightly browned, about 5 minutes, using a wooden spoon to break up the ground meats into smaller pieces.
3. Stir in onion and fennel; cook for 2 minutes.
4. Add garlic, cumin, oregano, chili powder, Montréal steak seasoning, and black pepper; stir to combine.
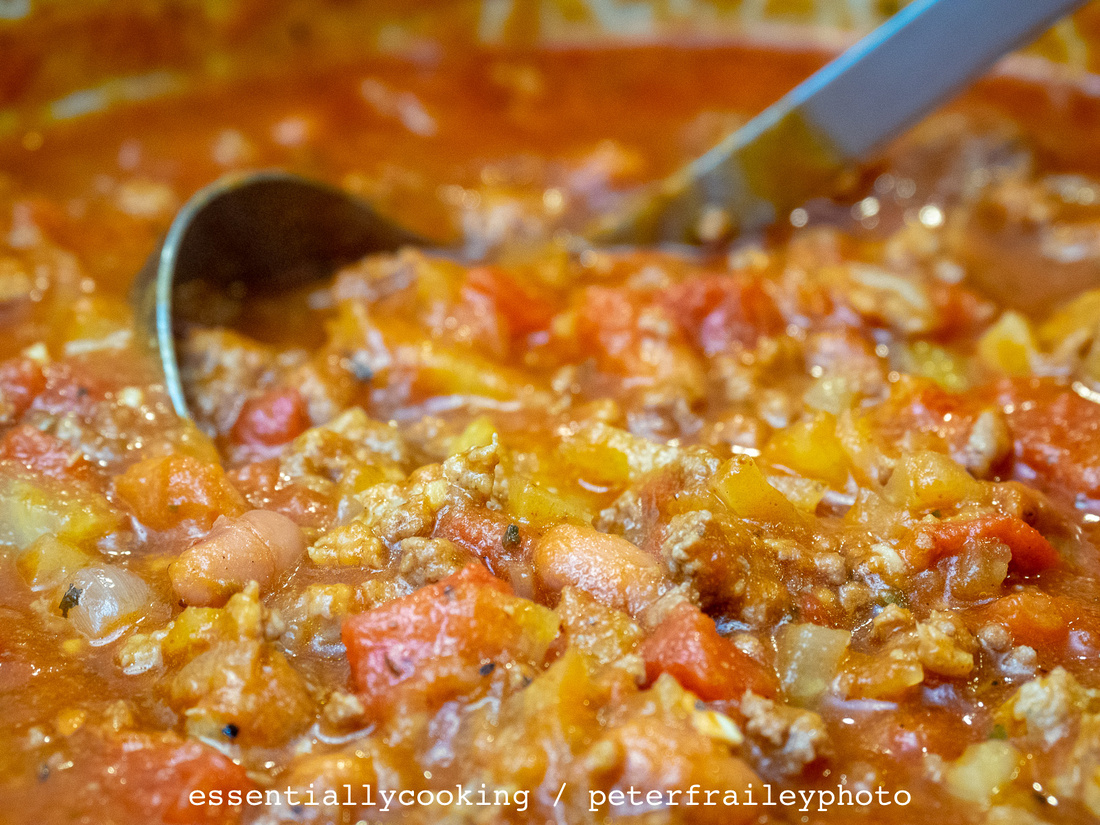
5. Add stock, beer, pumpkin purée, tomatoes, kidney beans, and maple syrup. Stir well as you bring the chili up to a low boil.
6. Simmer for 1 hour over low heat, stirring occasionally. Season with salt.
7.Serve with toppings such as avocado, nonfat plain Greek yogurt, sour cream, cilantro, and/or salsa.
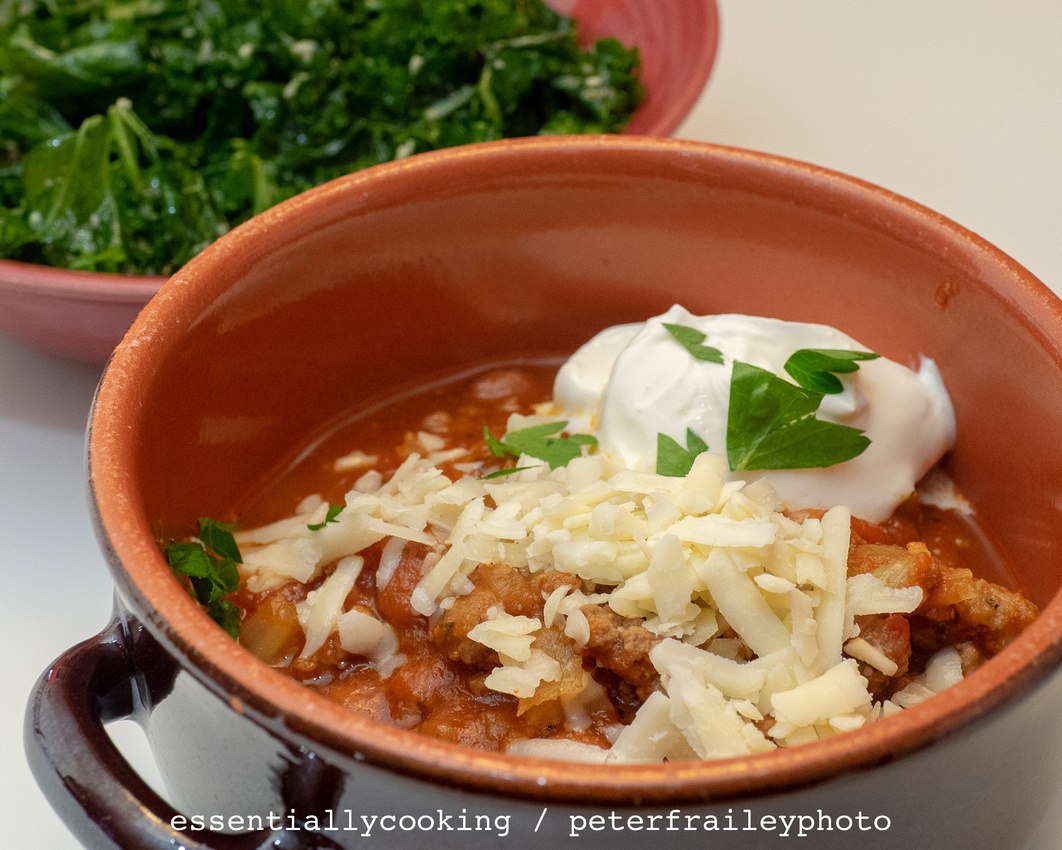 Toppings of grated cheddar cheeese, cilantro, and Greek yogurt
Served with a kale salad
]]>
This recipe comes from https://cafedelites.com/salmon-salad/ One of the things Laurie liked about this recipe is the practicality of the marinade/dressing. Half of it is used to marinate the salmon. The remaining half is used as dressing on the salad.
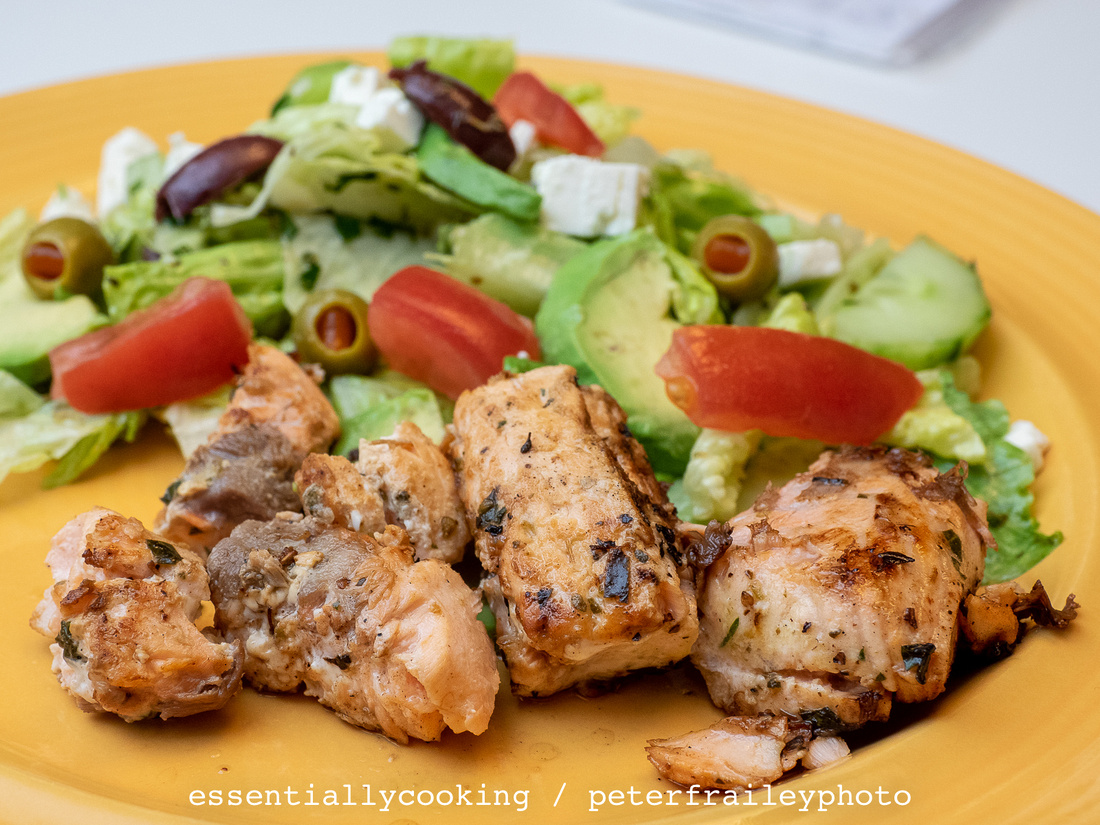
I’d suggest following the marinade/dressing ingredient amounts fairly closely, and perhaps modify to your liking the second time around. I thought these proportions tasted were perfect.
As far as the salad goes, obviously it’s easy to modify the ingredients and amounts based on personal preferences, and what you have available. I’m not a raw onion fan, so Laurie kept it out of my salad (though I think she may have added onion to hers). Everything else I think is a "must", if you’re trying to go Mediterranean.
What you need:
Salmon Marinade/Salad Dressing:
- 3 tablespoons olive oil
- 2 tablespoons lemon juice, freshly squeezed
- 1 tablespoon red wine vinegar (optional)
- 1 tablespoon fresh chopped parsley
- 2 teaspoons garlic minced
- 1 teaspoon dried oregano
- 1 teaspoon salt
- cracked pepper to taste
- 1 pound skinless salmon fillets
Salad:
- 4 cups Romaine lettuce leaves, washed and dried
- 1 large cucumber diced
- 2 Roma tomatoes diced
- 1 red onion sliced
- 1 avocado sliced
- 1/2 cup feta cheese crumbled
- ⅓ cup pitted Kalamata olives (or black olives), sliced
- Lemon wedges to serve
What to do:
These directions are very easy, here:
https://cafedelites.com/salmon-salad/
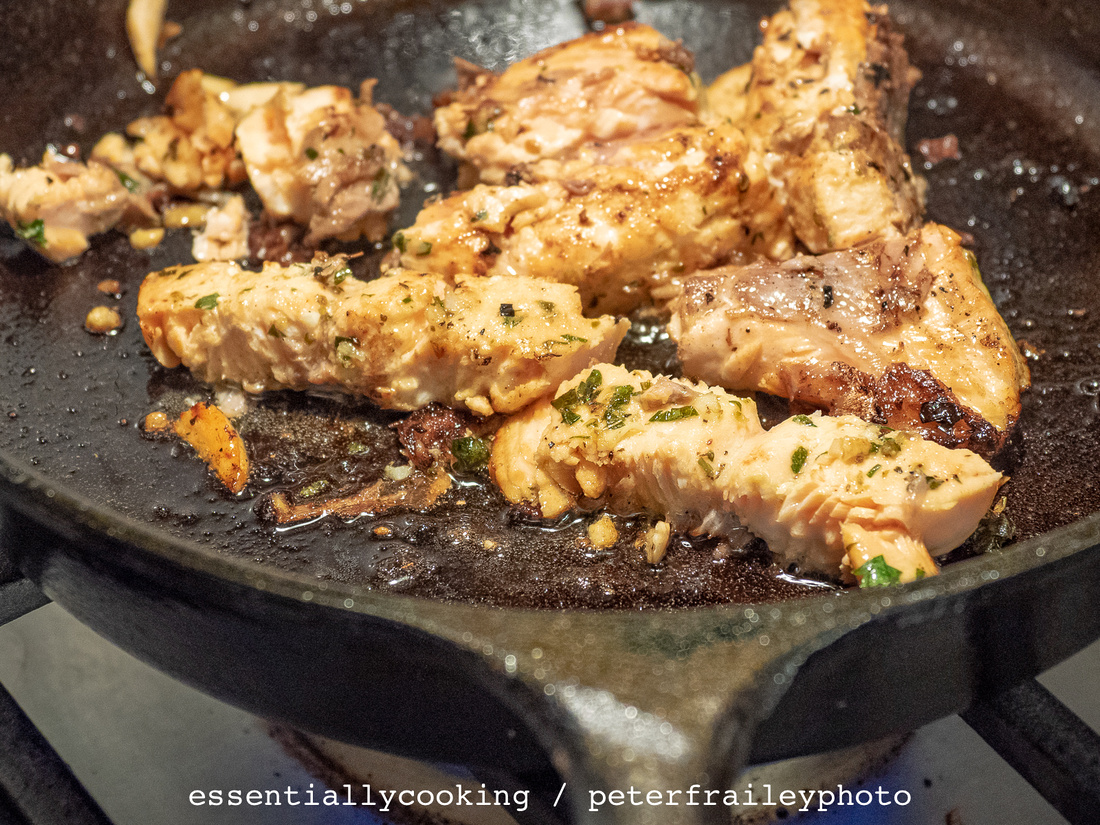
Basically you marinate the salmon with half of the marinade/dressing. Pan sear (use a cast iron fry pan if possible) the salmon until cooked to your liking. Make the salad and add the remaining half of the marinade/dressing. Serve with the salmon chunks on top of or beside the salad.
Additions:
Laurie added green olives to the salad.
]]>
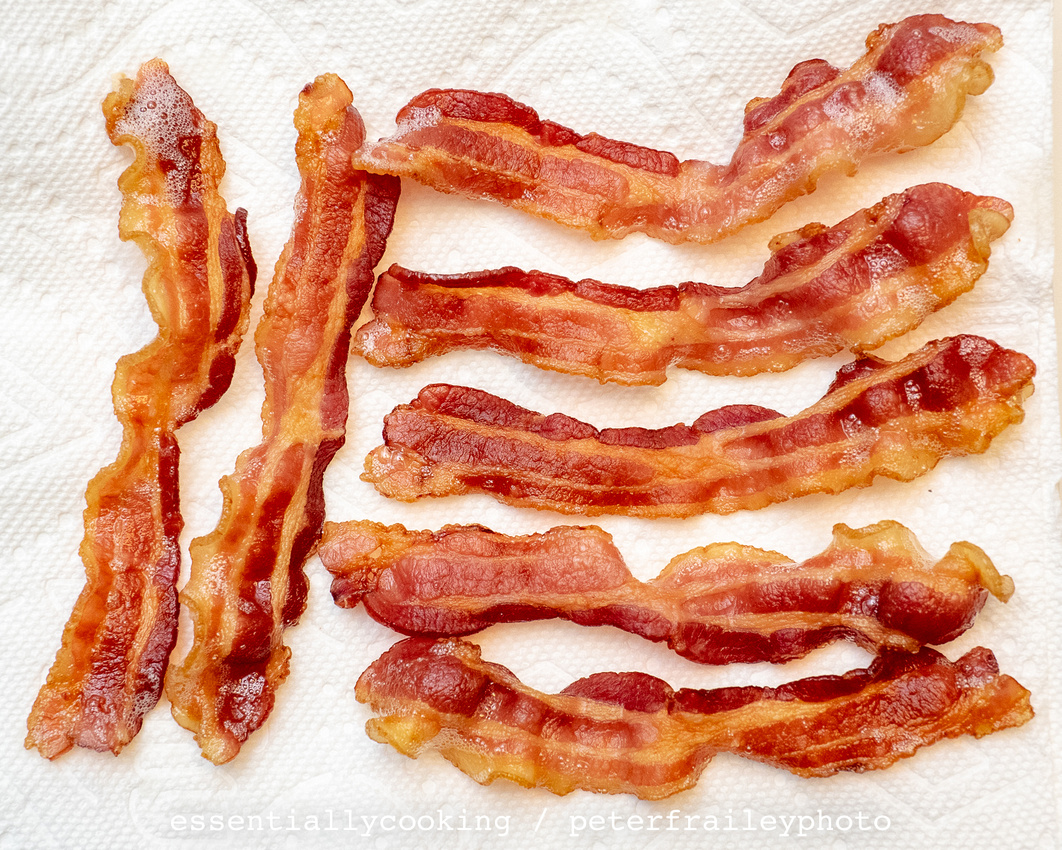
Bacon cooking is foolproof with this little microwaveable gizmo from Presto called a Power Crisp. I bet I’ve had it for 20 years.
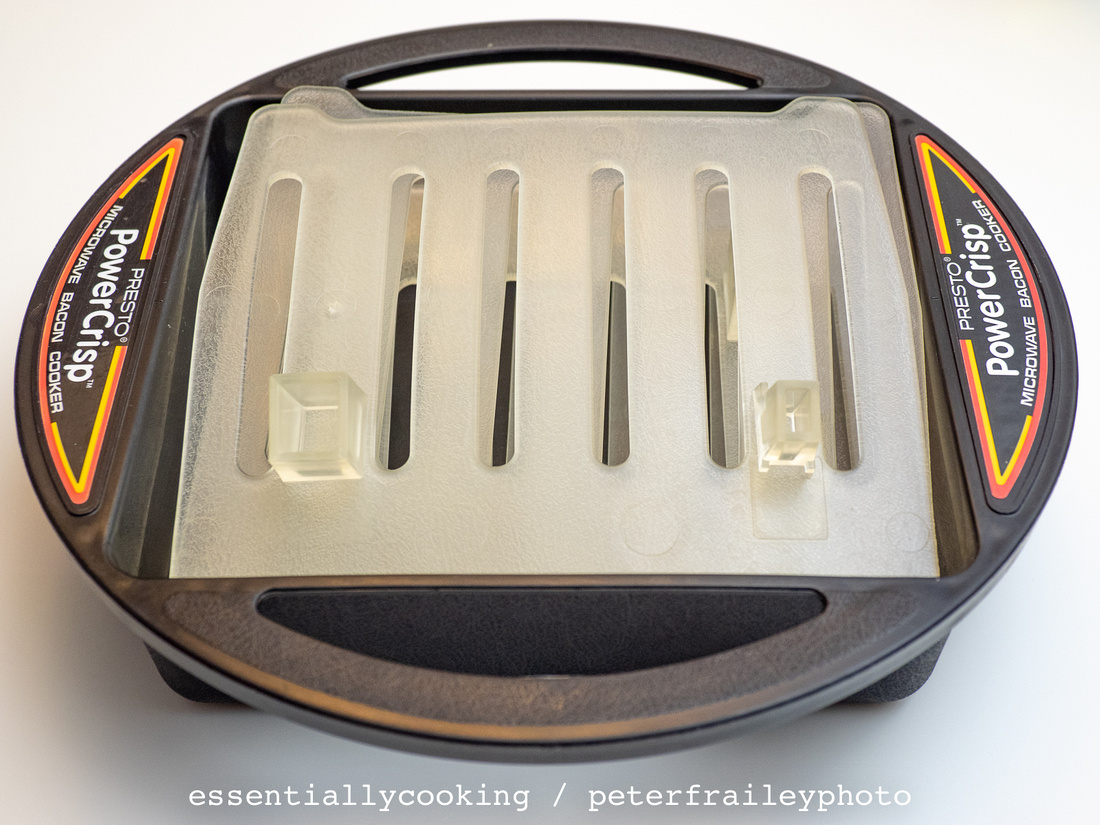
Admittedly it’s a “one-trick pony”; but it is small enough when folded up to have an dedicated spot in a kitchen cabinet, unlike some of our other one-trick ponies, like a bread making machine or an electric quesadilla machine. Both reside on some open shelving in the basement.
Cooking bacon with the Power Crisp is easy. And it need not be attended to, like cooking in a fry pan.
Assemble the two little tent-shaped hangers.
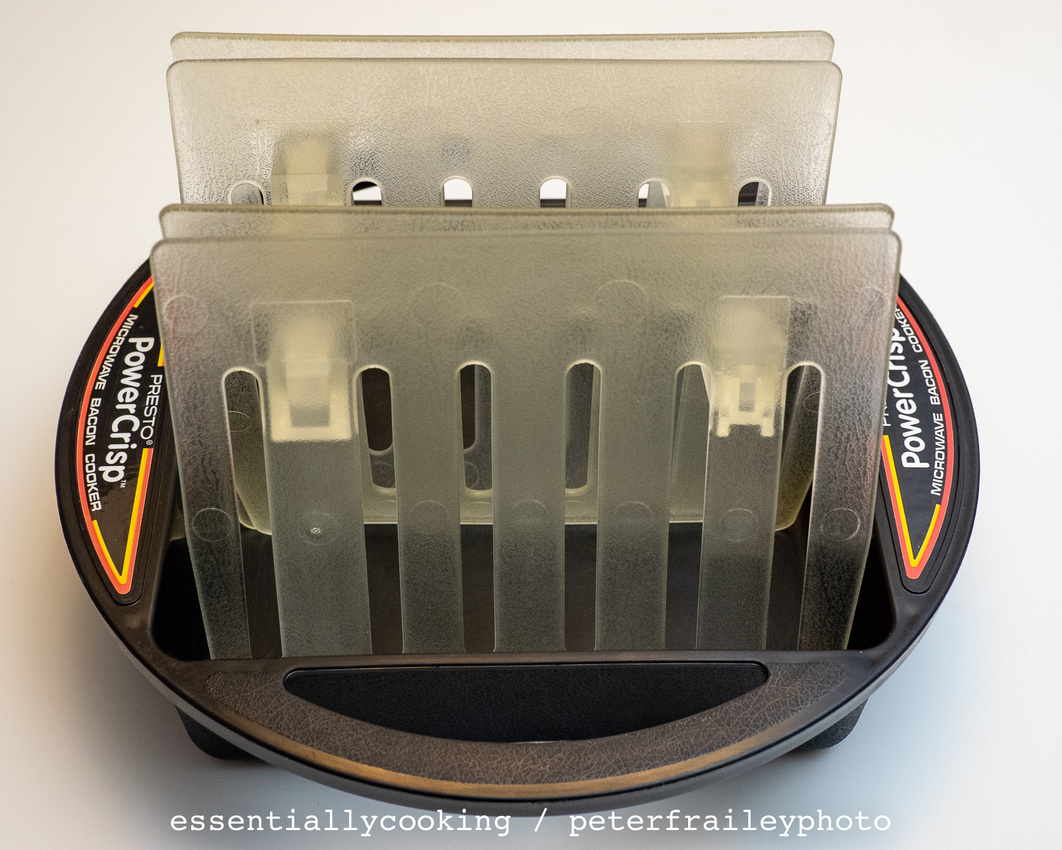
Drape up to four bacon slices on each hanger.
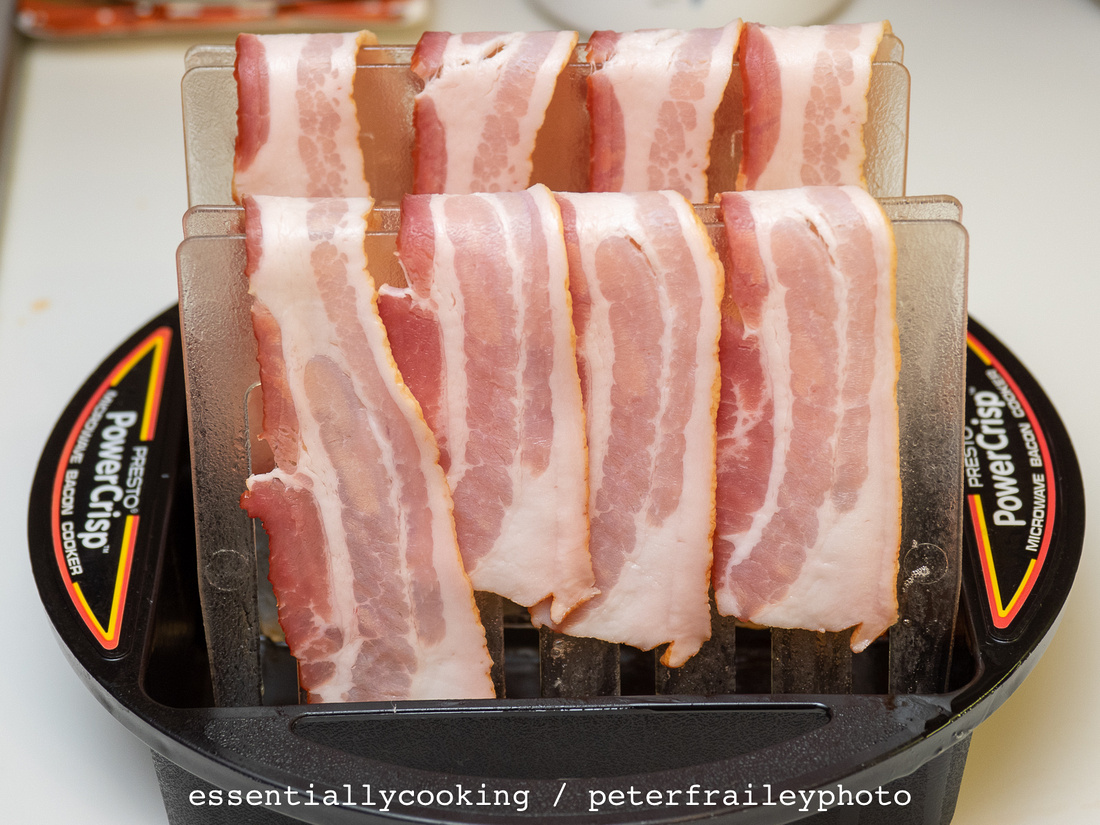
Place a paper towel over the slices.
Put the Power Crisp in the microwave on high.
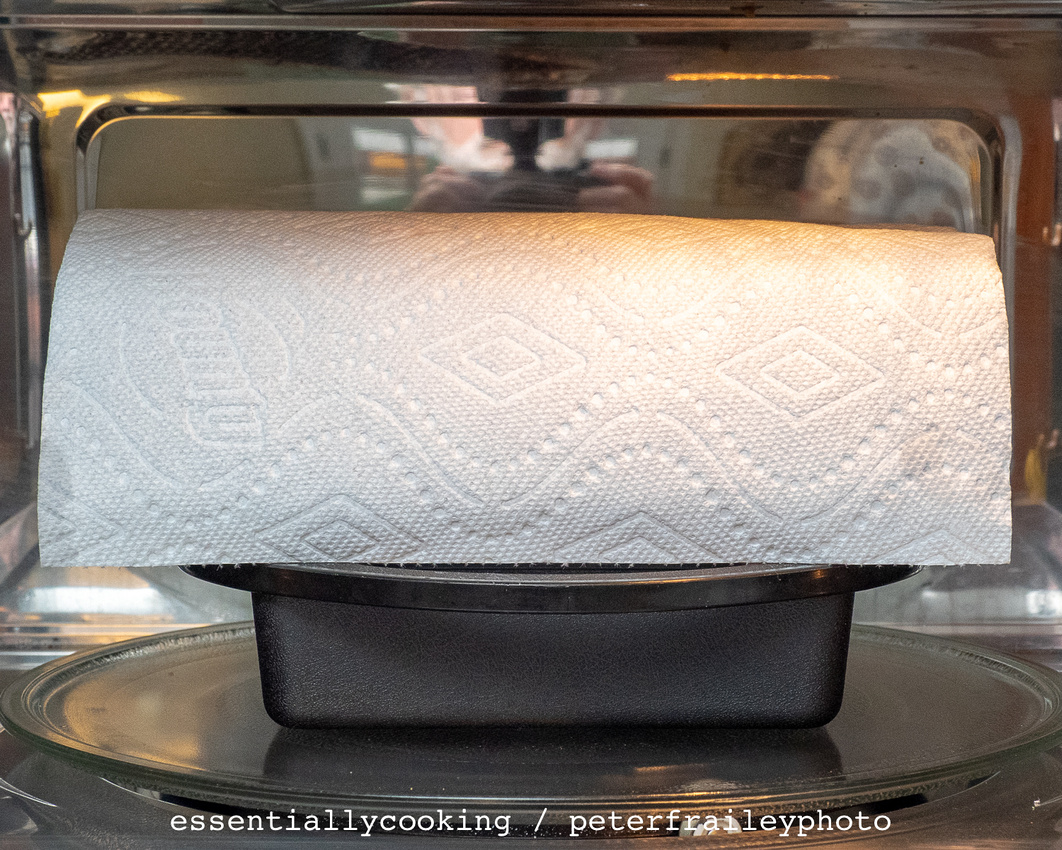
Depending on your microwave, the directions call for 30-90 seconds per slice. Microwaves vary in wattage and power (is that the same thing?), and I also think much of the time difference depends on how cooked you like your bacon. With our microwave set to “10”, it takes 6 minutes to get 8 crispy bacon strips.
Remove the bacon from the hangers with a knife.
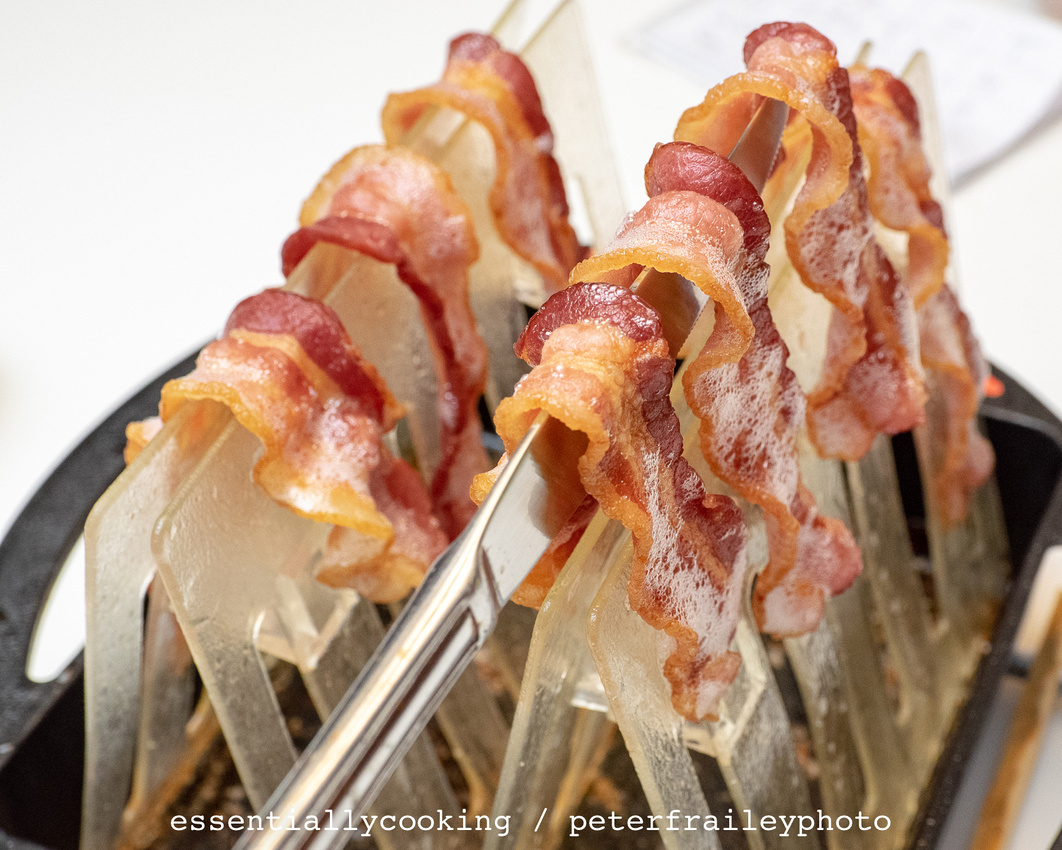
Place on a paper towel or two.
Eat!
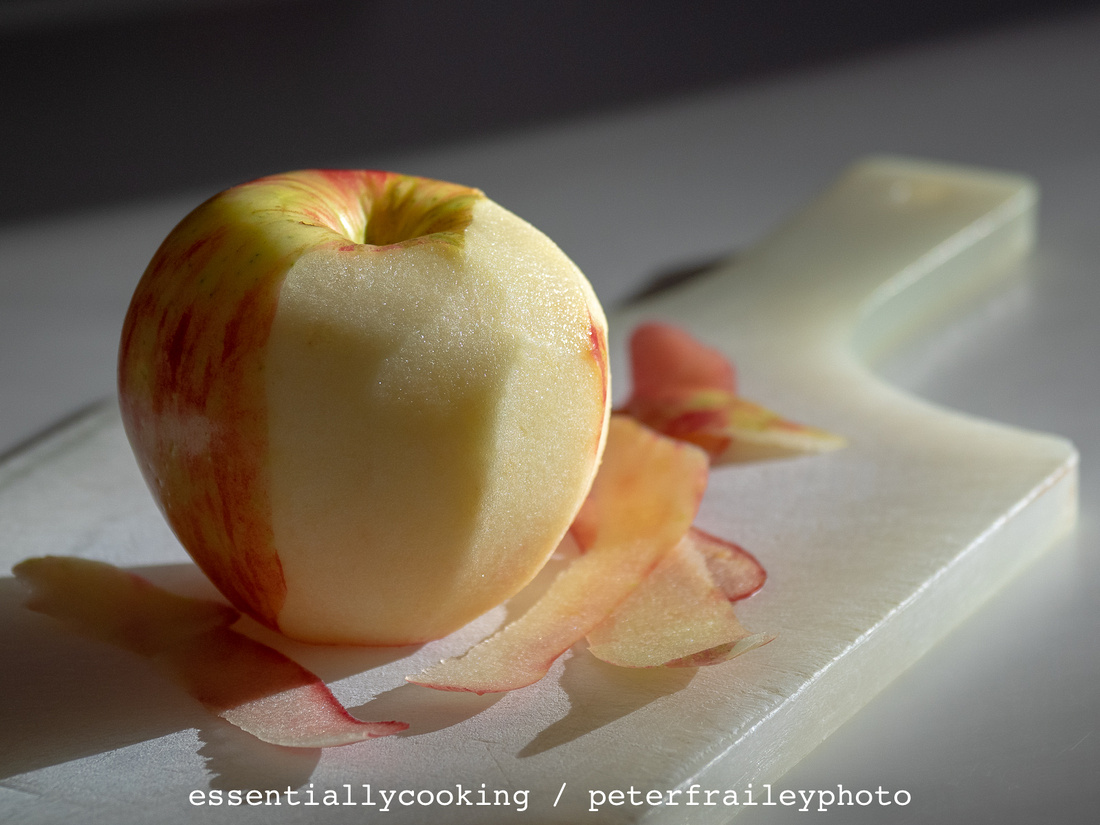
I have only been aware of this variety for a few years, and even then I don’t recall it being initially widely available. Until doing some research I had felt this variety might be a rediscovery of an old heirloom variety. But no, that’s not the truth.
"Afternoon Snack"
The truth is that it is a cultivated variety developed at the Minnesota Agricultural Experiment Station at the University of Minnesota. It was patented in 1988 and first released in 1991. One reason for its juiciness is that it has larger cells than most apples, which burst when bitten. And it stores very well if kept cool, which is likely why the one shown here was juicy and fresh tasting here in New England at the end of February, long after the growing season (the tree harvests in late September, just before Red Delicious). At minnesotaharvest.net they speak of a customer who tasted one on June 1, eight months after it had been picked, and declared it the best apple she’d ever tasted.
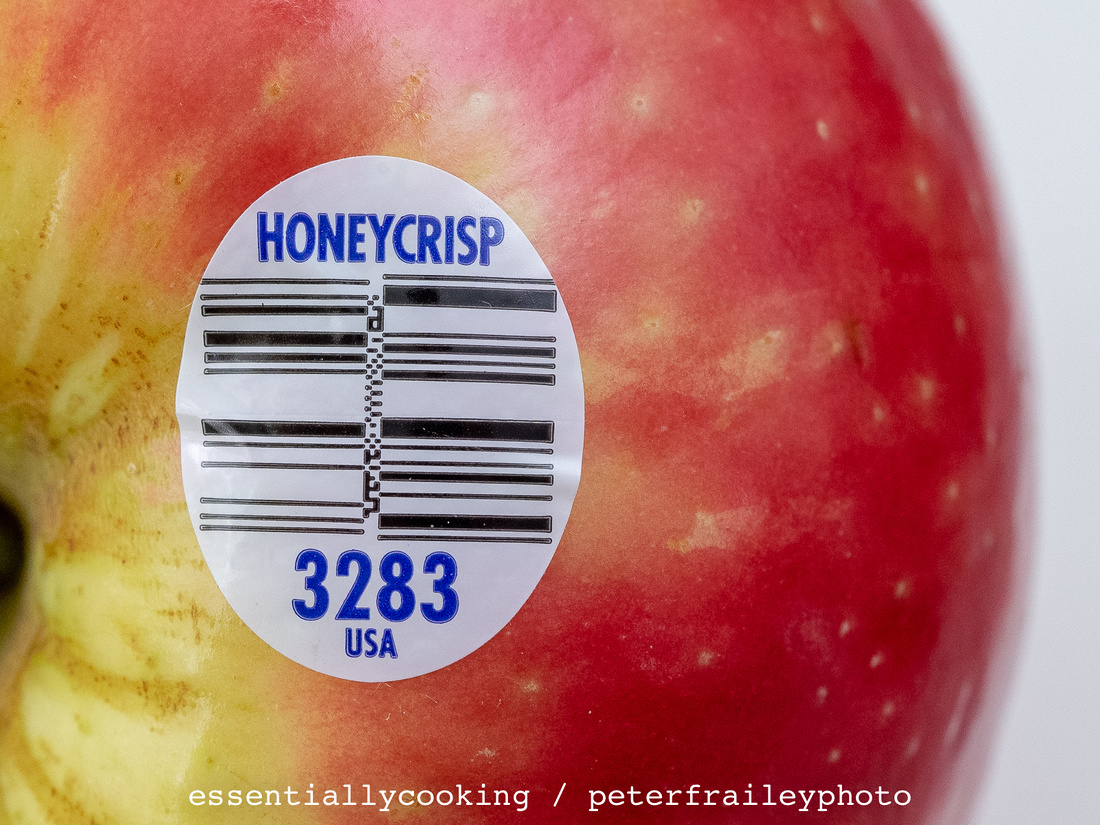
Made in the USA
Interestingly, the Honeycrisp cannot be grown from seed. That’s because it is what's called “self-sterile” which means another apple variety must be used to pollenize it. I don’t understand how this genetics works, because apparently most apple varieties can pollenize Honeycrisp, even crabapples; yet regardless, the resulting fruit is a Honeycrisp. On the other hand, if one tries to grow a tree with the seeds of the Honeycrisp apple, the result is a hyrid of the Honeycrisp and pollenater.
The U.S. Apple Association ranks it in fifth place for America’s favorite apples.
resouces: en.m.wikipedia.org and minnesotaharvest.net
]]>
The recipe comes from whatsgabycooking.com. It looked so good that Laurie decided to head to the market for fresh scallops. One downside...a pound of scallops costs $19. Since it was to be just the two of us for dinner, Laurie figured 3/4 pound of scallops would work fine.
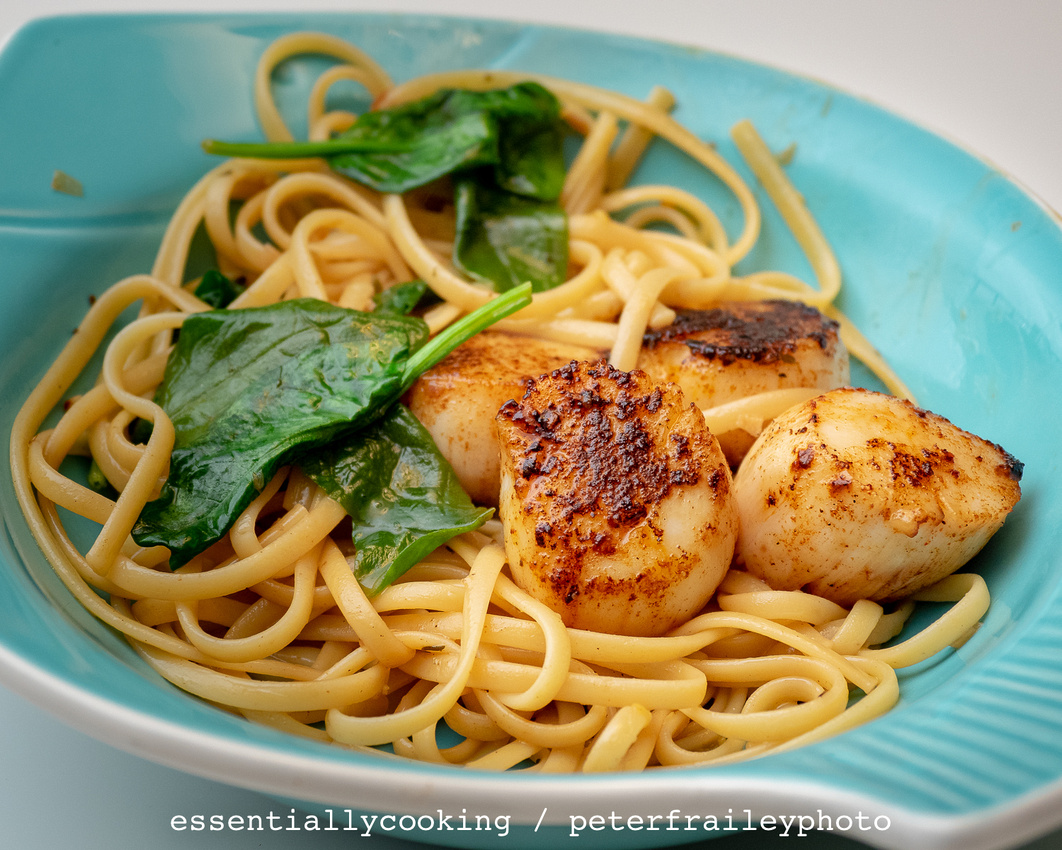
By adding some fresh spinach, Laurie made this a one-bowl meal
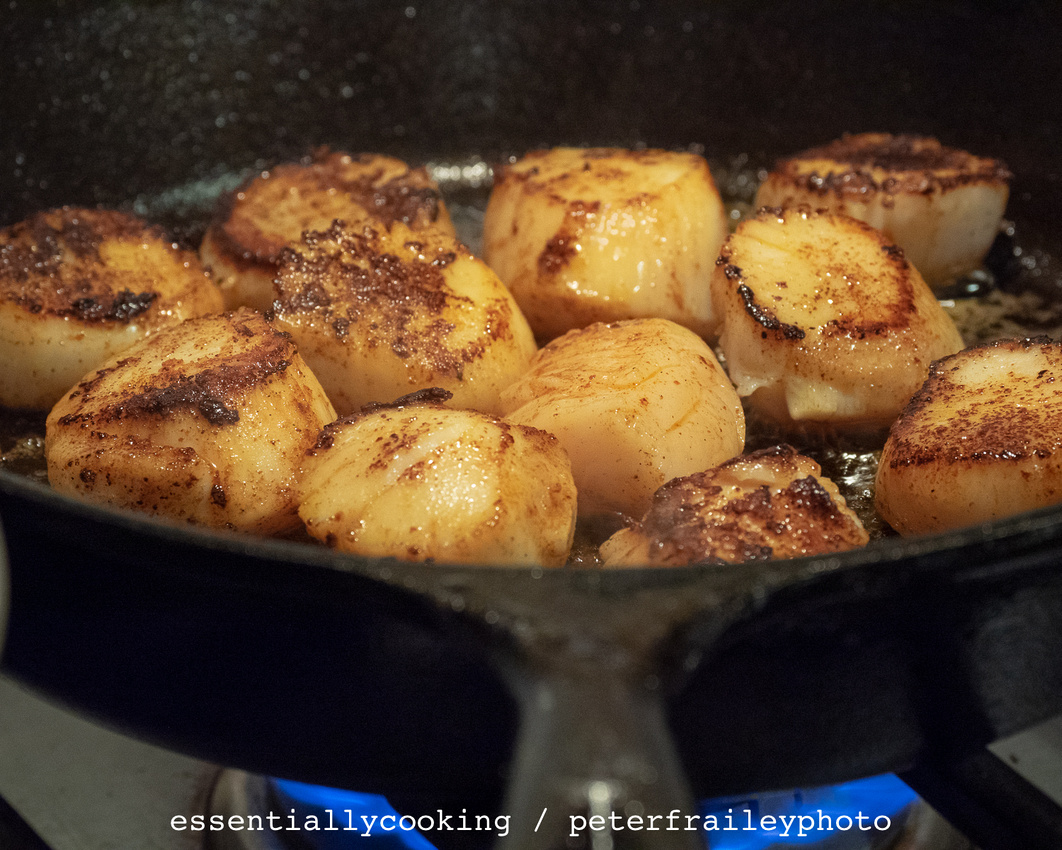 Scallops being seared in a well-seasoned cast iron fry pan
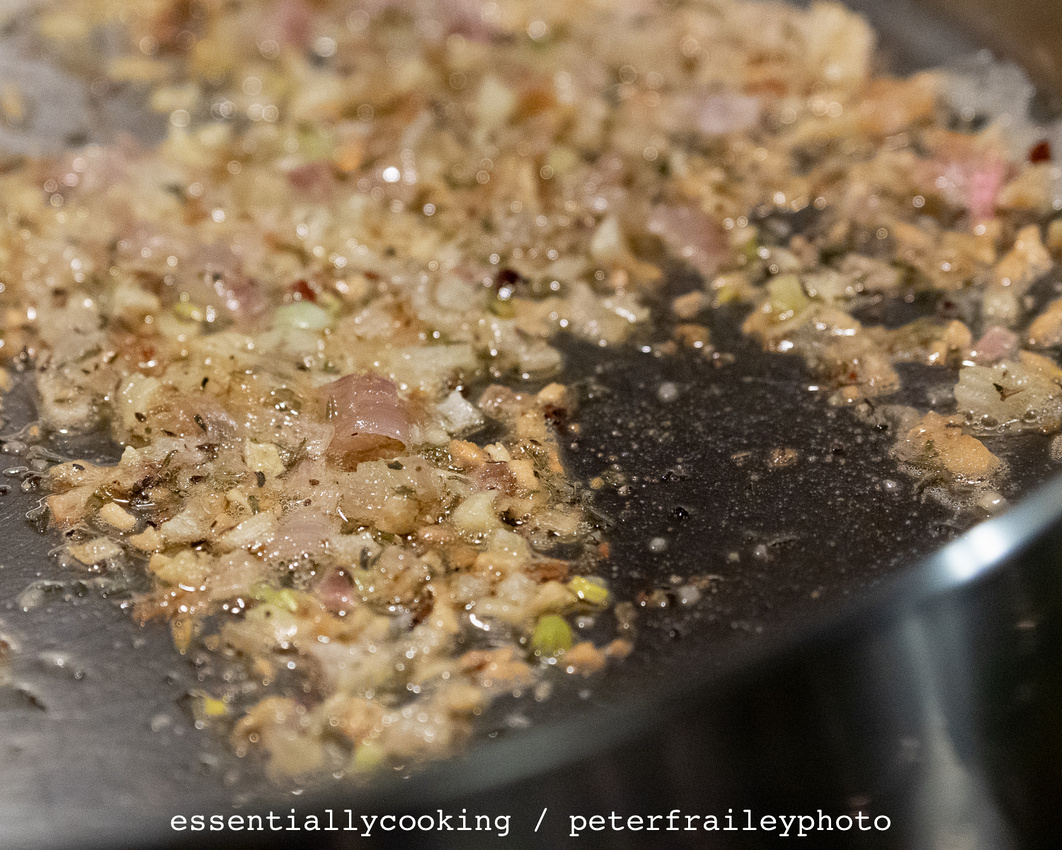 Everything but the scallops.
Seared scallops added next.
Then add cooked linguine.
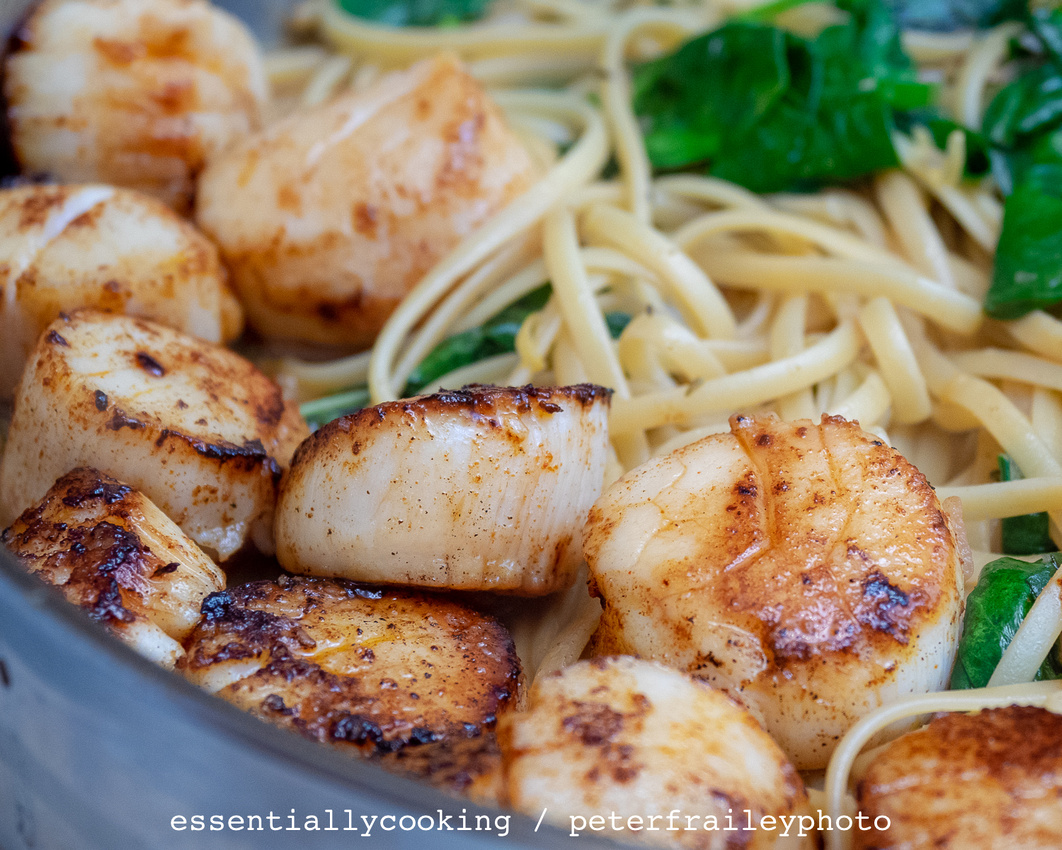 Ready to serve.
Laurie couldn't help adding some fresh spinach.
Purpose? To make it a one-bowl meal by adding some "green".
Lemon Garlic Scallop Pasta
What is needed:
- 1/2 pound linguini
- 1 pound scallops (see Laurie's Notes)
- Kosher salt and freshly ground black pepper
- 1 tablespoon olive oil, plus some for drizzling
- 3 tablespoons butter, divided
- 4 cloves garlic, chopped
- 1 large shallot, finely chopped
- 1/2 teaspoon crushed red pepper flakes (see Laurie's Notes)
- 4 sprigs fresh thyme, leaves removed and chopped (Laurie: I used a sprinkling of dried)
- 1 cup white wine (Sauv Blanc)
- 1 cup seafood stock (chicken stock will work too)
- 1 cup fresh basil, torn (Laurie: or less, like 1/2 to 3/4 c.)
- 1/2 cup chopped chives
- 2 lemons, zested and juiced
What to do:
Follow the instructions on Gaby's website, here.
Laurie's notes:
- This was delicious! Although I sprinkled in just a few flakes of red pepper, Peter felt it, so omit next time. (Add to mine after-the-fact.) ... I also cooked everything but the scallops in our largest fry pan, and I cooked the scallops in a smaller 10” cast iron pan. Maybe try everything in the cast iron next time (maybe it's time to purchase a 12” cast iron pan, too).
- To keep down the cost of the meal, I made this with 3/4 lb. sea scallops instead of a full pound. It was fine.
- I also added several ounces of fresh spinach. Why not? It makes this a one-bowl meal!
]]>
Doctored-Up Stir-Fry Sauce
What you need:
- 1/8 cup light soy sauce
- 1/8 cup all-purpose soy sauce (I use Kikkoman all-purpose, or use more light soy sauce)
- 1/4 cup oyster sauce
- 1/8 cup Chinese wine (or dry sherry)
- 1/8 cup cornstarch / cornflour
- 1/2 tbsp sugar
- 1 tbsp sesame oil , toasted
- 1/2 - 1 tsp ground white pepper (optional, in our house!)
- 2 garlic cloves, minced
- “squirt” of bottled ginger
What to do:
Combine ingredients in a jar and shake to combine. Store in fridge and shake before use.
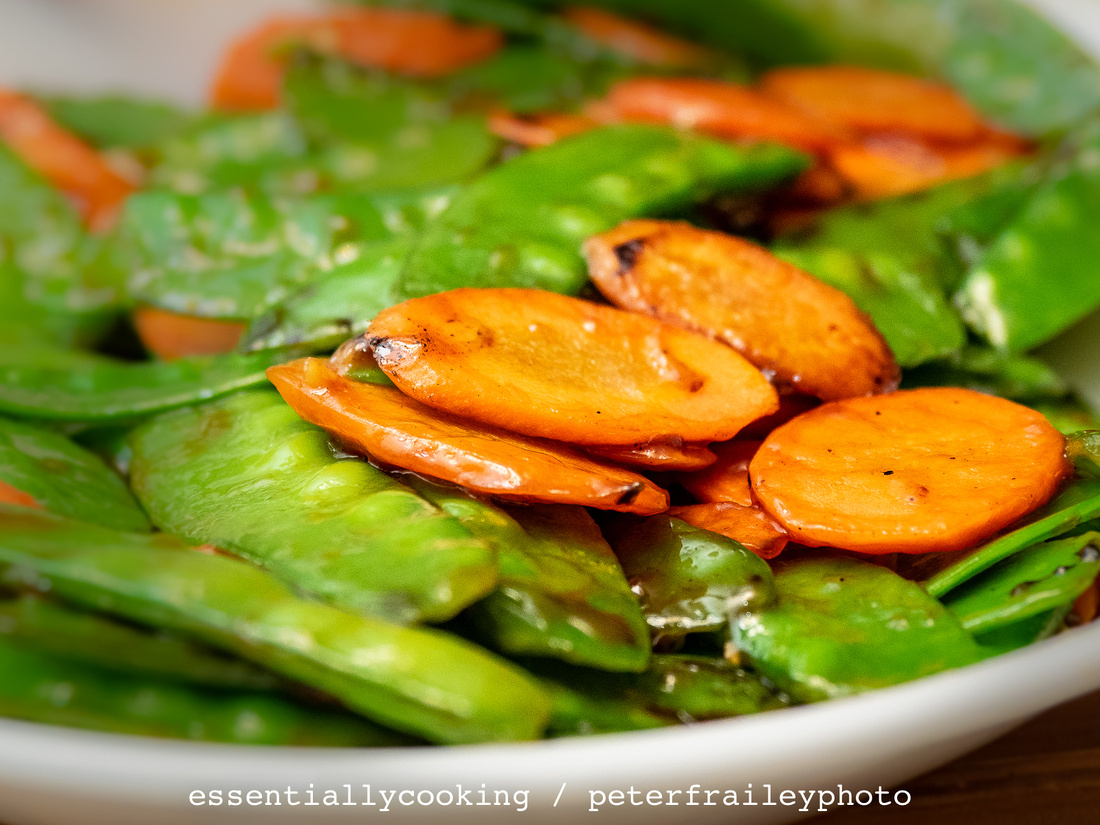
On this night, we had snow peas and thinly sliced carrots. Laurie stir-fried them in a tbs. of oil separately, then combined them in the wok with about 2 T. stir-fry sauce, re-heating until thickened. That left plenty more of this delicious stir-fry sauce for another time soon!
]]>
It’s on 1356 Washington Street, which runs right through town. because of that, we scratched our heads because we walk this street a lot during the summer when we spend a number of days at Mulberry House, another bed and breakfast, and we’d never seen a cafe of that name.
When we couldn’t find it, we put the address in our GPS and it aimed us in a direction that went out of the town center and into residential areas. As we counted houses up toward 1356, we were sure the address must be wrong. Why would anyone open a restaurant way out of town, in a residential area? However, when we arrived at 1356, a small sign (I think it was a sandwich board) with the word “Cafe” on it marked the entrance to a long driveway. We turned left onto the driveway and it took us to what appeared to be an old hospital.
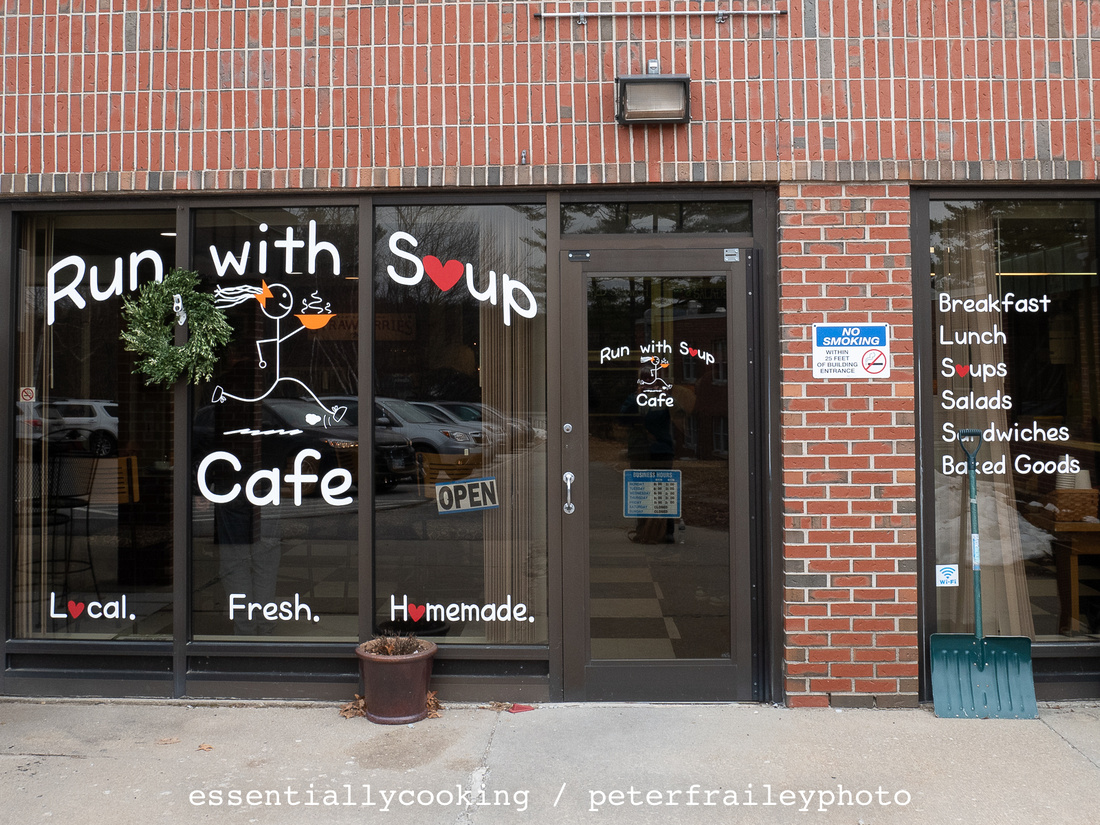
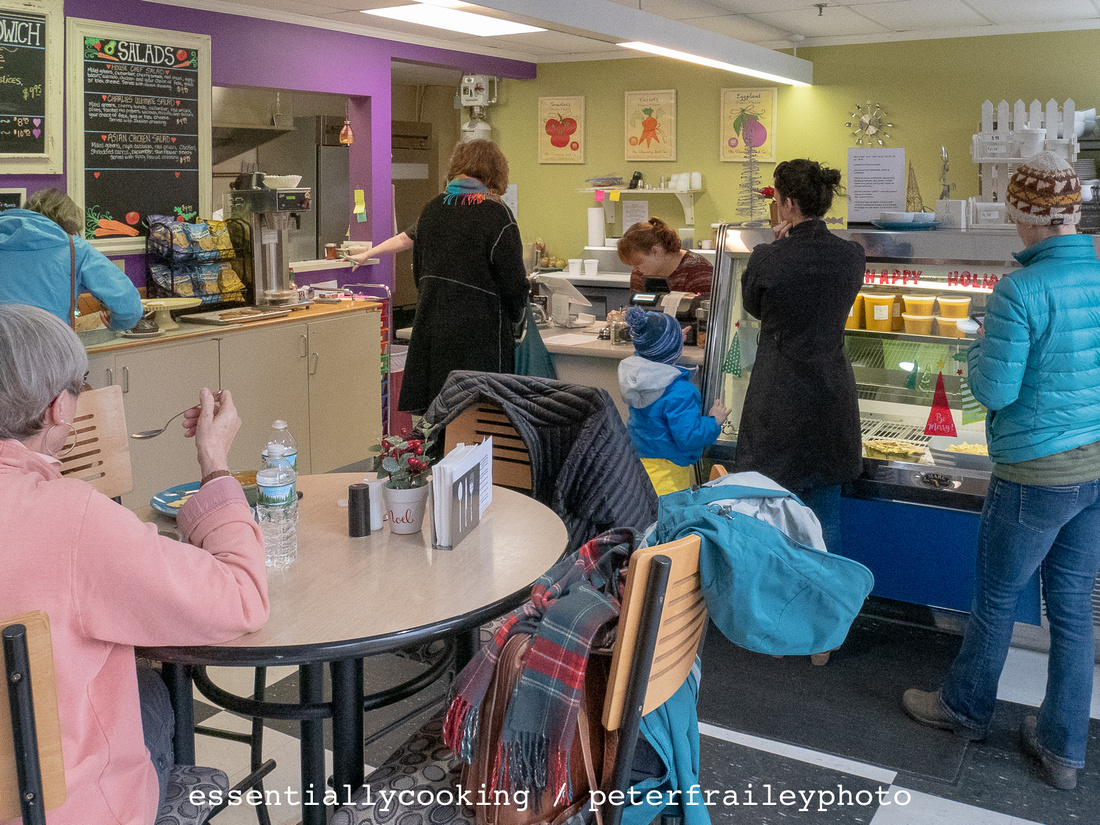
Indeed, Run with Soup Cafe is located on the first floor of what had been the city’s hospital “back in the day”. Much of the building is still leasable. Some of the second floor of one of the buildings appear to be apartments. I was told that some college courses were also given in this building, in the past.
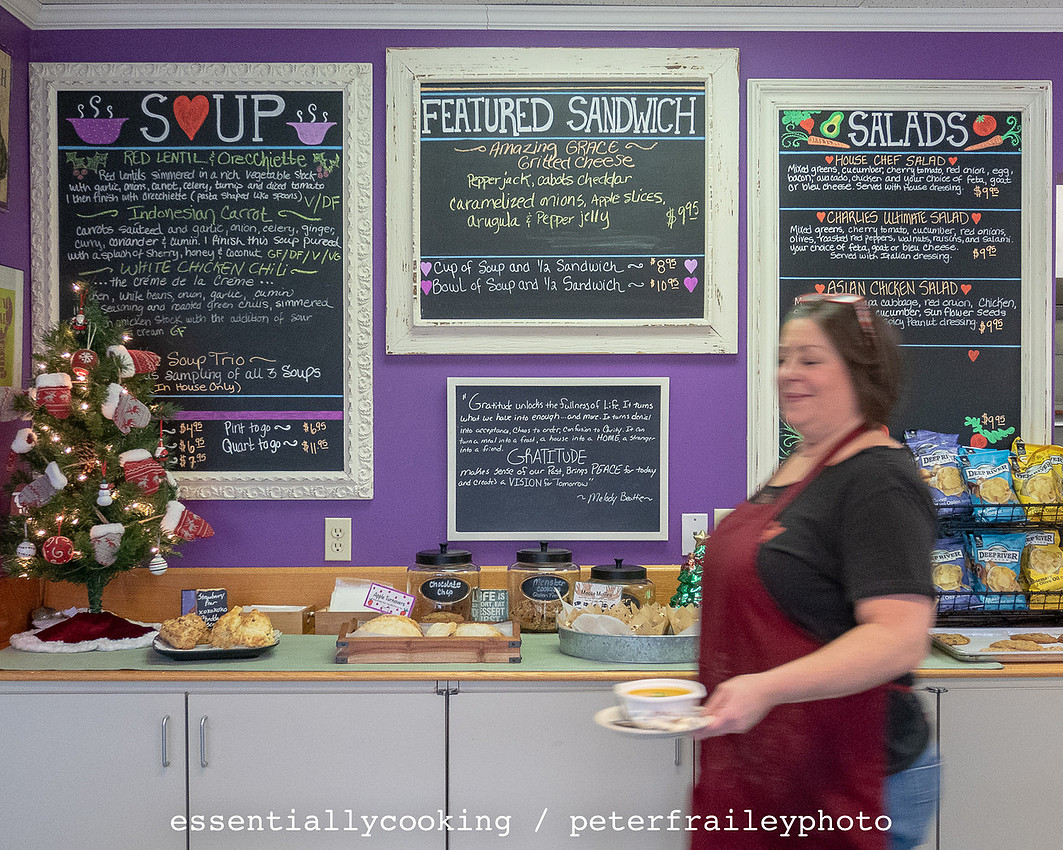
Everything inside is pretty basic. If you want to use the rest room you’ll need to walk down the institutional hallway of the old hospital to the rest room available to the entire floor.
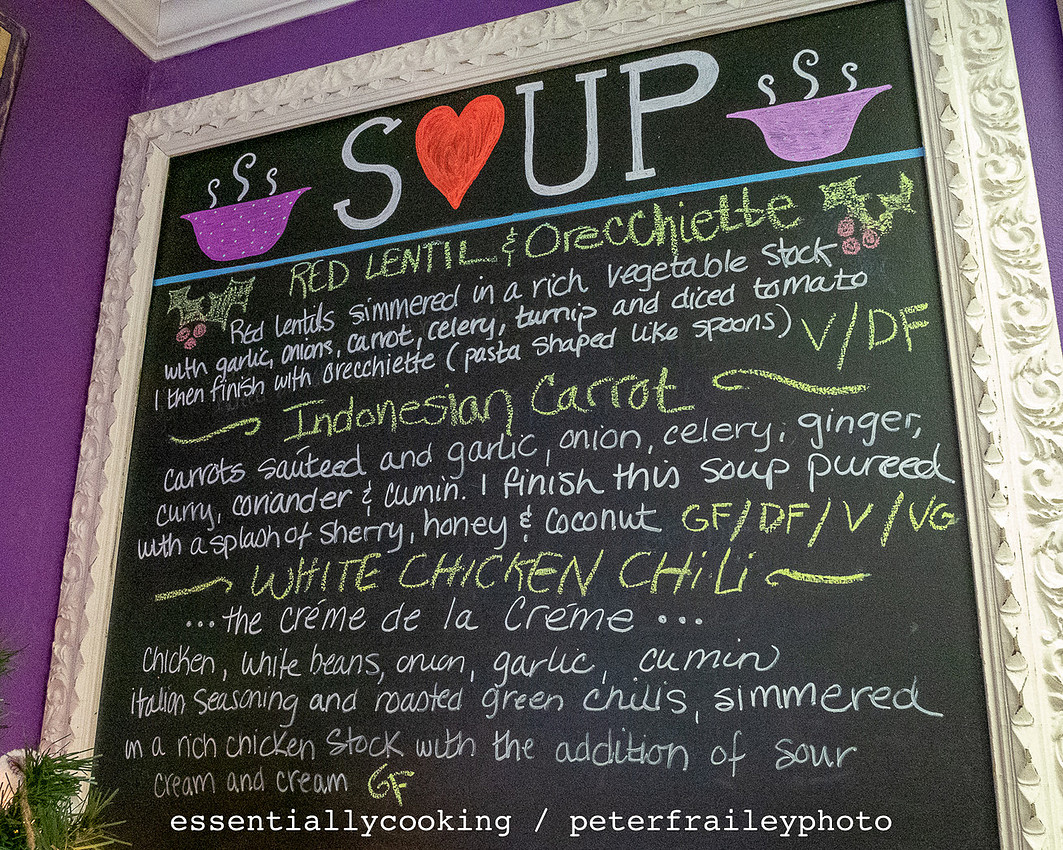
Every week three new soups are featured
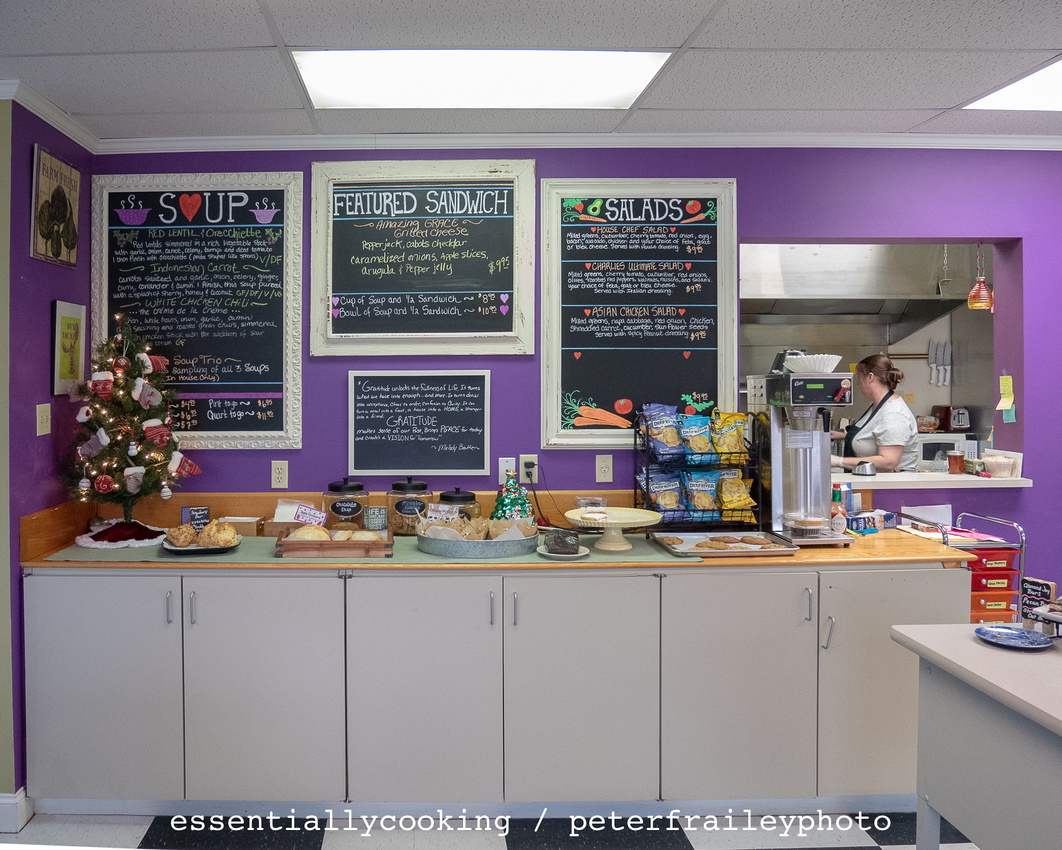
We thought it was great that this old building was now being recycled and reused for apartments, artist studios, and a cafe.
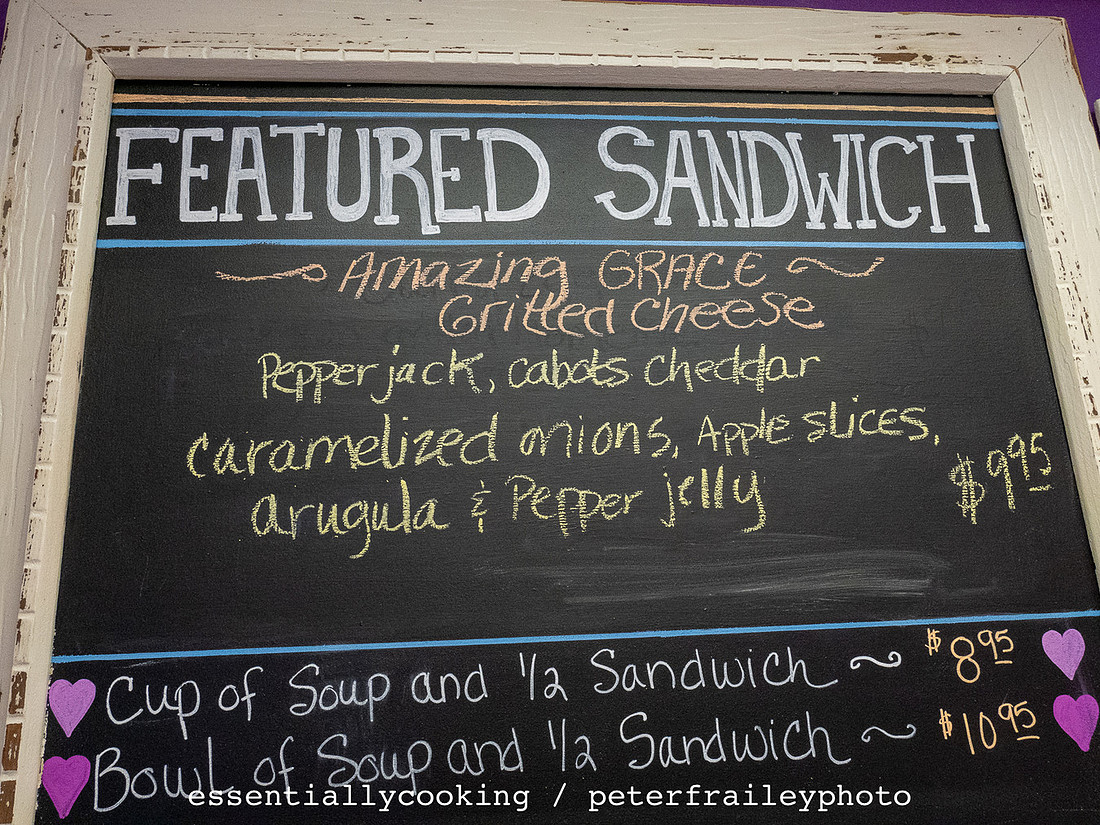
I didn’t take any notes while there; but, looking at the photos, I do recall that they offered three soups and three salads. We both picked the bowl of soup and 1/2 of a sandwich option for $10.95 each. Too, they gave us samples of each of the soups, which was nice and friendly. It is also good marketing, because all the soups were available “to go” in pint containers. Because of the cookies we had bought earlier at Mae’s Bakery, we skipped the sweets here, but they did look good. Next time.
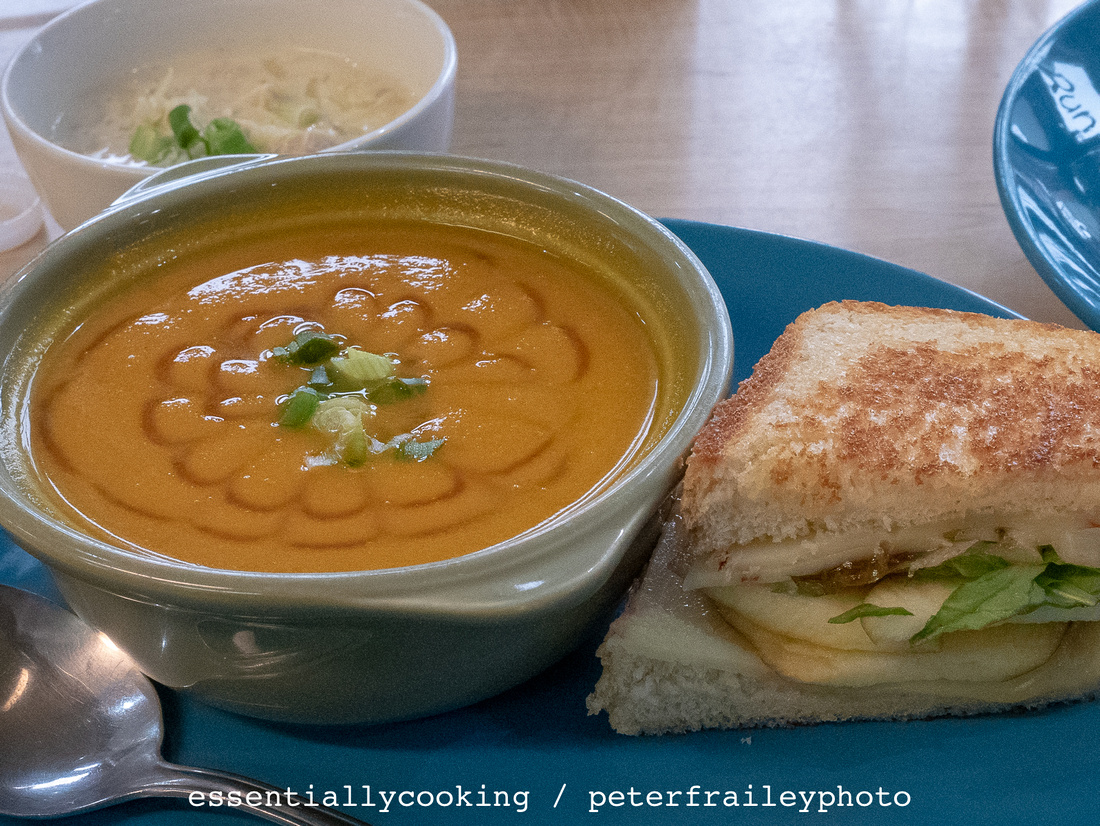
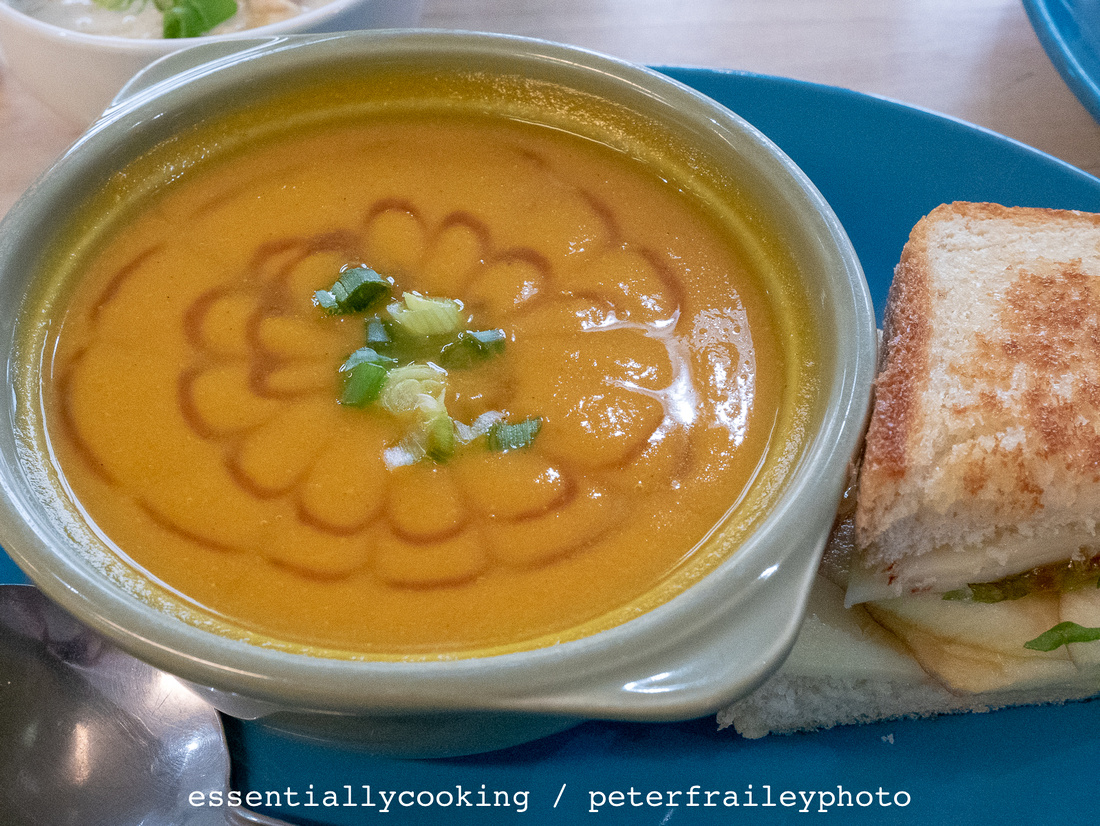
Amazing Grace Grilled Cheese sandwich and Indonesian Carrot soup
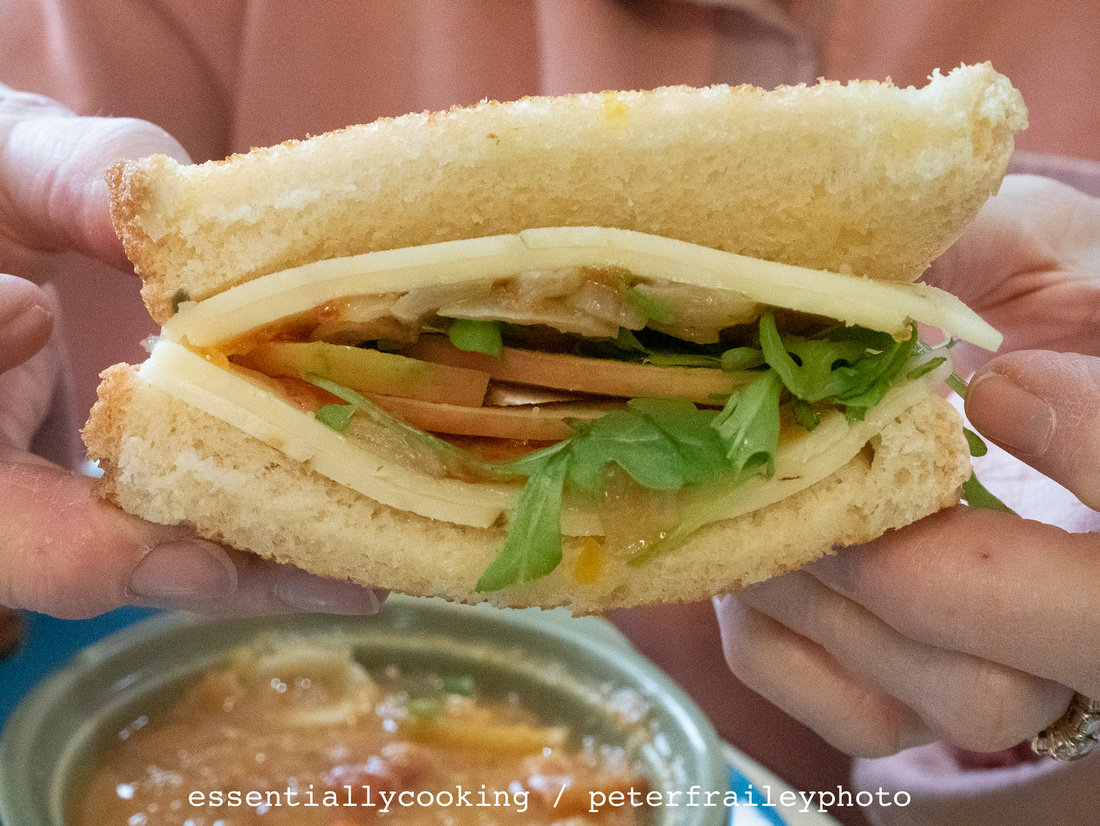
Amazing Grace Gilled Cheese: pepper jack cheese, caramelized onions, apple slices, arugula, and pepper jelly
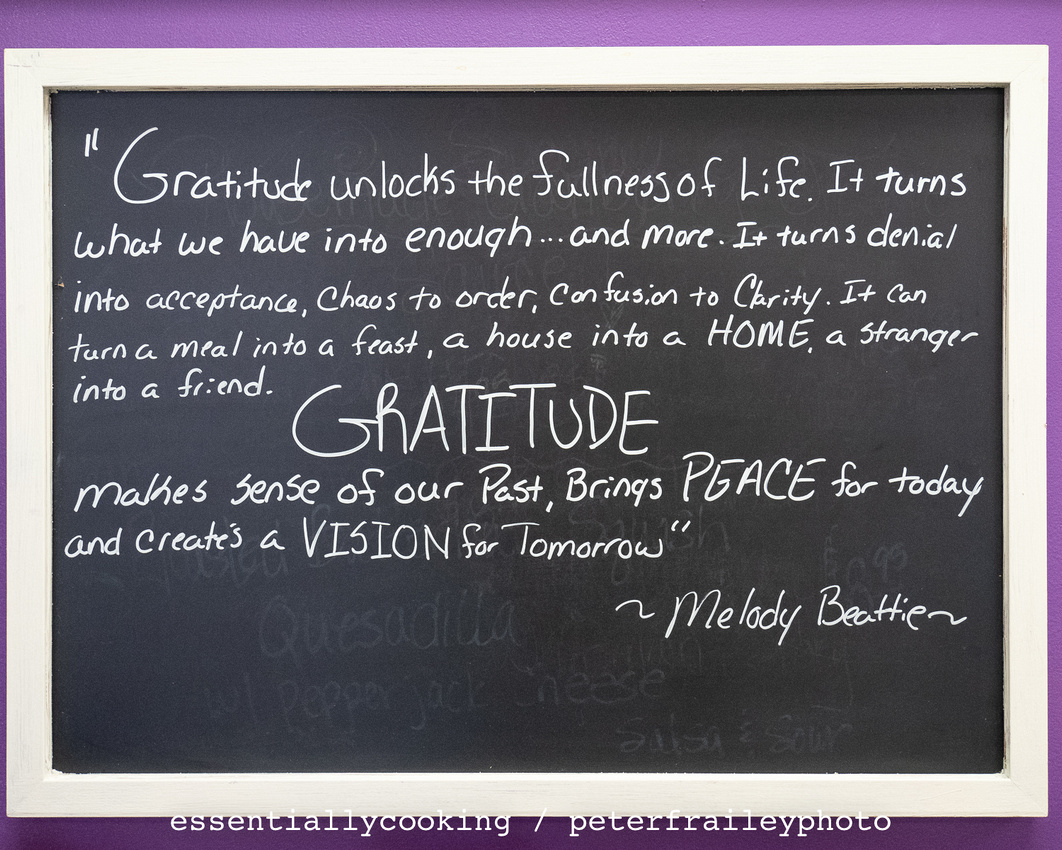
I want to point out something cool about the menu. The soups change every week. That’s a bit of a problem if you have a favorite soup. I was told it might be 40 weeks before a soup is offered again.
If you are a soup and sandwich fan, this is a terrific place to stop. Eat in or take out. And the prices are so reasonable.
]]>
The first time was at Christmas over a year ago. I see in Laurie's notes that we gave it four stars (of five) at the time. We brought it to a Christmas dinner with an Italian theme, and found that it provided a nice complement to a tomato based meal that included sausage and meatball "gravy" for the spaghetti and (as I recall) a traditional lasagna. Our white lasagna contribution was hugely popular.
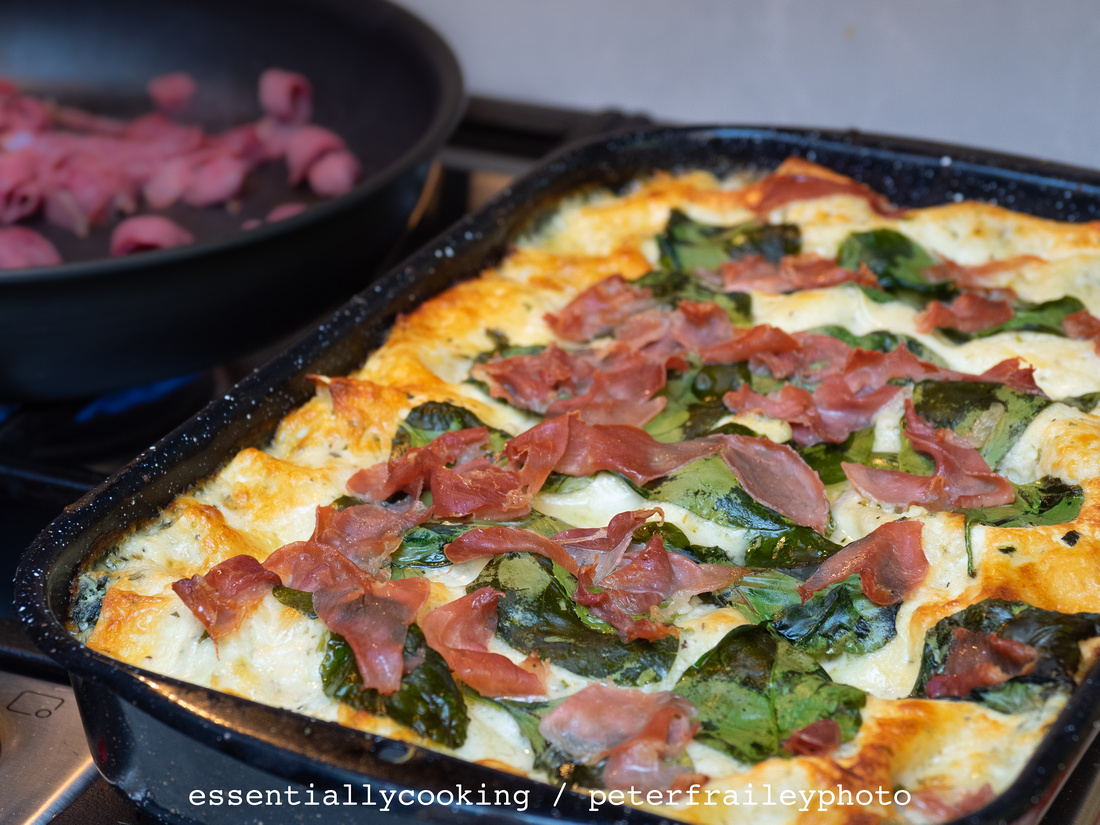
The second time she cooked this lasagna was last month. It is the lasagna you see in these photos. Almost after our first bite, we elevated it to five stars! Lasagnas are great for pot-luck suppers. Cook them ahead of time, but make sure the host(s) have room in their oven(s), to keep it warm.
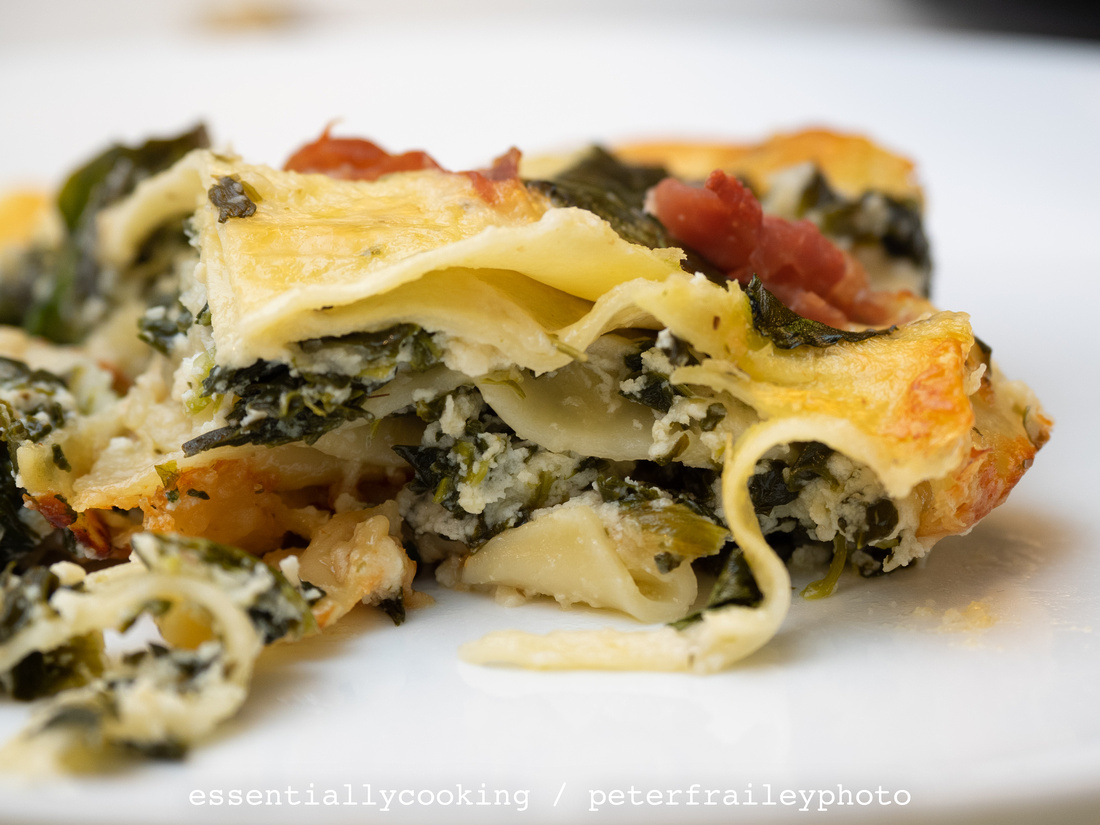
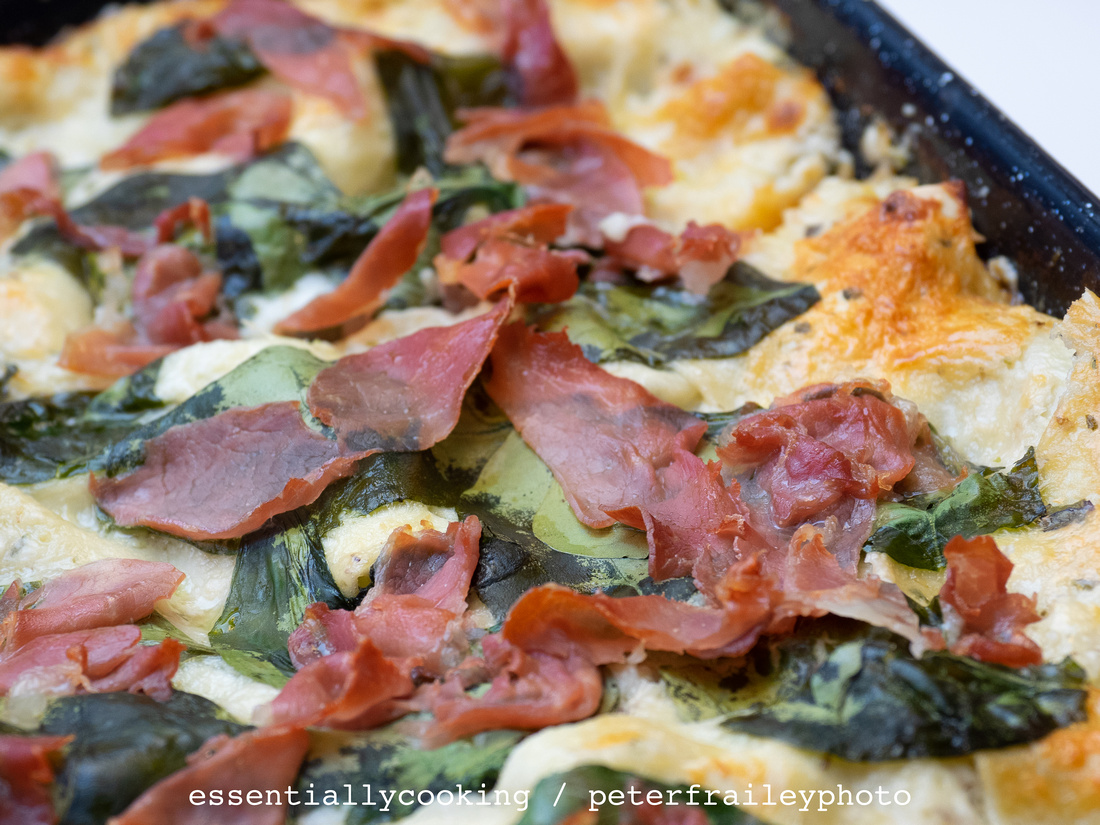
Crispy Prosciutto White Lasagna
What you need:
- 1 stick (1/2 cup) butter
- 2 cloves garlic minced or grated
- 1 tsp dried basil
- 1 tsp dried oregano
- 1/2 teaspoon kosher salt + pepper
- 1/4 cup flour
- 2 cups milk (2% is fine)
- 2 cups chicken broth (vegetable broth can be used)
- 1 cup shredded mozzarella cheese
- 1 cup parmesan cheese grated
- 2 cups whole milk ricotta
- 2 cups shredded provolone
- 2 packages frozen spinach thawed and drained
- 1 box no-boil lasagna noodles
- 3 ounces prosciutto torn
What to do:
Follow the step-by-step directions at halfbakedharvest.com, here.
Laurie's suggestions:
- Place some fresh spinach leaves on the last layer as well. Looks beautiful!
- The Barilla 9-oz. box of lasagna noodles is fine.
]]>
This pizza was cooked by Laurie and is based on a recipe from favorite family recipes, here. The thinly sliced peppers were Laurie's idea.
To makes things especially simple, I suppose you could use a Bobili crust, already made and cooked. But Laurie used a bag of store-brand fresh pizza dough.

 Fresh arugula added to the top before eating.
What you need (original recipe)
For the Pizza:
- 1 pre-prepared pizza crust
- 1 to 2 cups shredded mozzarella cheese
- lemon pepper chicken—grilled and sliced (recipe here: https://www.favfamilyrecipes.com/lemon-pepper-chicken/)
- marinated artichoke hearts
- 1 lemon, thinly sliced
- feta cheese, crumbled
- arugula lettuce
For the Lemon Cream Sauce:
- ¼ c. butter
- 4 oz cream cheese
- ¼ c. sour cream
- 1 tsp. garlic powder
- 1/2 c. milk
- 1/2 c. fresh grated parmesan cheese
- 2 Tbsp. lemon juice
- Salt and pepper to taste
Laurie's suggestions:
- For added color, thinly slice a green, red, and/or yellow bell pepper
- Not everyone likes arugula, so have it an a bowl so it can be sprinkled on by those who want to add some green to their pizza pieces.
What to do:
- Follow the easy instructions from favorite family recipes, here: https://www.favfamilyrecipes.com/lemon-chicken-pizza/
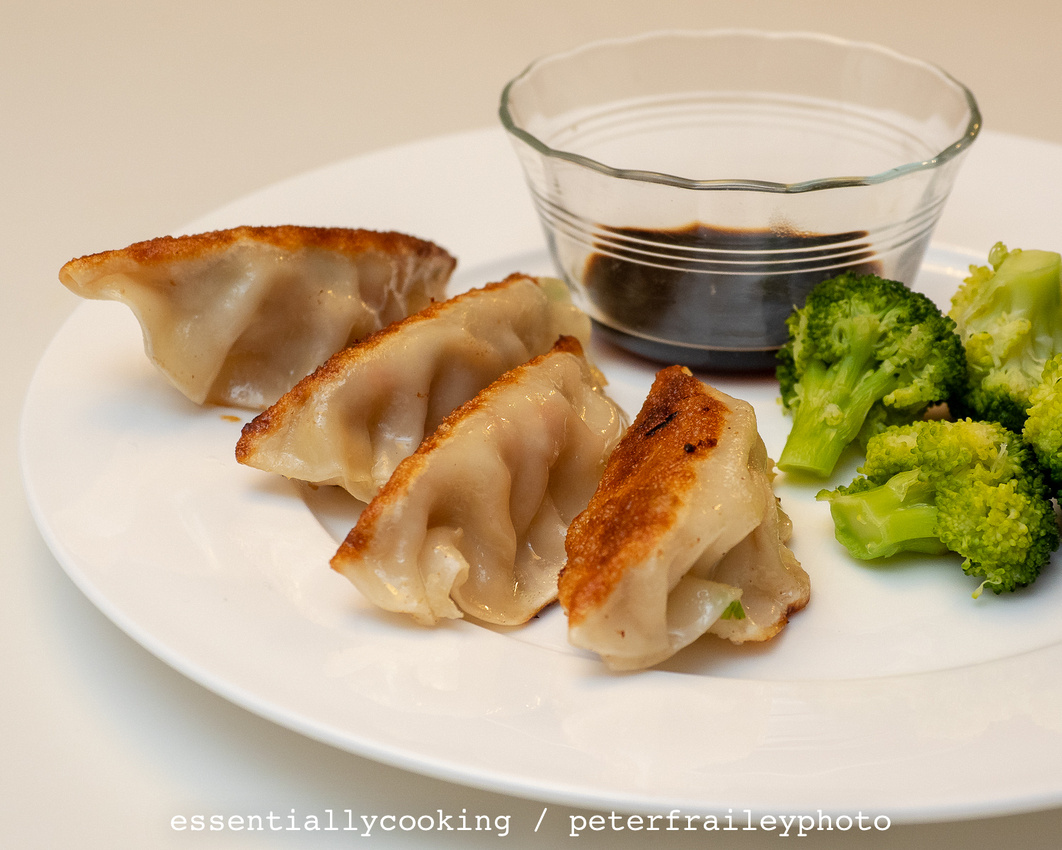
The recipe is from thekitchen.com. Laurie is on a cabbage kick right now, and this recipe gave her a chance to pull a head of cabbage out of the refrigerator and get it chopped up (very finely with a cheese grater). A simpler alternative is store-bought cole slaw mix.
Funny that thekitchn.com shows prep time as 10 minutes. Seriously? Getting all these ingredients together and measured took way more time... maybe it was an hour+ before she could begin cooking. On the other hand, the effort resulted in at least 3 dozen potstickers. We consumed perhaps 5 each and the remainder were frozen for a couple of meals in the future.
Despite all the work, it looked like Laurie had a good time wrapping up these little morsels in the little (3 1/2 diameter) potsticker wrappers.
So, if cooking is your hobby and you enjoy your time in the kitchen, go for it.
A few of the steps:
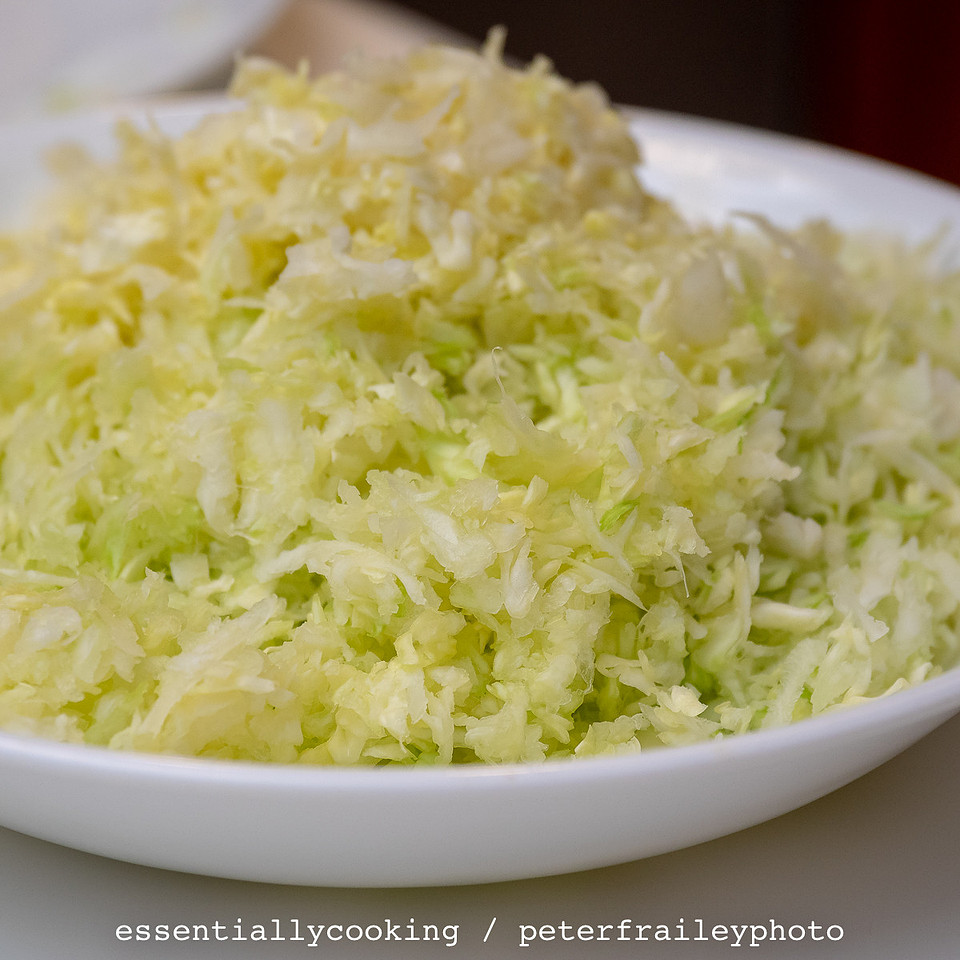 A cheese grater was used to get the cabbage really fine
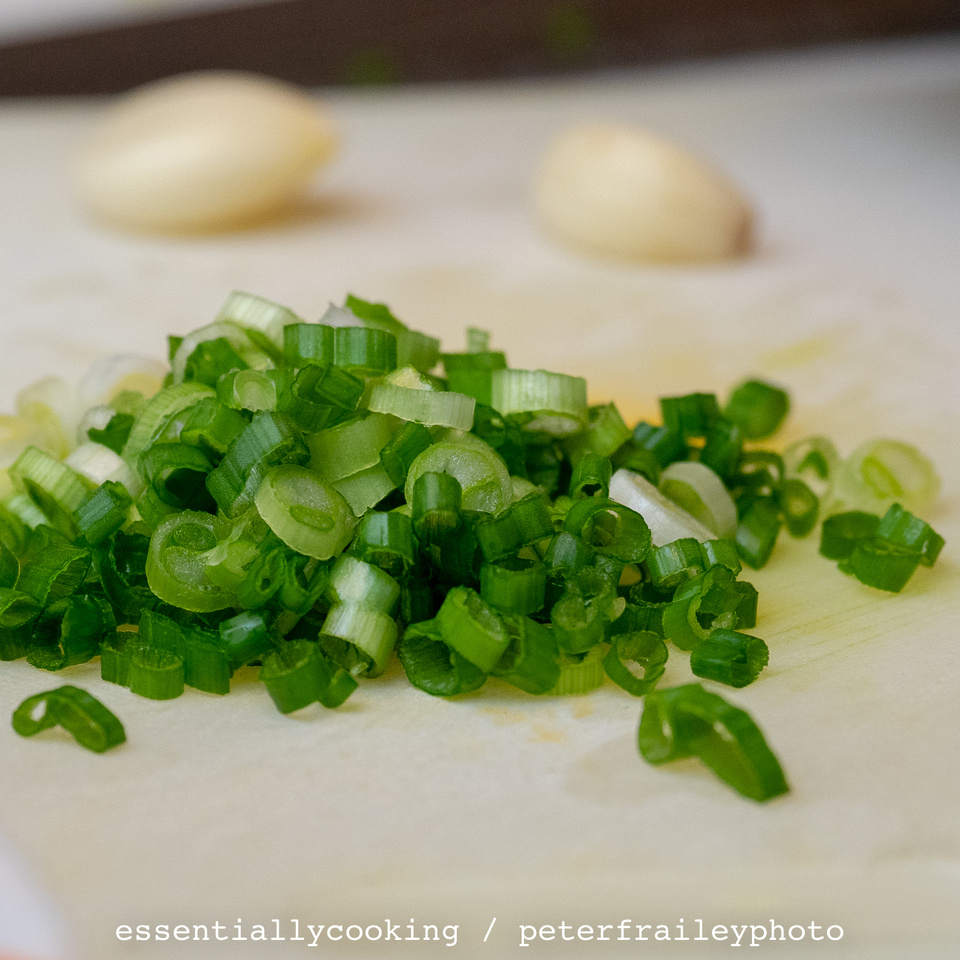 Shallots
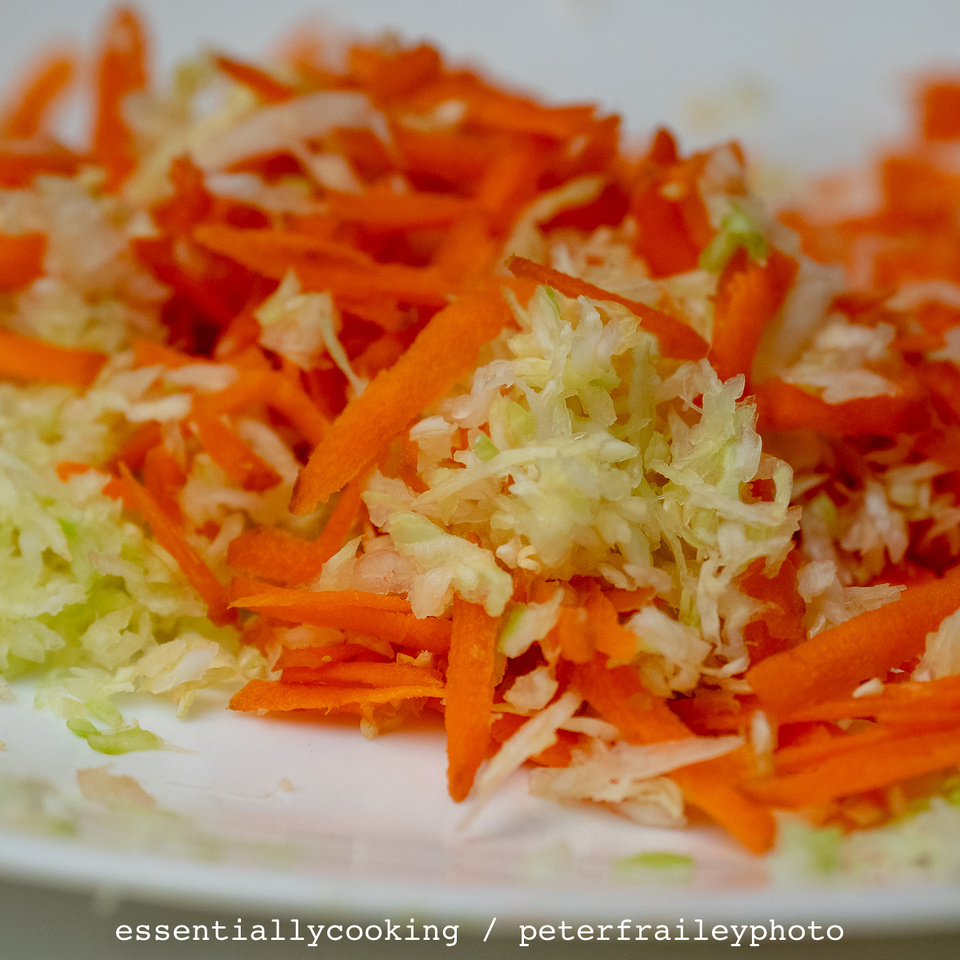 Laurie chose to do 1/2 shredded carrots (with cheese grater) and 1/2 cabbage instead of all cabbage
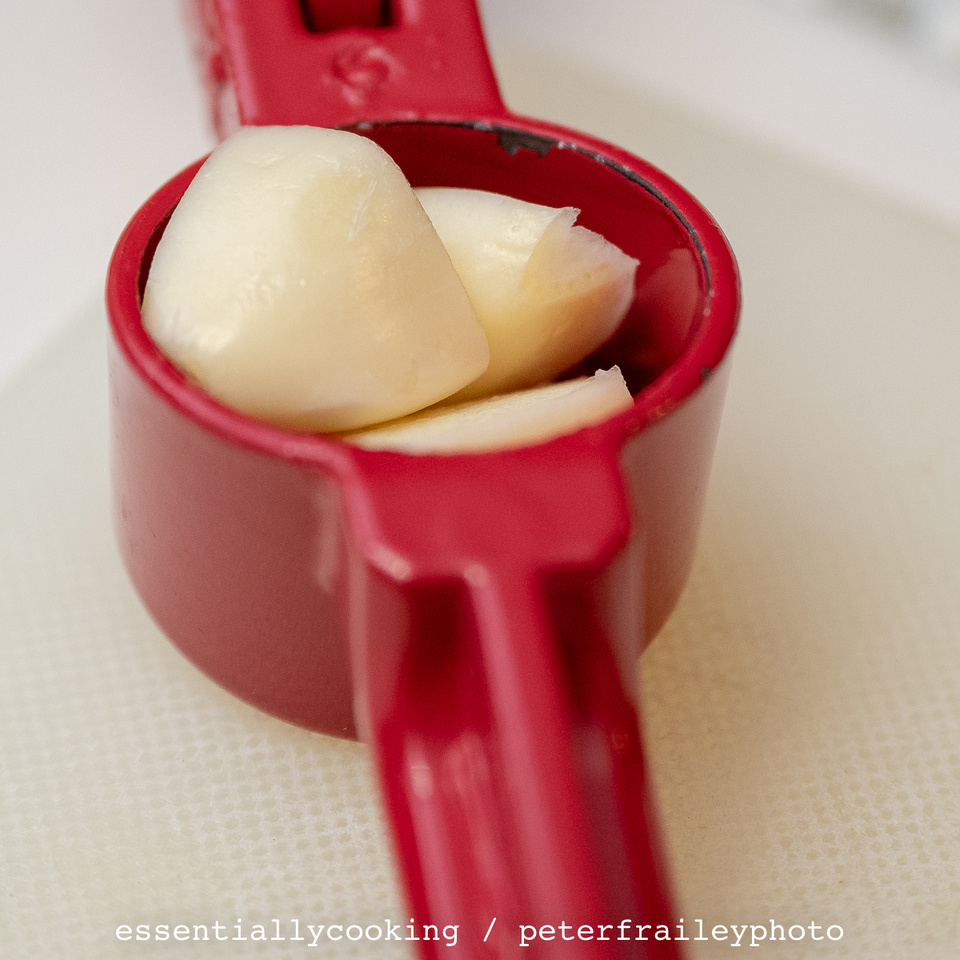 What would the recipe be without garlic
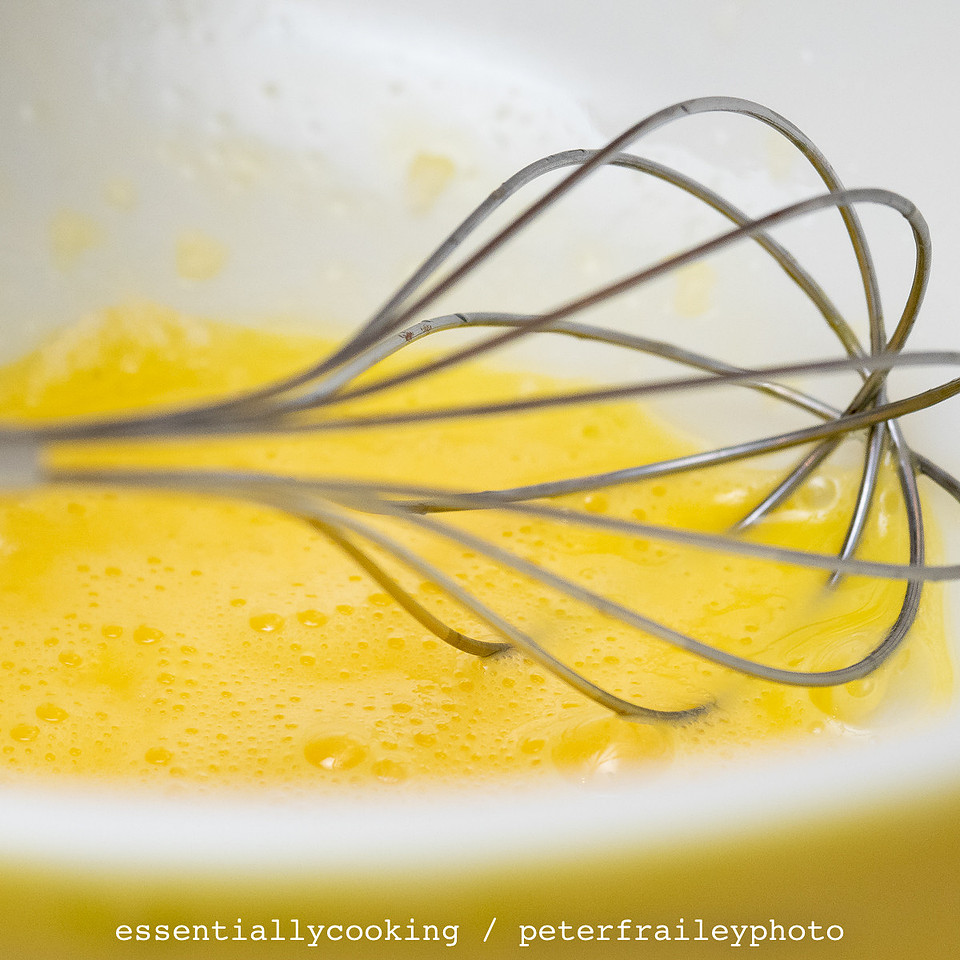
Egg mixture
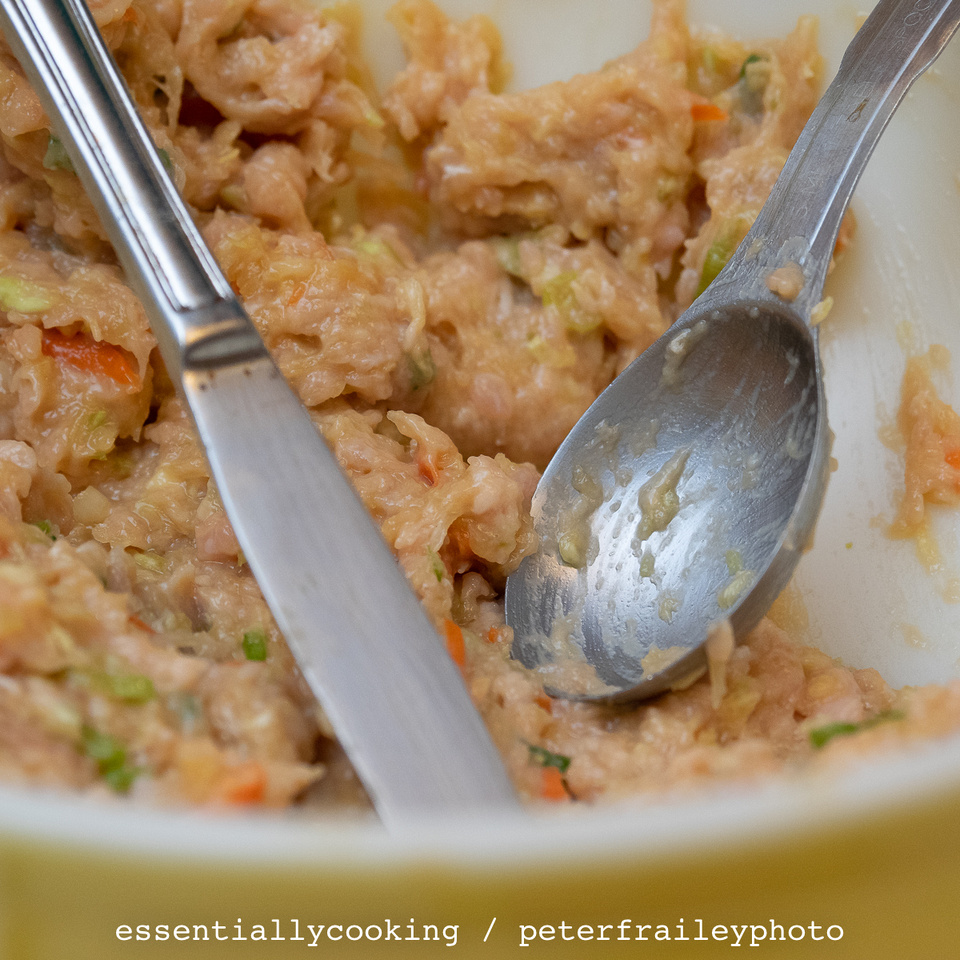 At this point all the ingredients have been mixed into the bowl
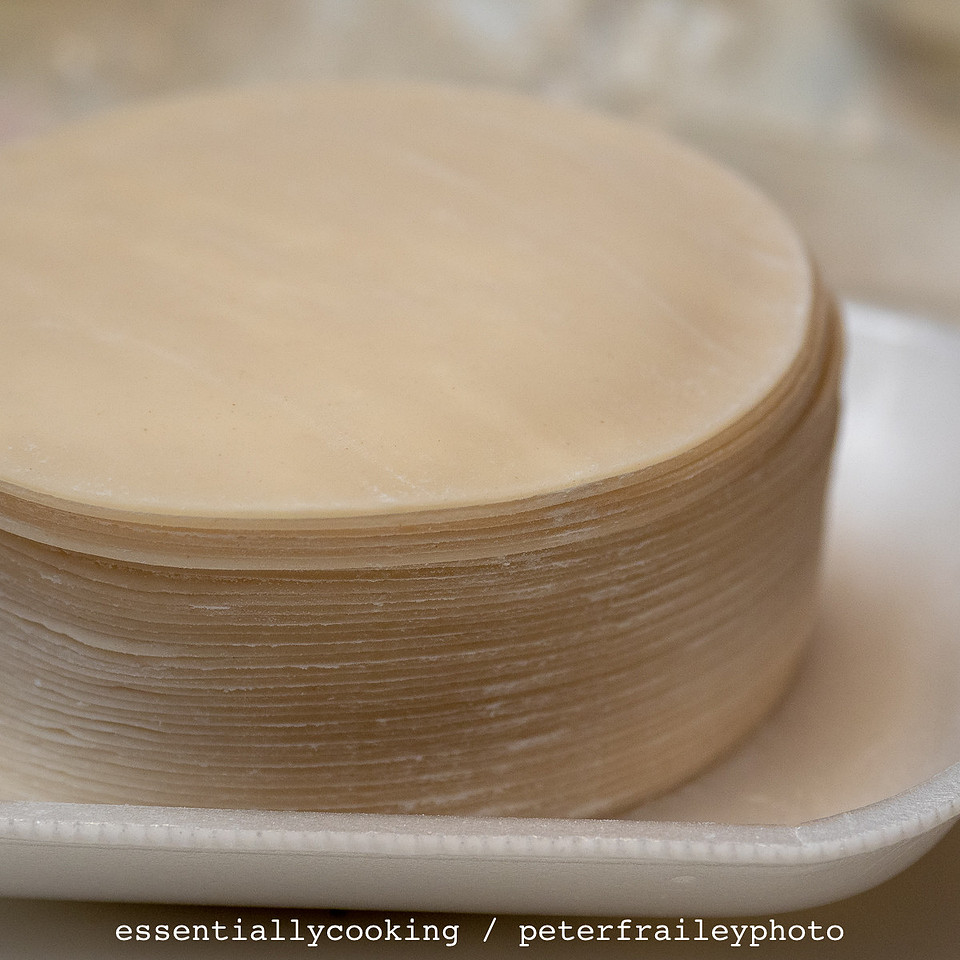
Potsticker wraps
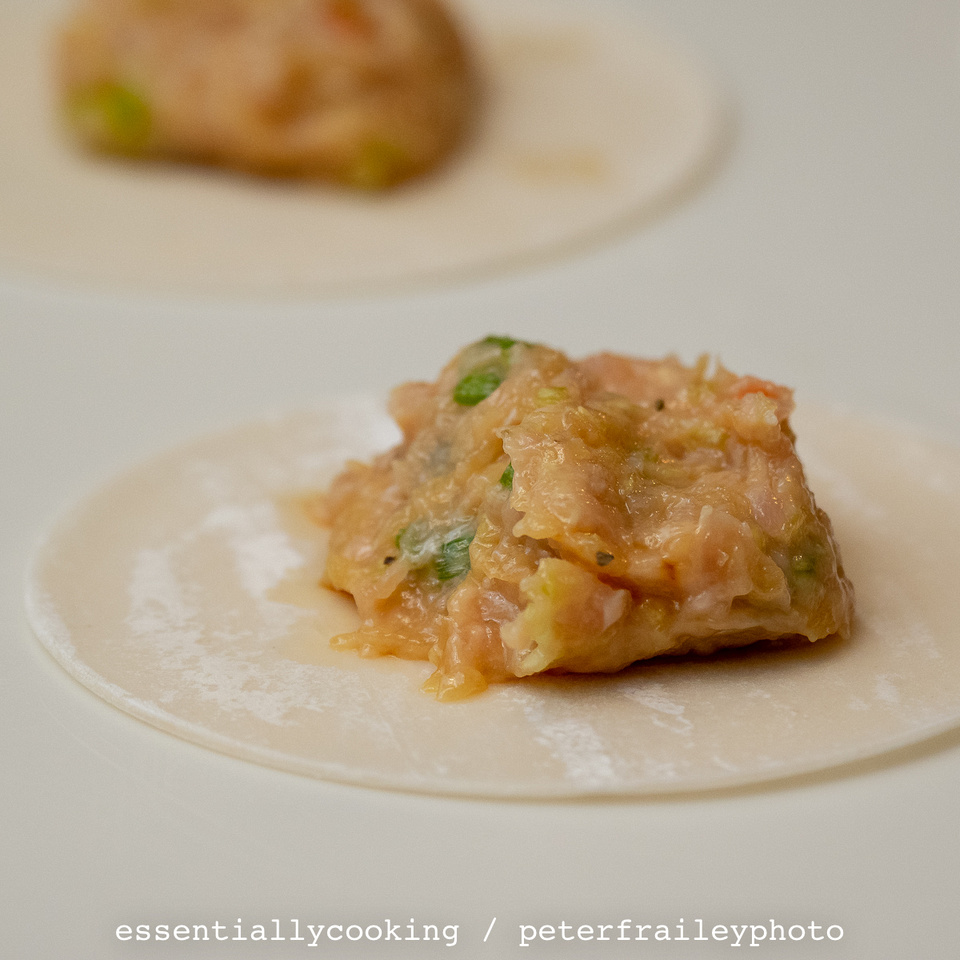 One serving of the mixture ready to be wrapped
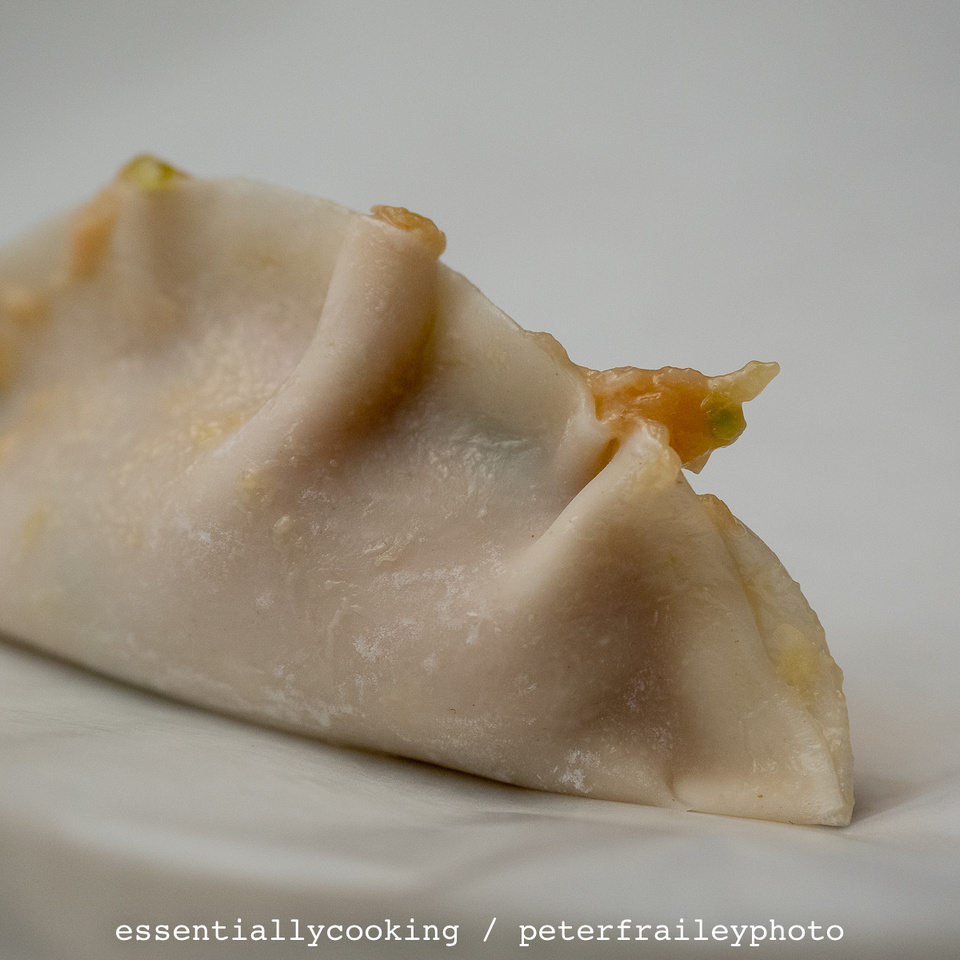 Pinching it all together is kind of fun. Very cute
 Finished potstickers served with soy sauce and steamed broccoli
What you need:
- 8 ounces finely shredded cabbage or coleslaw mix (about 3 packed cups)
- 1 teaspoon kosher salt
- 1 large egg
- 2 medium scallions, thinly sliced (about 1/4 cup)
- 2 tablespoons soy sauce
- 2 cloves garlic, minced
- 1/4 teaspoon freshly ground black pepper
- 1 pound ground chicken
- 1 (10- to 12-ounce) package round Asian dumpling wrappers (about 3 1/2 inches in diameter, sometimes labeled gyoza or potsticker wrappers)
- 1/2 cup vegetable oil, divided
- 1/4 cup soy sauce
- 3 tablespoons rice vinegar
- 1 medium scallion, thinly sliced
- 1 to 2 teaspoons chile-garlic sauce, such as sambal oelek (optional)
Laurie's suggestion:
- Use 4 ounces of finely grated cabbage and 4 ounces of grated carrots. Use a cheese grater for both.
What to do:
- Follow the instructions from thekitchn.com, here: https://www.thekitchn.com/easy-chicken-potstickers-261538
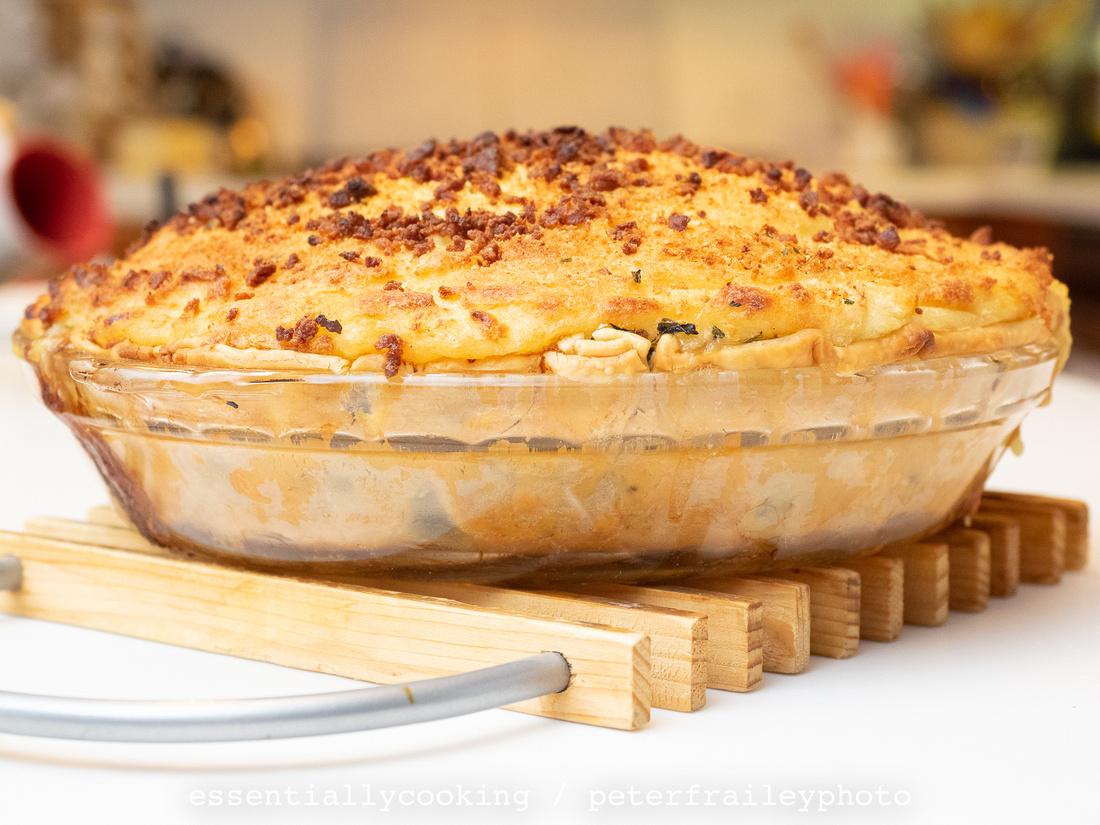
Perhaps at the top of our comfort food list is Shepherd’s Pie. What is more comforting than meat and potatoes?
When it comes to Shepherd’s Pie we have pretty much settled on this recipe, though its flavor will vary depending on what meat(s) are used. The starting point was a recipe adapted from “The Great American Pie Book" by Judith Choate ( Yankee Books, 1984). Unfortunately I am unable to find a link to it on the Internet.
Her recipe says the pie will feed 4 to 6. I’m thinking more like 4 to 8. I suppose it all depends on what else is being served alongside.
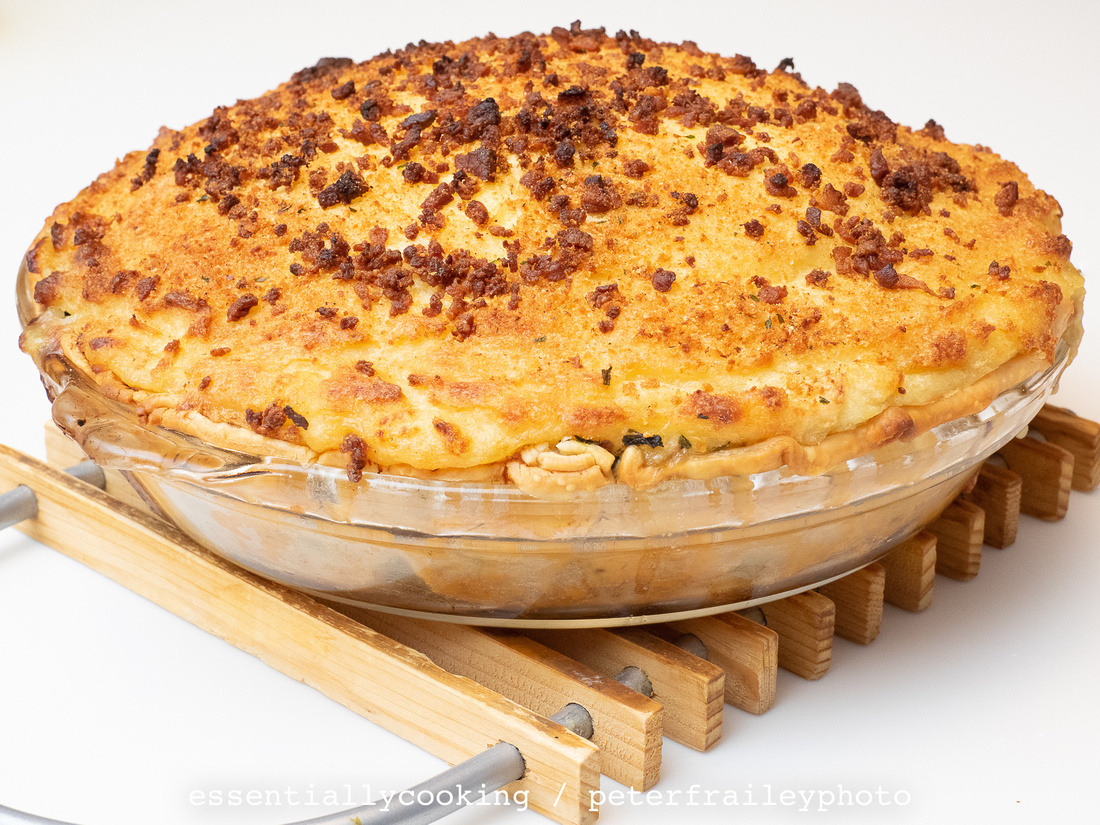
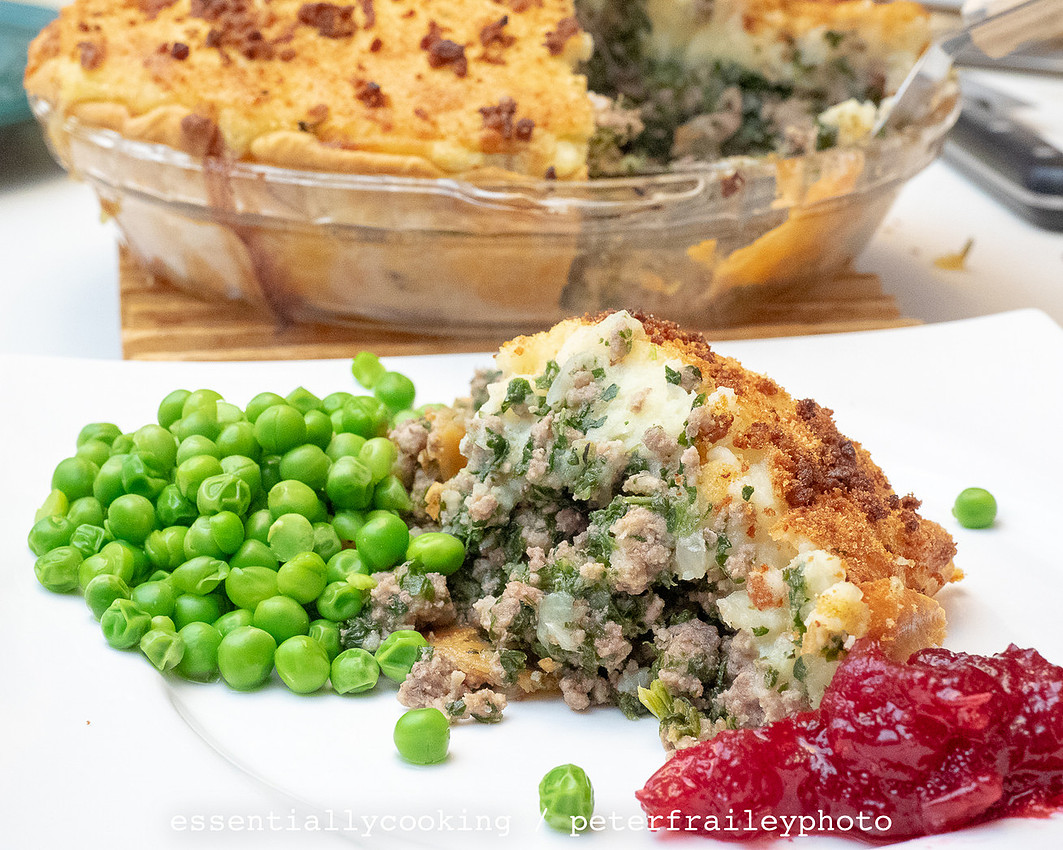 Served with peas and cranberry sauce
Shepherd's Pie
What is needed:
- 2 T. unsalted butter
- 3 T. olive oil
- 2 lbs ground meat (veal, beef, lamb, pork, poultry, venison, or combine)
- 1 large onion, chopped fine
- 1 tsp. thyme
- ½ tsp. dill
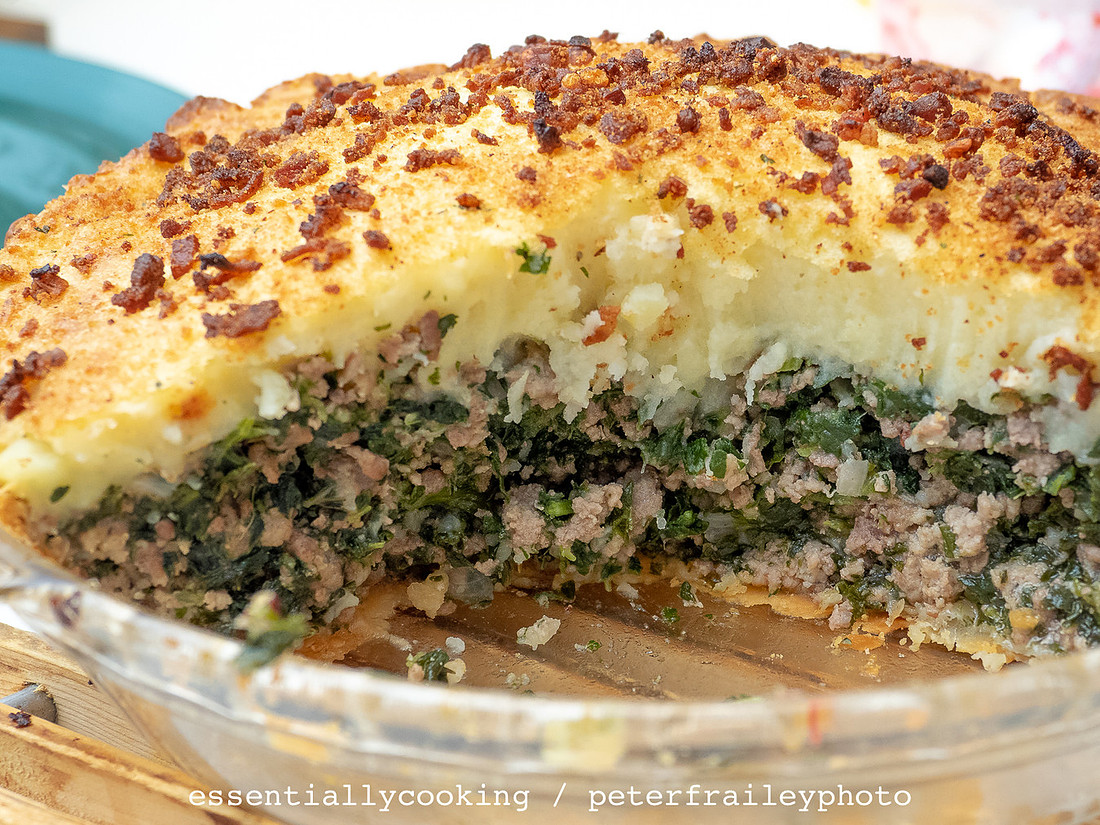
- 1 cup spinach, chopped, cooked, thoroughly drained
- 4 c. mashed potatoes*
- salt and ground black pepper to taste
- 1 T. butter, melted
- 1 T. bread crumbs
What to do:
- Preheat oven to 500°.
- Pastry needed: Unbaked 9" pie crust (ex., Pillsbury)
- Baking time: 15 minutes at 500°, 35 to 45 minutes at 375°.
- Melt the 2 T. butter and olive oil in heavy saucepan over medium heat.
- Add the lamb (other meat, combo, or whatever), onion, and herbs
- Cook, stirring constantly, until meat loses its color.
- Add the spinach and 1 c. mashed potato. Stir to blend
- Add salt and pepper to taste.
- Place mixture in pie crust and use remaining mashed potatoes to cover the top, mounding it slightly in the center
- Brush with 1 T. melted butter, sprinkle with bread crumbs, and bake as directed.
Laurie's Notes:
I generally use 50% lamb, 50% lean ground beef. The lamb gives it that shepherd's pie flavor.
* A recipe’s worth of mashed potatoes:
- 2 1/2 lbs. Yukon gold potatoes
- 1/2 c. milk or half-and-half, or a combination
- 1 T. butter
- Peel and cut potatoes into quarters lengthwise. Remove any spots, lumps or knots (warts).
- Place potatoes in a large pot (6-quart) and cover with cold, salted water by an inch. Bring to a boil, reduce heat to medium-low and allow to simmer until fork tender (about 15-20 minutes).
- Drain cooked potatoes, add the milk and butter
- Mash the potatoes with a potato masher until smooth, adding a little extra milk if needed. (OPTIONAL: Use a strong wooden spoon OR electric beaters to beat further until smooth. Be careful NOT to over beat or they will become gluey.)
]]>
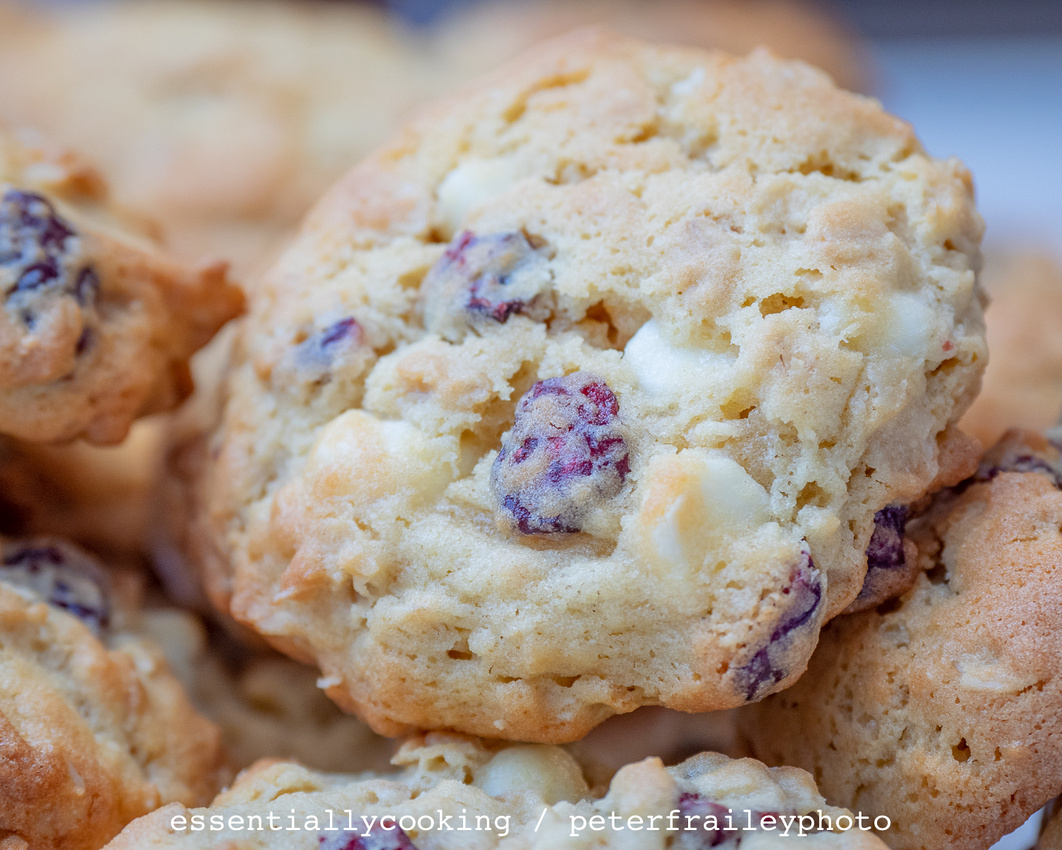
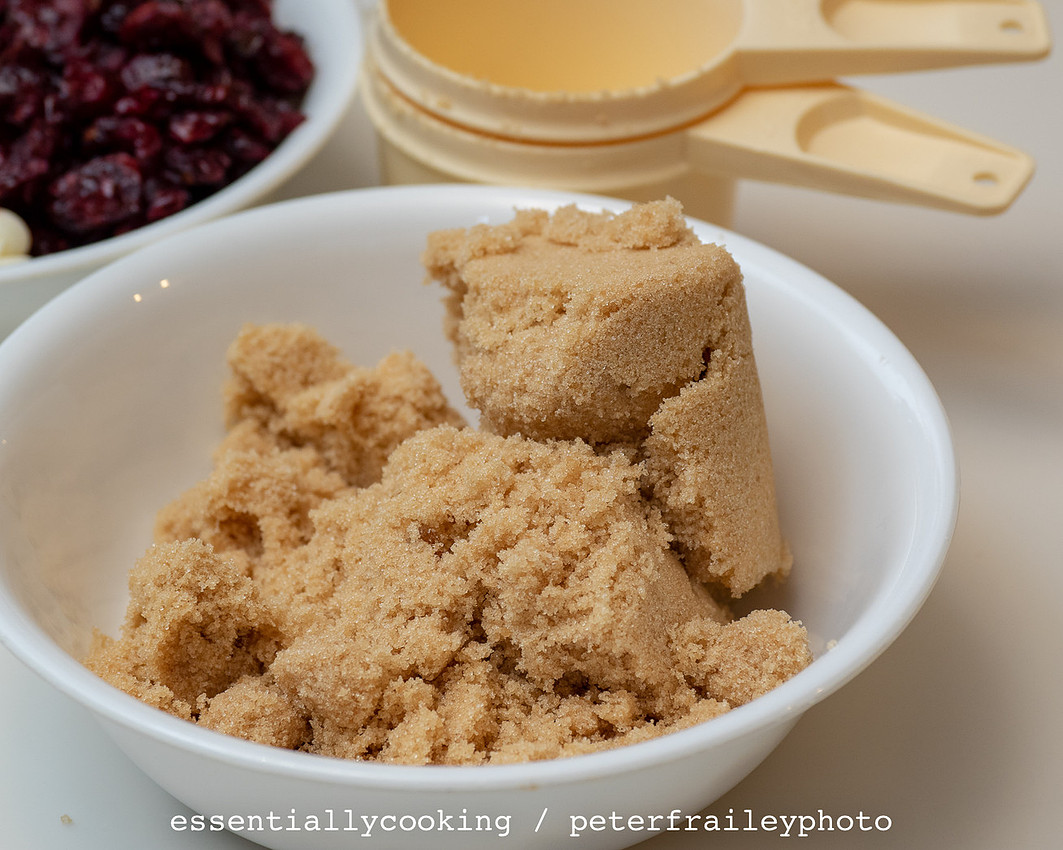
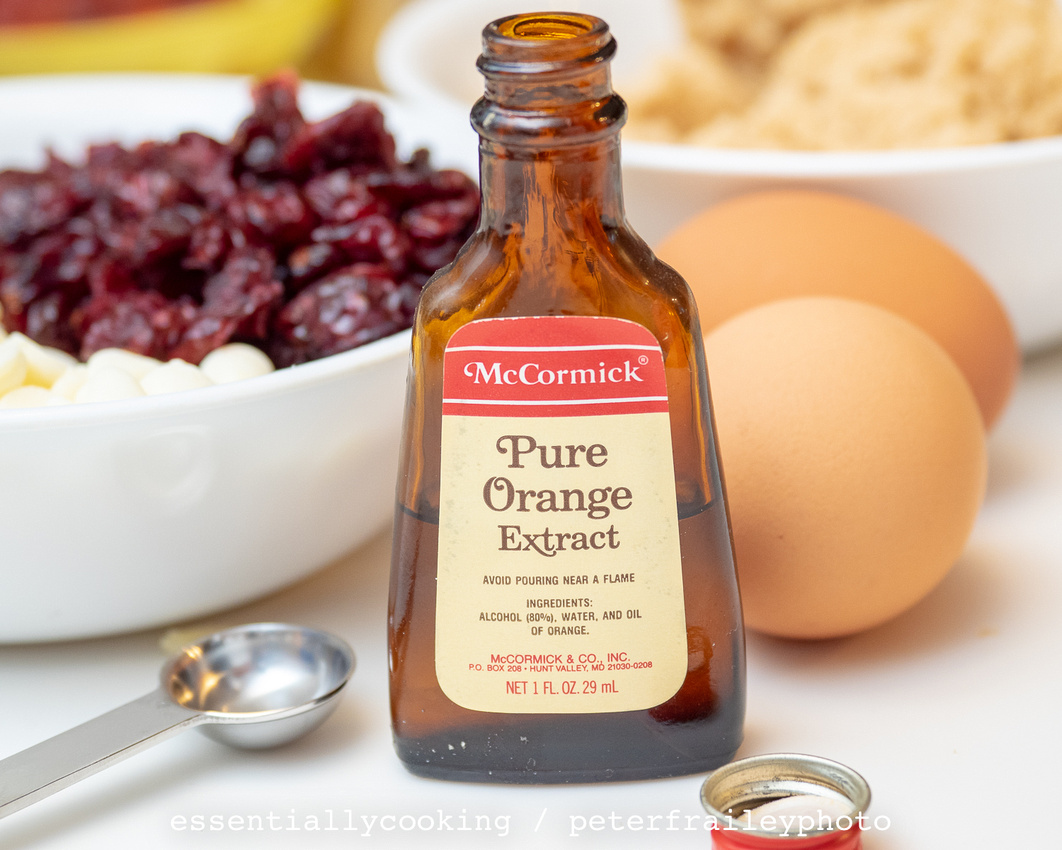
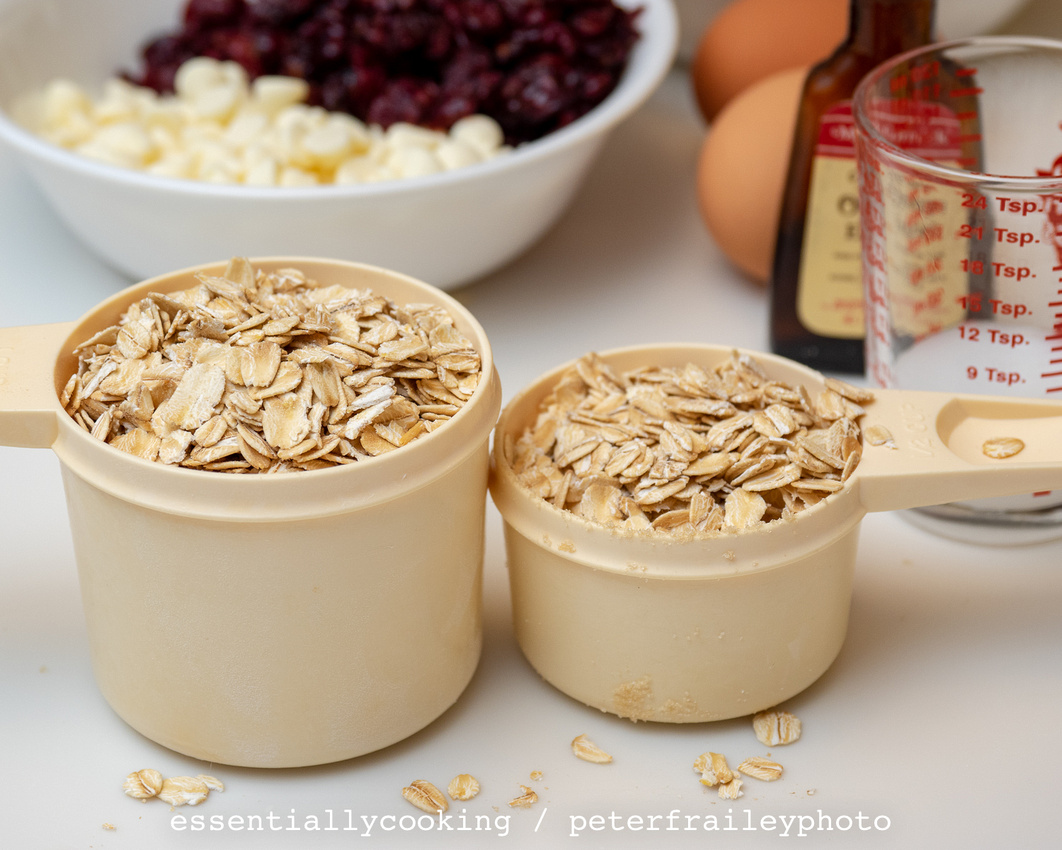
I adapted that recipe by substituting 1 cup of white morsels for the 1-2 cups of butterscotch morsels, and adding 1 cup of Ocean Spray brand Craisins (dried cranberries). If you compare the recipes you will see that I also reduce the butter and sugar by 25%. I make this reduction on my chocolate chip cookies as well.
The Cookie:
The Recipe:
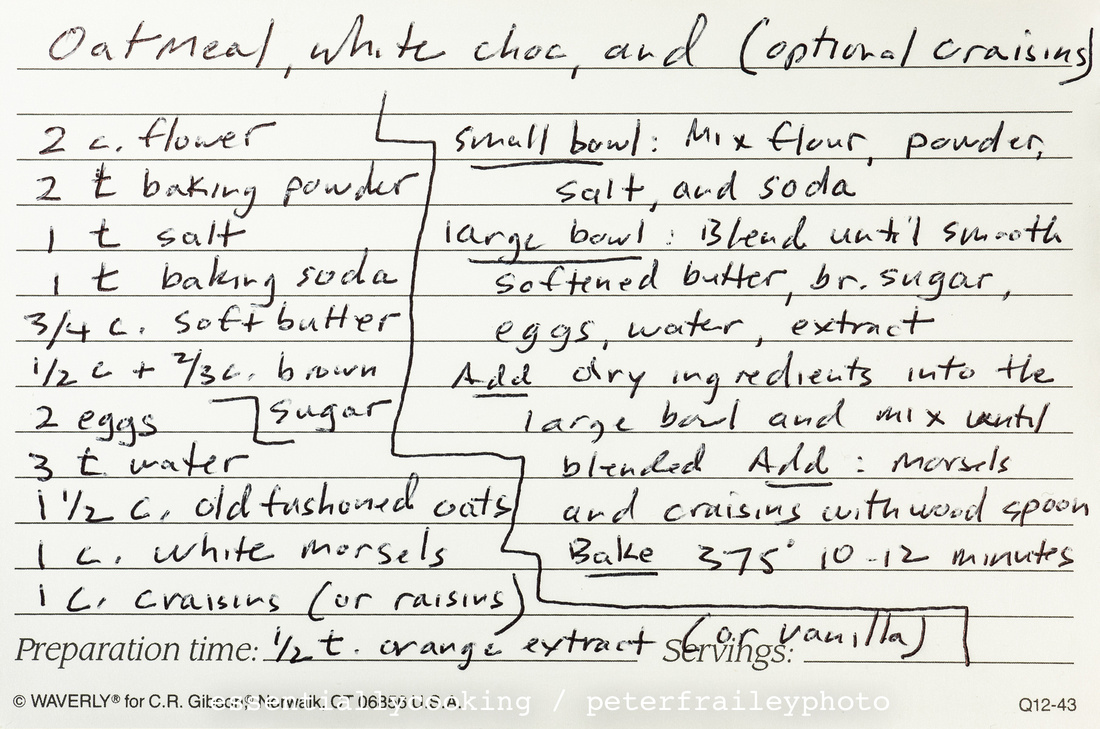
Basically, dry ingredients get mixed in one bowl, and wet ingredients in a second and slightly bigger bowl. After both bowls are mixed, add the dry ingredients slowly to the wet ingredients while mixing. When blended, add the white morsels and craisins.
A few step-by-step photos:
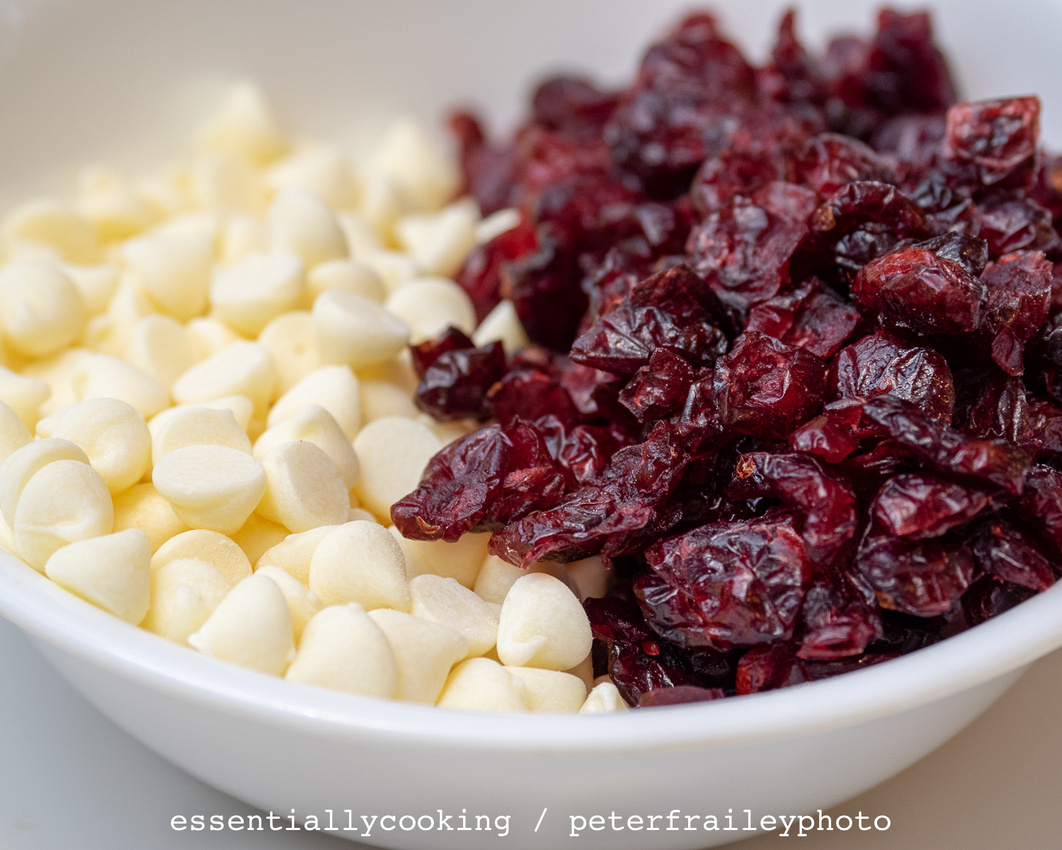 One cup of each.
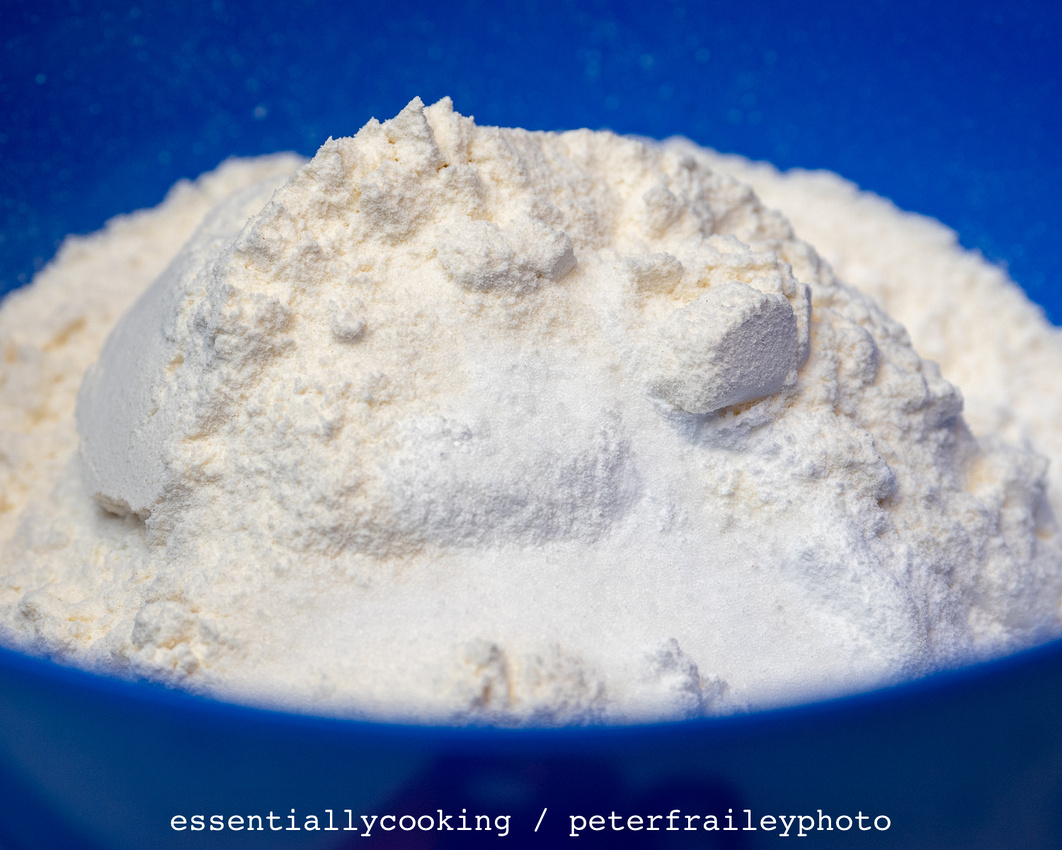 Dry ingredients in one bowl
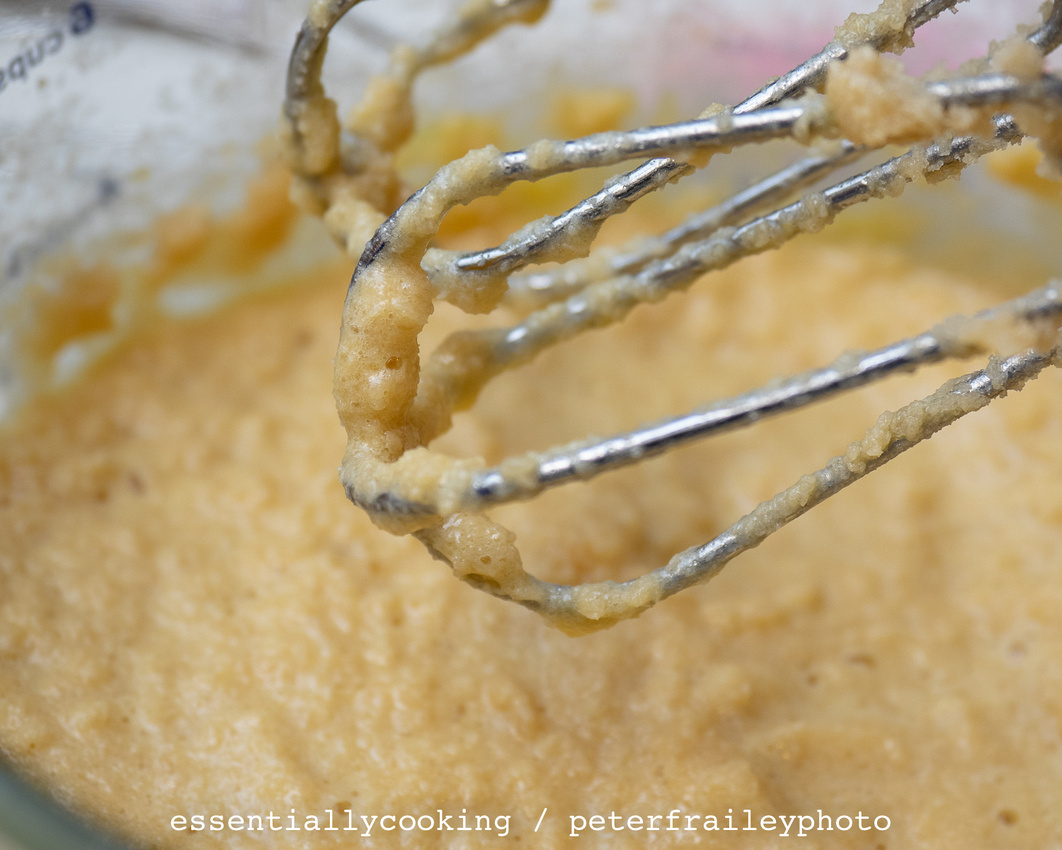 The wet ingredients after the eggs have been beaten into mix.
 Batter after dry ingredients are mixed in, and before morsels and craisins have been mixed in with a wooden spoon.
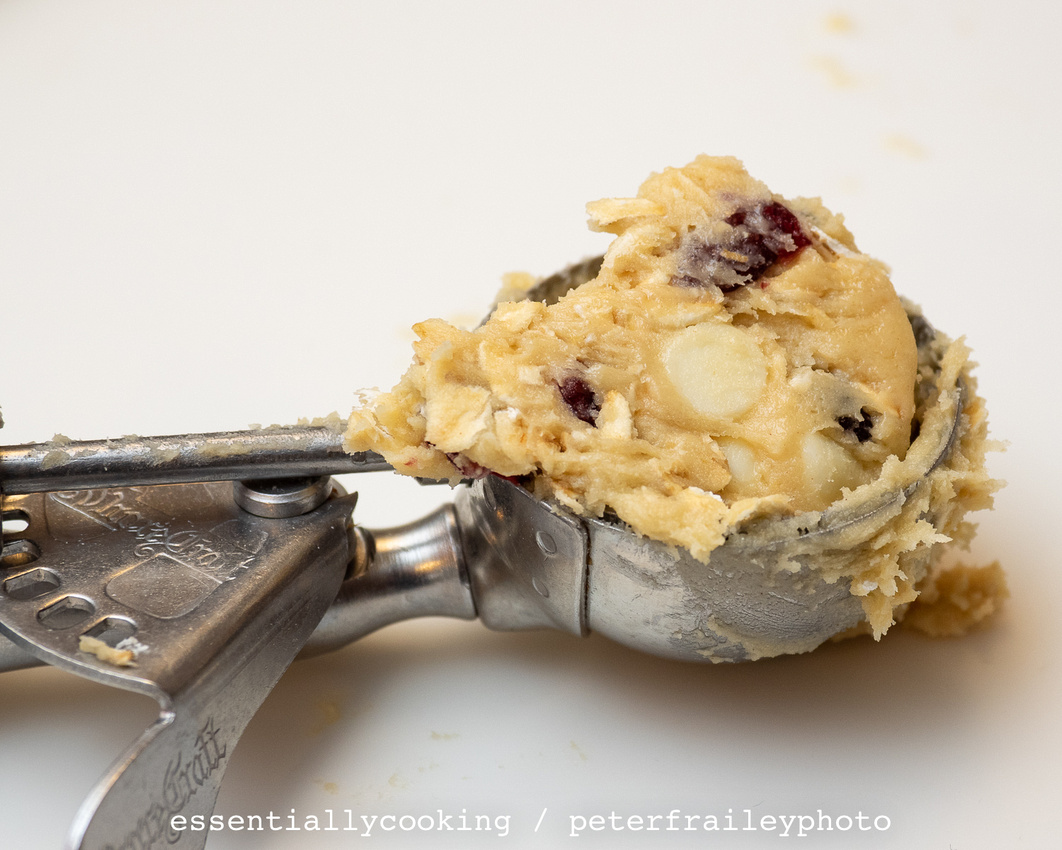
The "scoop" measures 1 3/4" in diameter
 The finished product!
]]>